
If you love roses and have always wondered how to propagate them in an easy and cost-effective way, we have an unexpected solution for you: potatoes! You may be surprised to learn that these humble tubers can play a key role in extracting and growing roses. This unique method of rose propagation might just be the perfect trick for gardening enthusiasts, especially for beginners. Let’s dive into how potatoes can help you grow beautiful roses with minimal effort.
Why Potatoes Work for Rose Propagation
Potatoes are often seen as a delicious food staple, but they also have properties that make them ideal for plant propagation. When it comes to growing roses from cuttings, potatoes provide the perfect environment for the roots to form. The starch-rich composition of potatoes helps in creating a moist and nutritious space for the rose cutting to thrive. Here’s why potatoes work so well:
- Moisture Retention: Potatoes retain moisture, which prevents the rose cutting from drying out during the rooting process.
- Nutrient-Rich Environment: The nutrients in the potato nourish the cutting, promoting faster root development.
- Rooting Support: Potatoes have the perfect structure to support the rose cutting while roots grow. The potato holds the cutting in place while providing essential moisture and nutrients.
How to Propagate Roses Using Potatoes
The process of using potatoes to propagate roses is simple, effective, and surprisingly easy. Here’s a step-by-step guide to help you grow roses from cuttings using potatoes.
Step 1: Choose the Right Rose Cutting
Start by selecting a healthy rose bush that you’d like to propagate. Take a 6-8 inch cutting from a non-flowering stem, ensuring it has at least one node (the point where leaves or buds grow from the stem). Remove the lower leaves from the cutting, leaving only a few at the top.
Step 2: Prepare the Potato
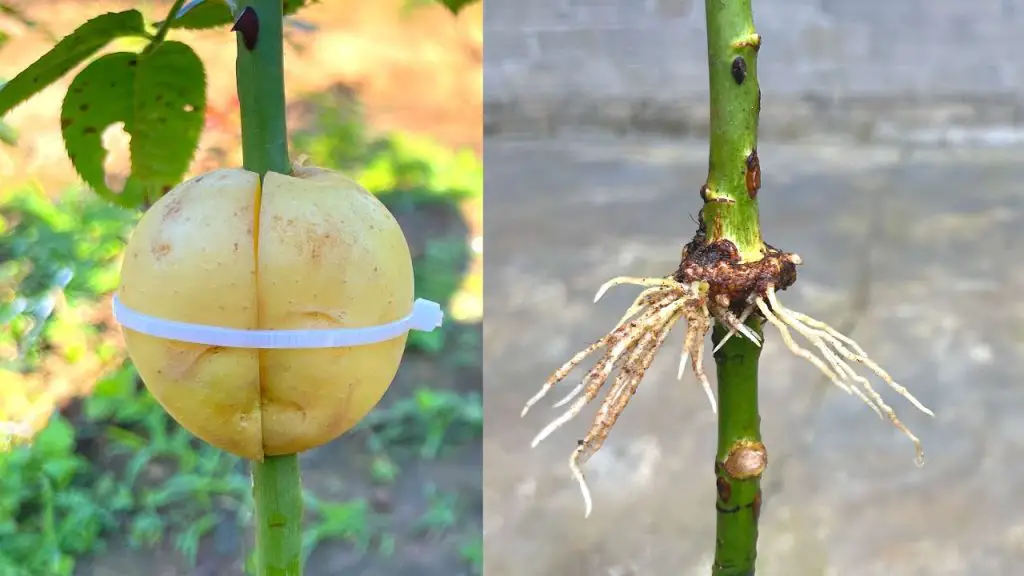
Choose a firm potato that is free from rot or disease. You want a potato with a smooth surface and no visible spots or cuts. Cut the potato in half, or use a whole potato, depending on the number of cuttings you plan to propagate.
Use a knife or a spoon to create a small hole in the center of the potato large enough to fit the rose cutting. The hole should be deep enough to hold the cutting securely in place.
Step 3: Insert the Rose Cutting into the Potato
Take the prepared rose cutting and insert the end with the node into the hole of the potato. Make sure the node is submerged in the potato, as this is where the roots will begin to grow.
Step 4: Plant the Potato with Cutting
Place the potato in a pot or container with well-draining soil. Position the potato with the cutting facing upward and cover the potato with a small amount of soil to secure it in place. Ensure the soil is moist, but not soggy.
Step 5: Create a Greenhouse Effect
To help the cutting root, create a greenhouse effect by covering the entire cutting and potato with a plastic bag or clear plastic dome. This helps maintain the moisture and warmth needed for root development. Place the pot in a bright, indirect light location, avoiding direct sunlight which could burn the cutting.
Step 6: Wait for Roots to Form
In a few weeks, you should notice roots beginning to form around the rose cutting. Once the cutting has developed a healthy root system, you can remove the plastic cover and allow the plant to acclimatize to normal conditions.
Benefits of Using Potatoes for Rose Propagation
You may be wondering why you should choose potatoes over other propagation methods. Here are some key benefits of using potatoes:
- Easier Success Rate: Potatoes provide the moisture and nourishment necessary for the cutting to establish itself, making the propagation process easier and more successful.
- Natural Growth: As a natural material, potatoes allow the rose cutting to grow in a more organic environment, free from harsh chemicals.
- Cost-Effective: Potatoes are an affordable resource, and using them to propagate roses is a budget-friendly method of growing new plants.
Caring for Your Rose Cutting
Once your rose cutting has rooted successfully in the potato, it’s time to transfer it to its final planting spot. After a few weeks, when the roots are strong, you can transplant the rose into a larger pot or directly into your garden.
Make sure to continue caring for your new rose plant with:
- Proper watering: Keep the soil consistently moist, but not soggy.
- Adequate sunlight: Roses need plenty of bright, indirect sunlight to grow well.
- Regular feeding: Use a balanced fertilizer to provide essential nutrients as the plant grows.
Conclusion
Who knew that potatoes could be the secret to growing roses? With their moisture-retaining properties and nutrient-rich composition, potatoes provide an ideal environment for propagating rose cuttings. Whether you’re an experienced gardener or a beginner, this method is an easy and effective way to grow new roses without spending too much money. So, next time you have a rose cutting, don’t toss that potato—put it to good use and watch your garden bloom with beautiful roses!
Give this method a try and be surprised at the stunning results. Happy gardening!


