
Growing hydroponic sprouts at home has never been easier! By using a clay pot, you can cultivate fresh, nutritious sprouts without soil, making it a simple, mess-free, and cost-effective way to enjoy homegrown greens. Whether you want to add crunch to your salads, sandwiches, or smoothies, hydroponic sprouts are an excellent choice.
In this article, I’ll show you how to grow hydroponic sprouts effortlessly using a clay pot, ensuring a healthy and chemical-free harvest!
1. Why Use a Clay Pot for Hydroponic Sprouts?
Using a clay pot for hydroponic sprouting has several benefits:
✔ Natural Moisture Retention – Clay pots absorb and release water gradually, keeping the sprouts hydrated without overwatering.
✔ Breathability – The porous nature of the clay allows air circulation, preventing mold and rot.
✔ Eco-Friendly and Reusable – Unlike plastic containers, clay pots are sustainable and long-lasting.
✔ Even Temperature Control – Keeps sprouts cooler in warm weather and maintains optimal humidity for faster growth.
💡 Tip: Choose an unglazed clay pot for the best hydroponic sprouting results!
2. Materials Needed for Hydroponic Sprout Growing
✅ Clay pot (small to medium size)
✅ Sprout seeds (mung beans, lentils, alfalfa, radish, or broccoli)
✅ Clean water (filtered or dechlorinated)
✅ Shallow tray or bowl (to hold excess water)
✅ Breathable cloth or mesh (to cover the pot)
✅ Rubber band or string (to secure the cover)
💡 Tip: Use organic sprouting seeds for a chemical-free and healthy harvest!
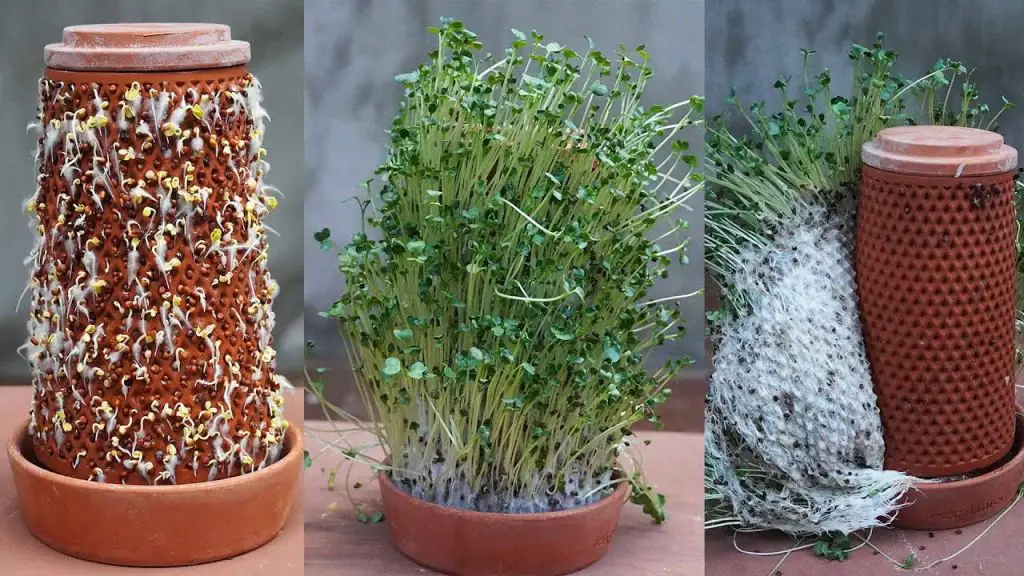
3. Step-by-Step Guide to Growing Hydroponic Sprouts in a Clay Pot
🌱 Step 1: Prepare the Clay Pot
- Choose a clean, unglazed clay pot with a drainage hole at the bottom.
- Place the pot in a shallow tray of water so it can absorb moisture naturally.
💦 Step 2: Soak the Seeds
- Rinse the sprouting seeds thoroughly.
- Soak them in clean water for 6-12 hours (depending on the seed type).
🌿 Step 3: Transfer Seeds to the Clay Pot
- Drain the soaked seeds and spread them evenly inside the pot.
- Cover the opening with a breathable cloth or mesh to allow airflow while preventing insects or dust.
💧 Step 4: Maintain Moisture and Airflow
- Keep the pot in a cool, shaded area away from direct sunlight.
- Check the water level in the tray daily and refill as needed.
- If the sprouts appear dry, mist them lightly with clean water.
🌞 Step 5: Wait for the Sprouts to Grow
- Within 2-5 days, the sprouts will begin to grow.
- Gently rinse them every 12 hours to remove seed hulls and prevent mold growth.
🥗 Step 6: Harvest and Enjoy!
- Once the sprouts reach your desired length (usually 3-5 inches), they are ready to eat!
- Rinse well and store them in the refrigerator for up to 5 days.
4. Best Tips for Successful Hydroponic Sprout Growing
✔ Use Fresh Water – Change the water regularly to prevent stagnation and odors.
✔ Rinse Seeds Twice Daily – Keeps sprouts fresh and free from bacterial growth.
✔ Avoid Direct Sunlight – Keep the pot in a shaded area to maintain moisture balance.
✔ Choose the Right Seeds – Mung beans, lentils, and broccoli sprouts grow quickly and easily.
✔ Monitor Growth – Harvest at the right time for the best flavor and texture.
5. Why Grow Hydroponic Sprouts in a Clay Pot?
✔ No Soil Needed – Clean and mess-free growing method.
✔ Minimal Maintenance – The clay pot regulates moisture naturally.
✔ Nutritious and Fresh – Homegrown sprouts are packed with vitamins and minerals.
✔ Eco-Friendly and Cost-Effective – Reuses water efficiently and reduces waste.
Final Thoughts
Growing hydroponic sprouts in a clay pot is a simple, sustainable, and effective way to enjoy fresh, homegrown greens without soil. This method is perfect for urban gardeners, apartment dwellers, or anyone looking for a hassle-free way to grow food indoors!
🌿 Try this easy hydroponic method today and enjoy nutrient-rich sprouts straight from your kitchen! 🥗💧


