If you’ve always dreamed of enjoying fresh, juicy watermelon straight from your balcony, you’re in for a treat! Growing watermelon at home has never been easier, and with the right tips, you can have a high-yield watermelon harvest, even in small spaces. The key is using DIY plastic bottles to create a simple, effective growing system. Here’s a step-by-step guide to help you grow delicious watermelons right at home.
🌱 Why Grow Watermelon on the Balcony?
Balconies are often underutilized when it comes to gardening, but they offer great potential for growing delicious fruits like watermelons. While watermelons are typically known for needing large garden spaces, they can thrive in containers like plastic bottles, making it possible to grow them on your balcony or in other small spaces.
Benefits of Growing Watermelons on the Balcony:
- Space-saving – Ideal for small spaces such as balconies, patios, and terraces.
- Portable – Easy to move containers to catch the best sunlight.
- Cost-effective – Recycle plastic bottles into planters and avoid expensive gardening supplies.
- High yield – You can still achieve big, sweet watermelons even in limited space with the right techniques.
🍉 Step-by-Step Guide to Growing Watermelon in Plastic Bottles
1. Gather Your Materials
Before you start planting, gather the following supplies:
- Large plastic bottles (2-liter or bigger)
- Potting soil (preferably well-draining soil)
- Watermelon seeds (choose compact watermelon varieties)
- Compost (optional for added nutrients)
- Sharp scissors or a knife
- Watering can or spray bottle
2. Prepare the Plastic Bottle
Start by preparing your plastic bottle. Clean it thoroughly and remove any labels. Using sharp scissors or a knife, carefully cut the bottle in half. The bottom half will serve as your planting container. Use the top half to create a makeshift watering reservoir if needed.
Next, make several drainage holes at the bottom of the bottle to allow excess water to escape. Watermelons need well-drained soil to prevent root rot, so proper drainage is essential.
3. Fill the Container with Soil
Fill the plastic bottle with a high-quality potting mix that drains well. Add a little compost to enrich the soil and give the watermelon plant the nutrients it needs to grow strong. Make sure to leave enough space at the top for easy watering.
4. Plant the Watermelon Seeds
Plant watermelon seeds about 1 inch deep into the soil. Space the seeds at least 3 inches apart to give them room to grow. Watermelons need space for their roots to spread and vines to grow, even when planted in containers.
5. Water and Place the Container
Water your watermelon seeds gently after planting, ensuring that the soil is moist but not soggy. Place your plastic bottle planter in a sunny spot on your balcony that receives at least 6-8 hours of sunlight daily. Watermelons need plenty of sunlight to produce sweet, juicy fruit.
🌞 Tips for Growing Watermelon with High Yield on the Balcony
1. Provide Adequate Support
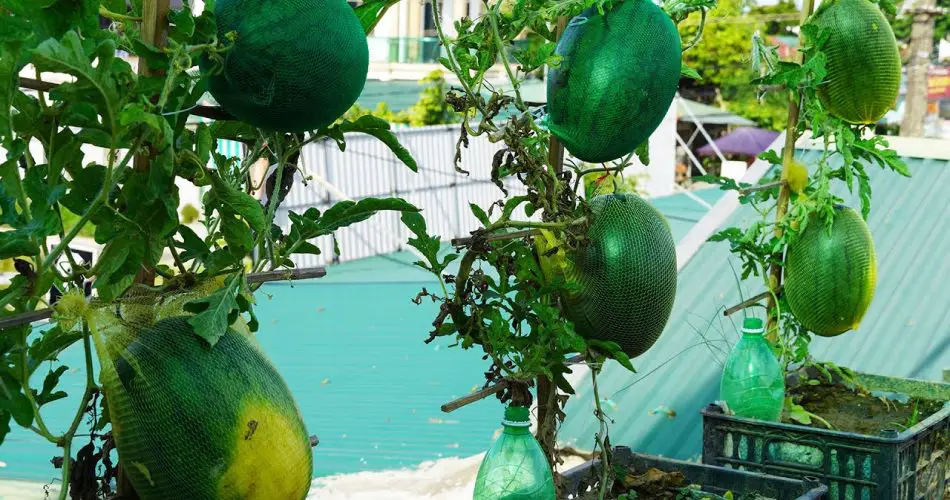
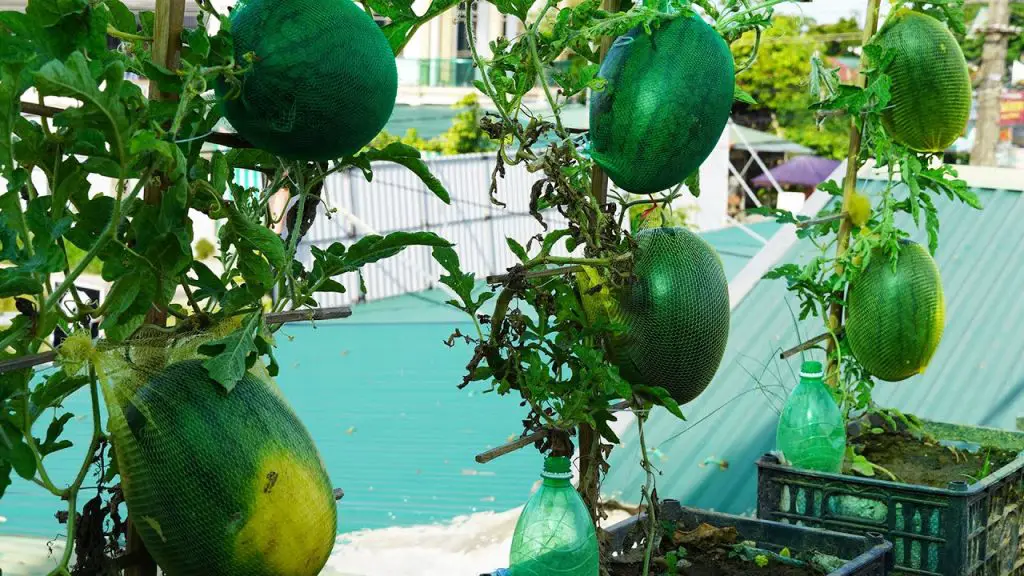
Watermelons produce long vines that need support as they grow. Use a trellis or even a simple string to guide the vines upward, preventing them from touching the ground. This not only saves space but also helps the watermelon plants grow healthier and produce larger fruits.
2. Keep the Soil Moist
Watermelons are high-water plants, so it’s essential to keep the soil consistently moist, especially during hot summer months. Water regularly, but avoid overwatering, as this can cause root rot. Plastic bottle containers help retain moisture, but you’ll still need to water the plants frequently.
3. Fertilize for Better Growth
Watermelon plants benefit from occasional feeding with a balanced fertilizer. Apply fertilizer every 2-3 weeks during the growing season to promote healthy vine growth and larger fruit production. If you’re using compost in the soil, you may not need to fertilize as often.
4. Pruning the Vines
As your watermelon vines grow, prune any excessive growth that might be crowding the plant. This allows the plant to focus its energy on producing fruit. Removing any dead or yellowing leaves will also help the plant stay healthy and reduce the risk of diseases.
🍉 Harvesting Your Watermelons
One of the best parts of growing watermelons is harvesting your fruit! Depending on the variety of watermelon and growing conditions, your fruit will be ready in about 70-90 days. When the melon reaches its full size, check the following signs to determine if it’s ready for harvest:
- Sound test: Tap the melon; a hollow sound usually indicates it’s ripe.
- Color: The watermelon should have a deep green color and the underside should turn from white to a yellowish tone.
- Tendrils: The tendrils closest to the melon will turn brown or dry up when the melon is ripe.
🌱 Conclusion: Enjoy Your Homegrown Watermelon
With this simple method of growing watermelon in plastic bottles, you can easily create your own high-yield watermelon garden right on your balcony. By following these tips and providing the right care, you’ll be able to enjoy fresh, delicious watermelon all season long, without needing a garden. The best part? You can use recycled materials to create a sustainable, space-saving garden that produces the sweetest melons.
Start your balcony watermelon garden today and enjoy homegrown, juicy fruit with minimal space and effort! 🍉


