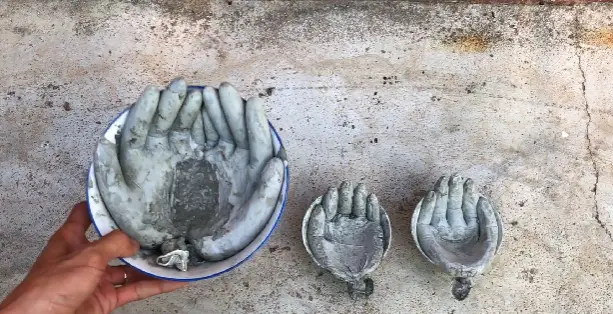
If you’re looking to add a personal touch to your garden or home decor, a hand-shaped flower pot is a creative and artistic option! This project not only showcases your unique style but also provides a functional planter for your favorite flowers or herbs. Here’s a step-by-step guide on how to make your very own hand-shaped flower pot.

Why Choose a Hand-Shaped Flower Pot?
- Artistic Appeal: A hand-shaped pot adds a whimsical touch to your space.
- Conversation Starter: Its unique design is sure to catch the eye and spark conversation.
- Personalized Gift: This pot makes a wonderful, personalized gift for friends and family.
Materials Needed
- Clay or Air-Dry Clay: Choose a type that suits your preference; air-dry clay is easy to work with and requires no firing.
- Rolling Pin: For flattening the clay.
- Sculpting Tools: To shape and detail your pot.
- Plastic Wrap: To keep the clay moist while working.
- Paint: Optional, for decorating your pot after it dries.
- Sealer: If using clay, a sealant can protect your pot from moisture.
Steps to Make a Hand-Shaped Flower Pot

1. Prepare Your Workspace
- Choose a flat, clean surface to work on and gather all your materials. It’s a good idea to cover the area with a plastic sheet to avoid mess.
2. Roll Out the Clay
- Use the rolling pin to flatten your clay to about 1/4 inch thick. This will be the base for your pot.
3. Shape the Hand
- Create the Palm: Using your hand as a mold, press the flattened clay around your hand, forming the palm and fingers. Ensure the clay is thick enough to hold its shape.
- Detailing: Use sculpting tools to add details, such as finger lines and texture, to enhance realism.
4. Form the Pot
- Gently remove the clay from your hand and shape it into a pot by pinching and molding the sides. Make sure the base is flat to provide stability when placed down.
5. Create Drainage Holes
- Use a small tool or your finger to poke holes in the bottom of the pot to allow for drainage. This is crucial to prevent overwatering.
6. Dry the Pot
- If using air-dry clay, let your pot sit for 24-48 hours until completely dry. For traditional clay, you will need to fire it in a kiln.
7. Paint and Seal (Optional)
- Once dry, you can paint your pot to add color and personality. Use outdoor paint if you plan to place it outside. After painting, apply a sealer to protect the pot from moisture.
8. Planting Your Flowers
- Add a layer of small stones or gravel at the bottom for extra drainage.
- Fill your hand-shaped pot with potting soil and plant your favorite flowers, herbs, or succulents.
Conclusion
Creating a hand-shaped flower pot is a fun and rewarding project that brings a unique artistic flair to your gardening endeavors. With just a few materials and some creativity, you can craft a stunning planter that’s sure to impress. Whether for your home, garden, or as a thoughtful gift, this project is an excellent way to express your creativity. Happy planting!
Copy
Show Comments


