
Grafting is a fantastic technique for creating multicolored rose bushes that showcase an array of vibrant blooms on the same tree. It’s not only a creative way to add variety to your garden but also a method that ensures your roses will have a stronger root system and better disease resistance. If you’ve ever wondered how to graft roses and achieve a colorful rose tree, this guide will walk you through the process step by step.
What is Grafting and Why Should You Graft Roses?
Grafting is the process of joining two plants together so that they grow as one. The top part of the rose (called the scion) is attached to the rootstock, allowing the new plant to inherit the qualities of both. In the case of multicolored roses, you can graft different rose varieties onto a single rootstock to create a tree that produces multiple colors of roses on the same plant. This method helps you save space, enjoy a variety of blooms, and gives your roses the best of both worlds: the beauty of the scion and the hardiness of the rootstock.
Choosing the Right Rose Varieties for Grafting
The first step in grafting roses is to choose the right varieties. Keep in mind that some varieties graft better than others, so it’s essential to choose compatible roses. Here’s what you need to consider:
- Compatibility: Ensure that the scion (the branch you’re grafting) and the rootstock are from the same rose family or species. Generally, most hybrid tea roses, floribundas, and climbing roses can be grafted together successfully.
- Color Variety: Select different colored rose varieties to achieve the multicolored effect. For example, you can graft a red rose, a white rose, and a yellow rose onto a single rootstock to create a stunning bouquet of colors.
- Hardiness: The rootstock should be disease-resistant and well-suited to the climate in which you are growing your roses. Common rootstocks include Dr. Huey and Rosa multiflora.
Step-by-Step Guide for Grafting Roses
1. Prepare the Rootstock and Scion
- Rootstock: Choose a healthy, disease-free rootstock rose. The rootstock should have strong roots and be a good match for the climate.
- Scion: Select healthy rose canes from the rose variety you want to graft onto the rootstock. The scion should be approximately the same diameter as the rootstock.
- Cutting the Scion: Using a sharp knife or pruners, cut a healthy cane from the desired rose variety. The cutting should be around 4-6 inches long and have at least 3-4 buds.
2. Prepare the Grafting Area
- Make a Clean Cut: On the rootstock, make a clean cut around 6 inches above the soil. The cut should be made at a 45-degree angle.
- Prepare the Scion: Make a matching 45-degree angled cut at the bottom of the scion. This will allow the vascular tissue (the tissue responsible for transporting nutrients and water) of the scion and rootstock to align perfectly.
3. Join the Rootstock and Scion
- Align the Cuts: Place the scion onto the rootstock, ensuring that the cuts fit snugly together. The two pieces should match up, and the vascular tissues should align.
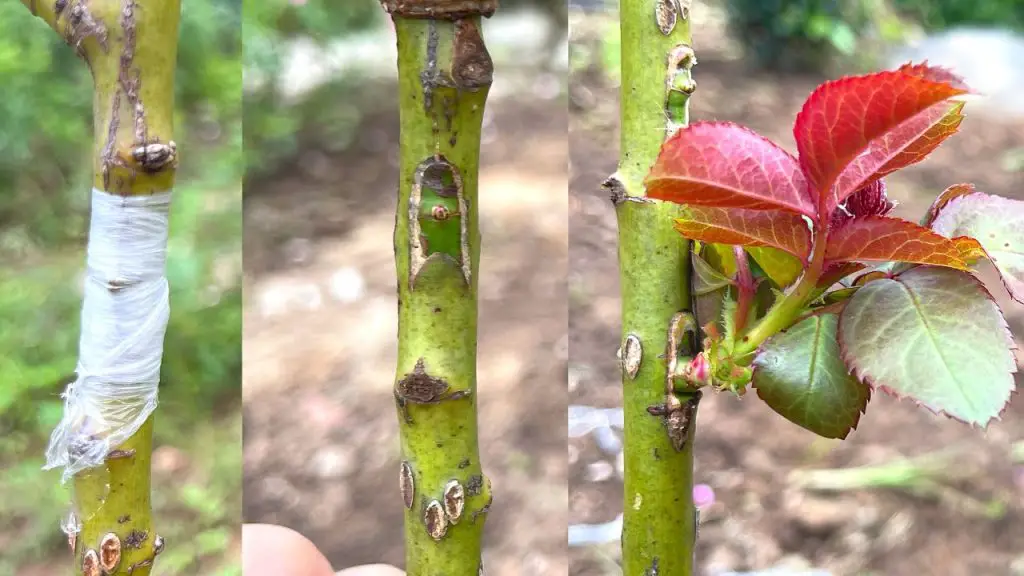
- Securing the Graft: Once aligned, secure the graft by wrapping the area with grafting tape or grafting wax. This will help hold the scion in place and protect the graft from drying out or being damaged.
- Seal the Graft: To protect the grafted area from disease and dehydration, cover the wound with a layer of grafting wax or sealant.
4. Care for the Grafted Rose
- Humidity and Temperature: Keep the grafted rose in a humid environment and out of direct sunlight for a few weeks while it heals. A plastic bag or grafting dome can help maintain humidity.
- Watering: Water the plant gently, making sure the grafted area doesn’t become waterlogged. Use a drip irrigation system or a watering can with a fine nozzle to avoid disturbing the graft.
- Monitor Growth: After a few weeks, you should notice new growth emerging from the scion. Once the graft has taken, you can remove the wrapping and allow the new rose to grow freely.
Tips for Success in Grafting Roses
- Use Clean Tools: Always use sharp and sterilized tools to prevent the spread of disease. Clean the tools with rubbing alcohol before and after use.
- Timing is Key: The best time to graft roses is during the spring when the plants are actively growing. This gives the graft the best chance of taking and establishing strong growth.
- Monitor for Pests: Keep an eye out for pests such as aphids and scale, which can damage your grafts. Treat any pest infestations promptly with organic pest control methods.
- Patience is Crucial: Grafting can take some time. Be patient and wait for the graft to establish. It may take 6 weeks or more before you see significant growth.
Conclusion
Grafting multicolored roses onto the same tree is a creative and rewarding way to enjoy a variety of rose colors while improving your plant’s health and resilience. By following these simple steps and tips, you’ll be able to create a stunning rose tree with beautiful blooms in a mix of colors, all growing from the same rootstock. So, roll up your sleeves, gather your materials, and get ready to enjoy a unique rose garden filled with vibrant, multicolored flowers! 🌹🌸


