If you love the vibrant colors and lush blooms of hydrangeas, growing them at home can be a highly rewarding experience. Whether you’re a seasoned gardener or a beginner, hydrangeas are relatively easy to grow with the right care. This article will guide you through the process of growing hydrangeas from flower stems, offering tips on planting, pruning, and caring for your hydrangeas to ensure they produce stunning blooms year after year.

What Are Hydrangeas?
Hydrangeas are beloved flowering shrubs known for their large, showy blooms that come in a range of colors, including pink, blue, purple, and white. They are versatile plants that can grow both in gardens and containers, making them perfect for a variety of landscapes. One of the most attractive features of hydrangeas is their flower stems, which are capable of producing abundant blossoms throughout the summer and into fall.
Can You Grow Hydrangeas from Flower Stems?
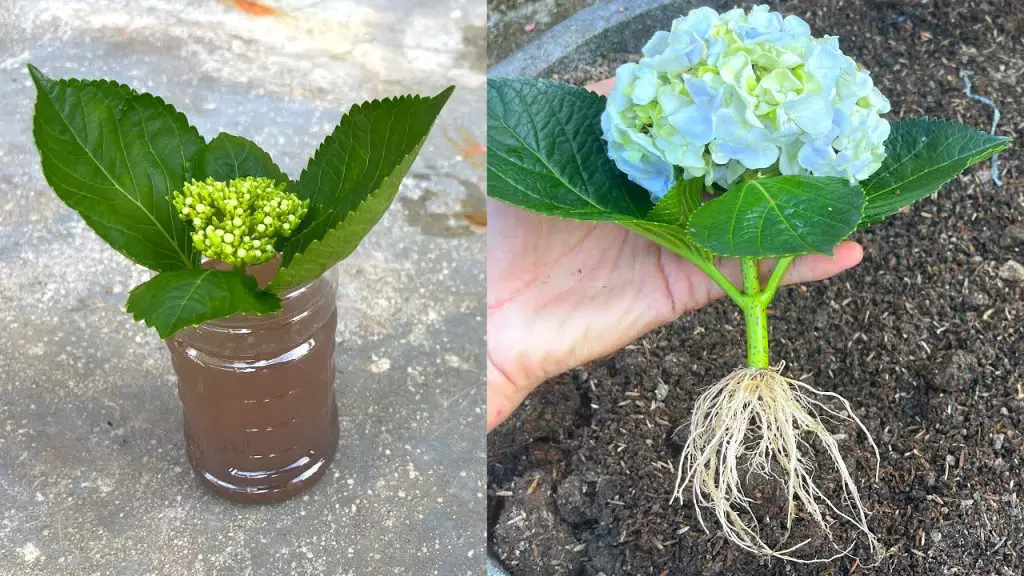
Yes, you can! Growing hydrangeas from flower stems involves taking cuttings from an existing plant and encouraging them to root. These cuttings can eventually grow into full plants, producing their own beautiful flower stems. The process is similar to propagating other types of plants through stem cuttings, and it’s a great way to expand your hydrangea collection.
Step-by-Step Guide to Growing Hydrangeas from Flower Stems
Step 1: Choose the Right Time to Take Cuttings
The best time to take hydrangea cuttings is during the late spring or early summer when the plant is actively growing. Ideally, you want to cut a softwood stem that is new and not yet fully mature. Softwood stems are more likely to root successfully compared to older, harder wood.
Step 2: Prepare the Cutting
- Select a healthy stem: Choose a stem that is healthy, free from disease, and about 4 to 6 inches in length. Ensure the stem has at least one node (the area where leaves emerge), as this is where the roots will form.
- Make the cut: Use a sharp pair of pruning shears or scissors to make a clean cut just below a node. Remove any leaves from the lower half of the cutting, leaving just a few at the top.
- Optional – Use rooting hormone: While not essential, applying a small amount of rooting hormone to the base of the cutting can help promote root growth.
Step 3: Plant the Cutting
- Prepare the soil: Hydrangeas prefer well-draining, moist soil that’s slightly acidic. Use a potting mix designed for cuttings or create your own by combining equal parts of peat moss and perlite. Make sure the container has drainage holes to prevent the soil from becoming waterlogged.
- Insert the cutting: Plant the base of the cutting about 2 to 3 inches deep into the soil, ensuring the node is well covered. Gently press the soil around the stem to secure it.
Step 4: Create the Ideal Growing Conditions
- Humidity: After planting, cover the cutting with a plastic bag or a clear plastic dome to create a humid environment. This helps prevent the cutting from drying out while encouraging root formation.
- Light: Place the cutting in a location with bright, indirect light. Avoid direct sunlight, as it can scorch the cutting or dry it out too quickly.
- Watering: Keep the soil consistently moist but not soggy. Water the cutting whenever the top inch of soil feels dry, but be careful not to overwater, as this can lead to root rot.
Step 5: Transplant the Rooted Cutting
After about 4 to 6 weeks, your cutting should begin to develop roots. Gently tug on the cutting to check for resistance, which indicates that roots have formed. Once the cutting is rooted, it’s time to transplant it into a larger container or directly into your garden.
- Transplanting into a pot: Choose a larger pot with good drainage. Fill it with a well-draining potting mix and carefully transfer the rooted cutting into the pot. Water it thoroughly and place it in a sunny location with partial shade.
- Transplanting into the garden: If you’re planting the cutting in your garden, choose a spot with well-drained soil and partial shade. Hydrangeas prefer a spot with some protection from the harsh afternoon sun. Dig a hole that’s large enough to accommodate the roots and plant the cutting at the same depth it was in the pot. Water well.
Step 6: Ongoing Care for Hydrangeas
Now that your hydrangea is planted, it’s time to provide ongoing care to ensure it thrives and produces beautiful flower stems:
- Watering: Hydrangeas need regular watering, especially during dry periods. Be sure to keep the soil moist, but avoid waterlogging.
- Fertilizing: Feed your hydrangeas with a balanced fertilizer in the spring and again in early summer. Avoid fertilizing too late in the season, as this can interfere with the plant’s dormancy period.
- Pruning: Once the plant is established, you may need to prune it to encourage new growth. Trim any dead or damaged stems and cut back older stems to maintain the shape and size of the plant.
- Winter Care: In colder regions, it’s essential to protect your hydrangeas during the winter. Mulch around the base of the plant to insulate the roots and cover the plant with burlap or another breathable material to protect it from frost.
Why Hydrangeas Are a Great Choice for Your Garden
Hydrangeas are incredibly popular among gardeners for several reasons:
- Stunning blooms: Hydrangeas produce beautiful flower heads that range from white to blue, pink, and purple depending on the soil pH and variety.
- Low maintenance: Once established, hydrangeas are relatively low maintenance and can thrive in a variety of growing conditions.
- Versatile: They grow well in both containers and gardens, making them perfect for any space.
Conclusion: Growing Hydrangeas from Flower Stems
Growing hydrangeas from flower stems is a wonderful way to propagate these stunning plants and enjoy their beautiful blooms year after year. By following the steps outlined in this guide, you can successfully propagate hydrangeas and add a touch of elegance to your garden or home. Remember, patience and proper care are key to growing strong, healthy hydrangeas that will reward you with vibrant flower stems for many seasons to come.


