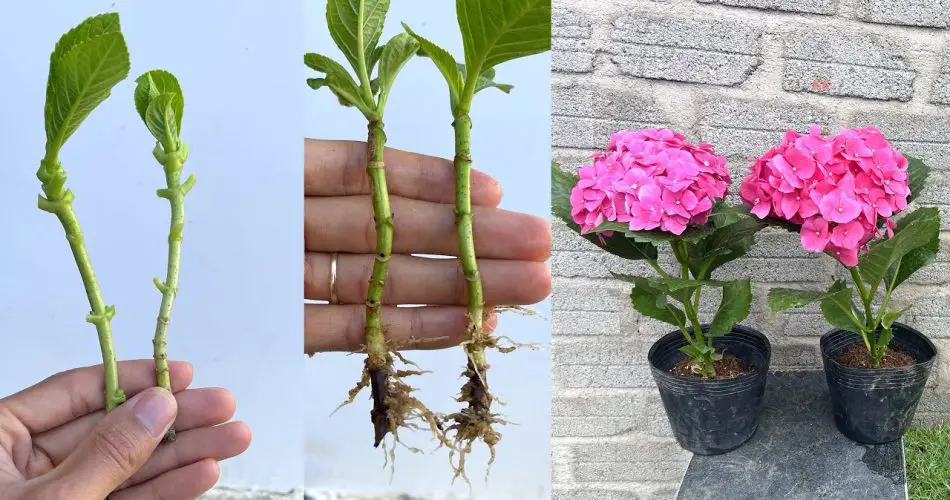
Hydrangeas are known for their gorgeous blooms and vibrant colors that can brighten up any garden. While growing hydrangeas from seeds is an option, propagating them through cutting branches is one of the easiest and most effective methods. In this article, we’ll guide you through the steps to successfully grow hydrangeas from branches, so you can enjoy an abundant display of flowers without the wait.
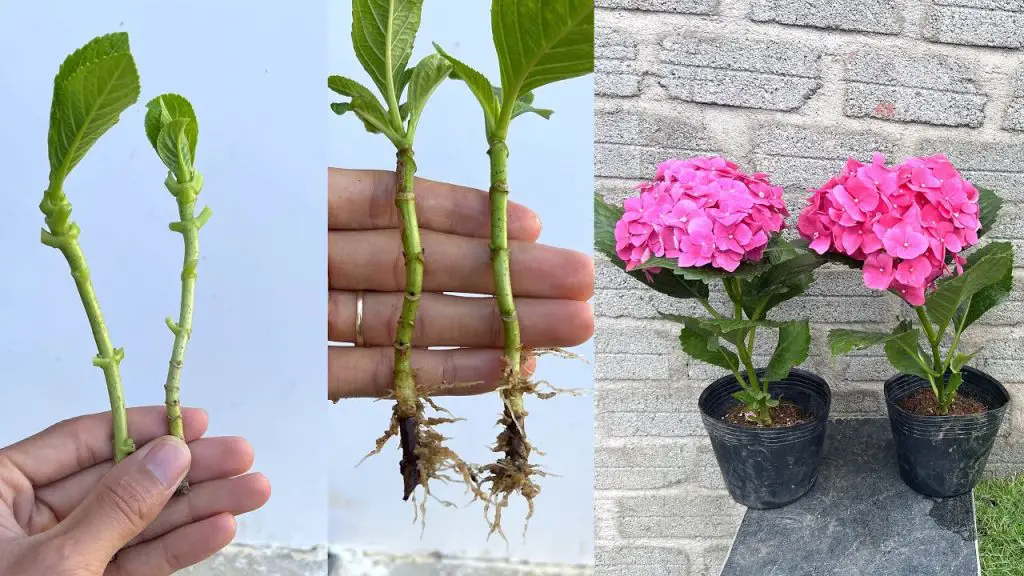
Why Propagate Hydrangeas with Branches?
Growing hydrangeas from branches, also known as cuttings, is a fantastic method because:
- Quick and Simple: Propagating from branches ensures quicker results, as you don’t have to wait for seeds to germinate and grow into mature plants.
- Preserve the Parent Plant’s Traits: By taking cuttings from a healthy, thriving hydrangea, you’ll be able to clone the plant and ensure that the new hydrangeas have the same flower color, size, and growing characteristics.
- Cost-Effective: Instead of buying new plants, you can multiply your existing hydrangeas for free!
What You’ll Need to Grow Hydrangeas with Branches
Before you get started, gather these essential materials for the propagation process:
- Healthy Hydrangea: Choose a mature hydrangea plant with strong branches.
- Sharp Pruning Shears or Scissors: For making clean cuts.
- Rooting Hormone (optional): Helps promote faster root development.
- Small Pots or Containers: For planting the cuttings.
- Well-Draining Potting Mix: Preferably a mix that is light and airy, such as a peat-based potting mix.
- Plastic Bag or Plastic Wrap: To create humidity and protect the cuttings.
Step-by-Step Guide to Growing Hydrangeas with Branches
1. Choose the Right Time to Take Cuttings
The best time to take cuttings from a hydrangea is during the late spring or early summer, when the plant is actively growing but before it begins to bloom. Avoid taking cuttings during the winter months, as the plant will be dormant.
2. Select Healthy Branches
Pick healthy, non-flowering branches that are about 4-6 inches long. These branches should be young and softwood, meaning they are not too woody or mature. Look for branches that are free from disease or damage.
3. Make Clean Cuts
Using your sharp pruning shears or scissors, cut the selected branches just below a leaf node. The leaf node is where the leaves emerge from the stem. Make a clean, diagonal cut to increase the surface area for rooting.
4. Remove the Lower Leaves
Remove the leaves from the bottom half of the cutting, leaving just a few leaves at the top. This step ensures that the cutting doesn’t waste energy on supporting leaves that are submerged in soil.
5. Apply Rooting Hormone (Optional)
Dip the cut end of the branch into rooting hormone to promote root growth. While this step is optional, it can significantly increase the chances of successful propagation. Tap off any excess powder to avoid clumping.
6. Prepare the Potting Mix
Fill your small pots or containers with a well-draining potting mix. You can use a combination of peat moss, perlite, and sand to create an ideal medium that retains moisture without becoming waterlogged.
7. Plant the Cuttings
Make a small hole in the potting mix using a stick or your finger. Insert the cut end of the branch into the hole and gently press the soil around it to secure the cutting. Be sure that the cutting is upright and well-positioned.
8. Create Humidity for Rooting
To keep the cuttings in a humid environment and encourage rooting, cover the pots with a plastic bag or plastic wrap. This will help retain moisture and maintain the right temperature for root growth. Place the pots in a bright, indirect light location, away from direct sunlight, as too much sun can dry out the cuttings.
Caring for Your Hydrangea Cuttings
Once the cuttings are planted, here’s how to care for them:
- Watering: Keep the soil moist but not soggy. Overwatering can cause the cuttings to rot. Check the soil regularly and water when the top feels dry.
- Humidity: Ensure the cuttings are kept in a high-humidity environment. You can mist them occasionally if needed, especially if the weather is dry.
- Temperature: Maintain a consistent temperature of 65-75°F (18-24°C). Avoid exposing the cuttings to cold drafts or extreme heat.
- Air Circulation: If using a plastic covering, make sure there is some airflow to prevent mold growth. Remove the plastic every few days for a short time to allow fresh air to circulate.
How to Know When the Cuttings Have Rooted
After a few weeks, the cuttings should begin to root. You can test for roots by gently tugging on the cutting. If you feel resistance, that means the cutting has formed roots and is ready for transplanting.
- Root Development: You can also check for rooting by carefully removing the cutting from the pot to inspect the roots. If the roots are strong and visible, it’s time to plant the cutting into its own container or directly into the garden.
- Transplanting: Once the hydrangea cuttings are rooted and strong, transplant them into larger pots or directly into the ground. Continue to care for them by providing regular watering and light.
Tips for Success
- Patience is Key: Hydrangeas can take several weeks to root, so be patient. It may take up to 6-8 weeks for the roots to develop fully.
- Use Healthy Branches: Always use branches that are free from disease or damage for the best results.
- Proper Drainage: Make sure your containers have good drainage to prevent waterlogged soil, which can cause rot.
Conclusion
Growing hydrangeas from branches is a simple and rewarding process. By following these easy steps, you can propagate beautiful hydrangeas that will thrive in your garden or home. Whether you’re a seasoned gardener or just starting out, this technique is a fantastic way to multiply your hydrangea collection and enjoy a garden full of vibrant flowers. Happy gardening! 🌸🌿
