If you’re a gardening enthusiast looking to expand your collection of roses without the high cost of purchasing new plants, you’ll be pleased to know that propagating rose cuttings is a simple and rewarding process. By using rose branches bought at your local market, you can easily grow your own roses at home. In this guide, we’ll explain how to propagate rose branches from market-purchased roses, offering tips for successful rooting and growing a beautiful new rose plant.
Why Propagate Rose Cuttings?
Rose propagation through cuttings is a great way to replicate the beauty of your favorite rose variety. Whether you’ve purchased a bouquet or a single stem from a local florist, you can make new plants that will grow just as strong and vibrant as the original. Some key benefits of propagating roses include:
- Cost-Effective: Instead of buying new rose plants, you can propagate from cuttings for free.
- Preserving Varieties: If you’ve fallen in love with a specific rose, propagation ensures you can preserve its beauty and characteristics.
- Personal Satisfaction: There’s a certain joy in watching a cutting grow into a thriving rose bush, which can add personal value to your garden.
Choosing the Right Rose for Propagation
Before diving into the propagation process, it’s important to select a healthy, fresh rose from the market. Look for roses that:
- Are not overly mature: Avoid roses that are already wilting or overly old, as these may have difficulty rooting.
- Have healthy stems: Choose roses with vigorous, green stems that are free from pests or disease.
- Are of the right variety: Some rose varieties may be easier to propagate than others. Hybrid tea roses and floribundas tend to root well.
Steps to Propagate Rose Cuttings from Market Roses
Once you’ve picked out your roses, follow these simple steps to propagate the cuttings:
Step 1: Prepare Your Materials
You’ll need a few basic materials to get started:
- Sharp, clean scissors or pruning shears
- A clean pot with good drainage (for the rooted cutting)
- A small amount of potting soil (a well-draining mix, like a mixture of peat and perlite)
- Rooting hormone (optional, but can help speed up the rooting process)
- A clear plastic bag or a plastic bottle to create humidity
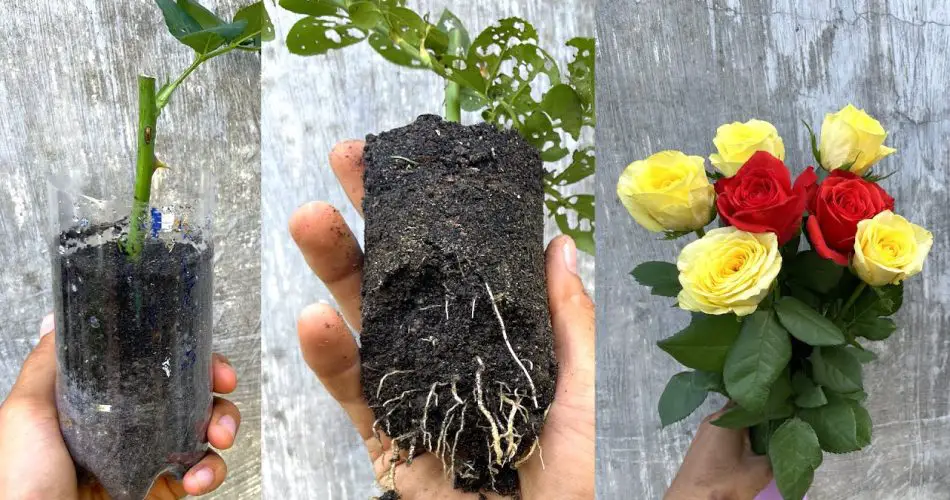
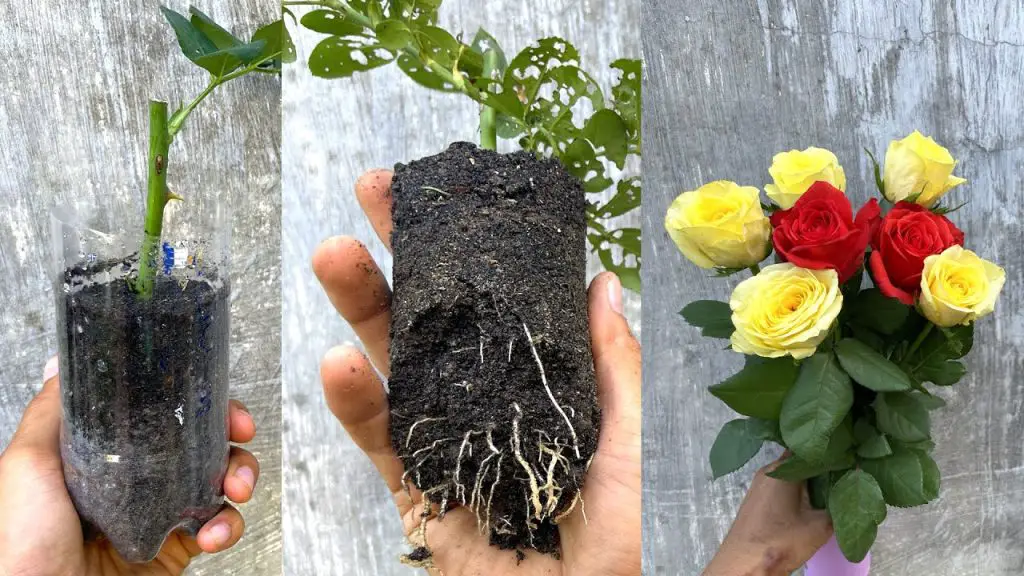
Step 2: Cut the Rose Stem
- Choose a healthy, semi-hardwood stem from your market-bought rose. The stem should be about 6-8 inches long.
- Cut just below a leaf node (where the leaves are attached to the stem) using sharp scissors or pruning shears.
- Remove the leaves from the lower half of the cutting, leaving a couple of leaves at the top.
Step 3: Prepare the Cutting
- Trim the bottom of the cutting to a sharp angle. This increases the surface area and can help with better absorption of water and nutrients.
- If you’re using rooting hormone, dip the cut end of the stem into the powder or gel. This hormone encourages root growth and can improve your chances of success.
Step 4: Plant the Cutting
- Fill a small pot with a well-draining potting mix, such as a combination of peat and perlite or sand.
- Insert the cutting into the soil about 2 inches deep.
- Gently press the soil around the cutting to stabilize it and ensure good contact with the soil.
Step 5: Create a Humid Environment
- To encourage rooting, place the pot in a humid environment. You can cover the cutting with a clear plastic bag or a plastic bottle (cut the bottle in half to create a dome).
- Ensure the bag or bottle does not touch the cutting directly, as this could encourage rot. Leave some air gaps for ventilation.
- Place the cutting in a bright, indirect light location, but avoid direct sunlight, as this can cause overheating.
Step 6: Watering and Care
- Keep the soil moist but not soggy. Check the soil regularly and water gently if it begins to dry out.
- The cutting will start to root in 4 to 6 weeks, but it can take a few months for the roots to become well-established.
- As the cutting begins to root, you can gradually remove the plastic cover to help the new plant acclimate to normal humidity levels.
Step 7: Transplanting Your New Rose
Once the cutting has formed a strong root system, you can transplant it into a larger pot or directly into the ground. Choose a sunny spot with well-drained soil, as roses thrive in full sunlight.
Tips for Success in Rose Propagation
- Patience is key: It can take time for rose cuttings to develop roots, so don’t rush the process. Make sure the cutting stays in the right environment and remains healthy.
- Use clean tools: To avoid transferring diseases, ensure your scissors and other tools are sterilized before use.
- Rooting hormone: While not strictly necessary, rooting hormone can significantly improve your success rate, especially with harder-to-root varieties.
- Keep humidity high: Roses love moist conditions when rooting, so don’t forget to maintain a humid environment around the cutting until it’s fully rooted.
Conclusion: Growing Beautiful Roses at Home
By using cuttings from roses bought at the market, you can easily propagate new rose plants for your garden or home. Whether you’re looking to expand your garden on a budget or preserve a particular rose variety, the process of propagating rose cuttings is straightforward and rewarding.
With just a little patience and care, you can successfully grow your own roses, creating a beautiful garden full of your favorite blooms. Remember to choose healthy stems, provide proper care, and enjoy the magical process of watching your cuttings grow into full-fledged plants!


