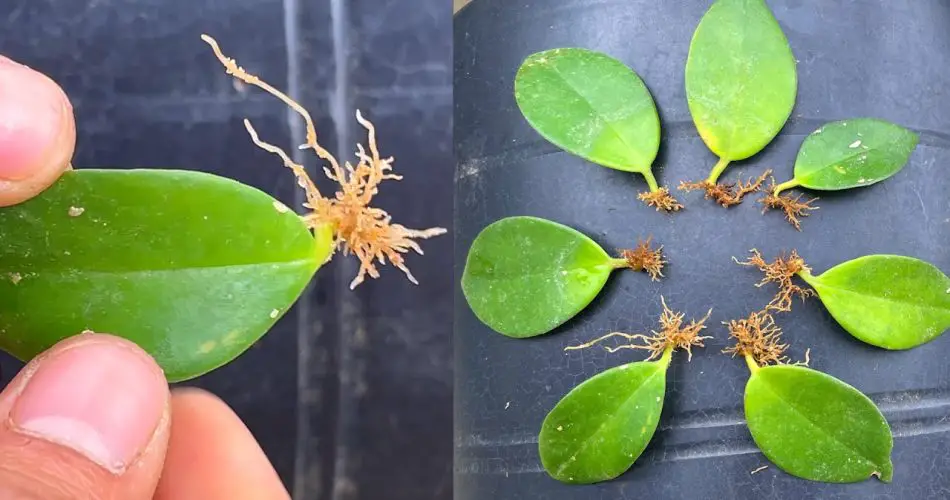
Growing plants from leaves and flowers can be a fascinating and rewarding experience, especially when you use sand as a medium. This method of propagation is not only simple but also effective for many types of plants. Whether you’re a beginner or an experienced gardener, learning how to grow roots from leaves is a great way to multiply your favorite plants. Here’s how you can make this process work for you and help your plants thrive.

1. Choosing the Right Plant for Leaf Propagation
Not all plants can be propagated by simply planting a leaf in sand. However, many houseplants and garden plants can thrive with this method. Some common plants that propagate well from leaves include:
- Begonias
- African violets
- Sweet potatoes
- Sansevieria (Mother-in-law’s tongue)
- Coleus
When choosing a plant, ensure that its leaves are healthy and free from disease or pests. Only mature leaves are suitable for propagation; avoid using damaged or very old leaves.
2. Preparing the Sand
Sand provides excellent drainage for leaf propagation. It helps create an environment that encourages root growth while preventing rotting. Here’s how to prepare your sand for optimal results:
- Use clean sand: Make sure the sand is free of contaminants, like salt or dirt. If using beach sand, wash it thoroughly to remove salt and debris.
- Choose coarse sand: Coarse or builder’s sand is ideal because it allows for better water drainage compared to fine sand. This ensures that the leaves don’t become waterlogged.
- Moisture: The sand should be kept slightly moist, but not soaked. Too much water can lead to fungal diseases or rot.
3. Cutting the Leaves for Propagation
The way you cut the leaves is crucial for successful root growth. Here’s how to do it correctly:
- Use a sharp, clean knife or scissors to avoid damaging the leaf and to prevent the transmission of diseases.
- For some plants, you can propagate from just the leaf blade, while others, like African violets, need a leaf with its stem. If you’re unsure, check the specific needs of the plant you are working with.
- Trim any excess foliage or damaged parts before placing the leaf in the sand.
4. Placing the Leaves in the Sand
Once your leaves are ready, it’s time to plant them in the sand. Here’s the best method:
- Make a small hole in the sand with your finger or a stick.
- Place the leaf or stem of the plant into the hole, ensuring that the cut end is slightly buried.
- Gently press the sand around the leaf to secure it in place, making sure the leaf is stable.
- For stem-cuttings, dip the cut end of the stem in rooting hormone (optional) before placing it in the sand to encourage faster root growth.
5. Providing the Right Environment
For your leaf to grow roots, it’s important to create a favorable environment. Here’s what to do:
- Humidity: Cover the plant with a plastic bag or use a clear plastic container to create a greenhouse effect. This will maintain humidity and help the leaf stay hydrated while it develops roots.
- Indirect Light: Place the container in a spot with bright, indirect light. Avoid placing the leaves in direct sunlight, as this can cause them to dry out.
- Temperature: Keep the area at a warm temperature, around 65-75°F (18-24°C), as most plants prefer moderate warmth for root development.
6. Caring for the Propagating Leaves
While the leaves are developing roots, it’s important to care for them properly to ensure success:
- Watering: Keep the sand moist, but avoid making it soggy. Water gently to prevent disturbing the leaf or cutting.
- Ventilation: Occasionally lift the plastic cover for air circulation, which helps prevent mold or mildew. Be cautious not to expose the plant to a sudden cold draft or direct sun, as this can hinder root development.
- Root Growth: After a few weeks, you should start seeing roots forming at the base of the leaf. This can vary depending on the plant species, but most plants will start showing roots within 3-6 weeks.
7. Transplanting the Rooted Leaves
Once the roots have developed well, it’s time to move the leaf or cutting into a pot or garden bed. Here’s how to do it:
- Prepare a new pot: Choose a pot with good drainage, and fill it with potting mix suitable for the type of plant.
- Transfer carefully: Gently remove the rooted leaf or cutting from the sand, making sure not to damage the roots. Place it in the new soil and cover with more potting mix.
- Water well: After transplanting, give the plant a good drink of water to help it settle into its new environment.
- Continued care: Keep the new plant in a warm, well-lit area, and water it regularly to ensure it grows strong and healthy.
8. Troubleshooting Common Issues
Sometimes things don’t go as planned, but don’t get discouraged. Here are some tips for common problems:
- Leaves not rooting: If the leaves aren’t growing roots, check the moisture level in the sand. Too much water or not enough can both cause issues. Also, ensure that the plant is getting enough indirect light and warmth.
- Rotting leaves: If your leaves start to rot, remove them from the sand immediately to prevent contamination. It’s important to ensure good air circulation and moisture levels are correct.
Conclusion
Growing roots from leaves in sand is a simple and efficient propagation technique that anyone can try. By selecting the right plants, preparing the sand properly, and maintaining a favorable environment, you can successfully propagate new plants for your garden or home. Whether you’re expanding your plant collection or simply enjoying the process of growing something new, this method is a great way to enhance your gardening skills. Happy planting!


