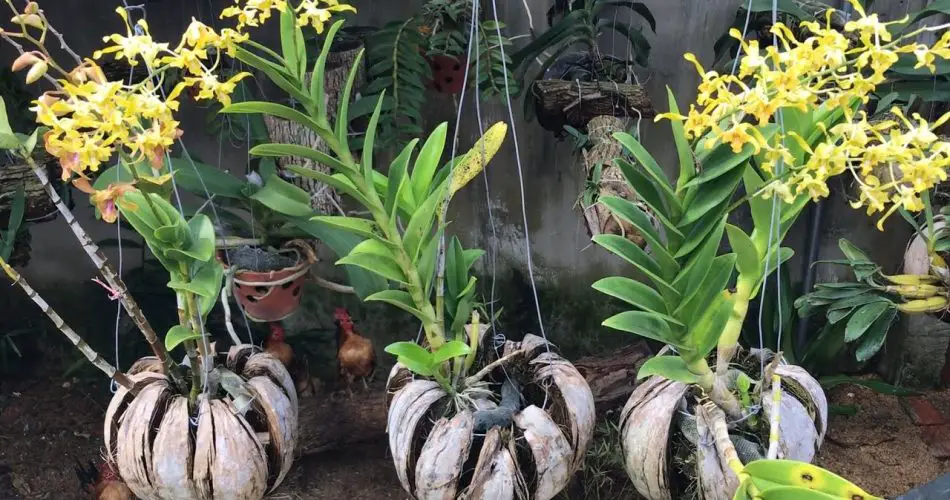
If you’re looking for a unique and eco-friendly way to grow orchids, consider planting them in a coconut shell. This method not only looks aesthetically pleasing but also provides the orchids with an environment that mimics their natural tropical habitat. Coconut pots are becoming increasingly popular among gardeners and orchid enthusiasts for their ability to retain moisture while providing good drainage. In this guide, we’ll explore the benefits of using coconuts as orchid pots and show you how to plant and care for your orchids in this unconventional container.
Why Use a Coconut for Orchids?
Orchids are known for their unique growing requirements, and they thrive in environments that provide good air circulation and moisture retention without allowing the roots to become waterlogged. Coconut shells provide an organic, breathable structure that encourages both of these conditions. Here’s why you should consider using coconut shells as orchid pots:
- Natural Aesthetic: The rustic, natural look of coconut pots adds an exotic touch to any indoor space, making them a stylish addition to your home décor.
- Air Circulation: Orchids need good airflow around their roots. Coconut shells are naturally perforated, allowing air to circulate freely, which reduces the chances of root rot.
- Moisture Retention: Coconut fibers, also known as coir, are great at retaining moisture, ensuring that the orchids’ roots stay hydrated without being waterlogged.
- Eco-friendly: Coconuts are a sustainable material, making coconut orchid pots an eco-friendly choice for those looking to reduce their environmental impact.
- Affordability: Coconut shells are often easy to find and inexpensive, making them a budget-friendly option for orchid lovers.
How to Prepare a Coconut Shell for Planting Orchids
Before planting your orchid in a coconut, you need to prepare the coconut shell properly. Follow these steps to create the perfect orchid pot from a coconut:
1. Choose the Right Coconut
Look for a mature coconut with a relatively intact shell. You can either use a whole coconut or one that has been pre-husked. Make sure the shell is free from cracks and damage.
2. Remove the Coconut Water
If you’re using a whole coconut, you’ll need to drain the coconut water from the shell. You can do this by poking holes into the eyes of the coconut (the three “eyes” or soft spots on the shell). Pour out the water and set it aside.
3. Cut the Coconut Shell
Once the coconut is drained, you can cut the shell in half or create a small hole at the top. If you’re using a whole coconut, cut it into two halves, leaving the fibrous husk intact. This creates a perfect natural pot that will house your orchid.
Alternatively, you can cut a smaller opening at the top if you want a more compact pot.
4. Prepare the Coconut Fiber (Coir)
Coconut coir is the fibrous material that comes from the shell and is an excellent growing medium for orchids. You can either leave the coir inside the shell or use a combination of coir, orchid bark, and perlite to create a well-draining potting mix. The coir provides moisture retention, while the bark and perlite ensure good drainage and aeration.
5. Drill Drainage Holes
Even though the coconut shell itself has natural holes, you may still want to drill a few additional drainage holes to prevent excess water from accumulating at the bottom. This helps avoid root rot, a common issue for orchids.
Planting Orchids in Coconut Shells
Now that you’ve prepared the coconut shell, it’s time to plant your orchid. Follow these steps to ensure your orchid thrives in its new coconut home:
1. Add a Layer of Drainage Material
To enhance drainage, place a layer of small rocks or gravel at the bottom of the coconut shell. This allows excess water to escape more easily and prevents the roots from sitting in stagnant water.
2. Fill with Orchid Potting Mix
Fill the coconut shell with a mixture of orchid bark, coconut coir, and perlite. This potting mix will provide the right balance of moisture retention and airflow for your orchid’s roots.
3. Place the Orchid in the Coconut Shell
Carefully remove your orchid from its old pot, making sure not to damage the delicate roots. Gently shake off any excess soil or medium. Position the orchid in the coconut shell, ensuring the roots have enough room to spread out. The crown (the top part of the plant) should be level with the opening of the shell.
4. Fill Around the Roots
Fill the gaps around the orchid’s roots with the potting mix, gently pressing down to secure the plant in place. Make sure the roots are not buried too deep, as orchids need to have some of their roots exposed to air.
5. Water and Settle the Orchid
After planting, water the orchid thoroughly, allowing the water to drain through the bottom. Place the coconut pot in a bright, indirect light location. Orchids thrive in warm, humid environments, so consider placing your coconut orchid pot on a humidity tray or near a humidifier.
Care Tips for Orchids in Coconut Pots
Orchids planted in coconut shells are relatively low-maintenance, but there are a few care tips to ensure your plant thrives:
- Watering: Water your orchid when the top of the potting mix feels dry. Orchids prefer to be watered thoroughly, but the coconut pot should be allowed to drain completely to avoid waterlogged roots.
- Light: Orchids love bright, indirect light. Avoid placing them in direct sunlight, as this can scorch their delicate leaves. A north or east-facing window is ideal.
- Humidity: Orchids require high humidity, typically between 50-70%. If your home is dry, you can increase humidity by placing a humidifier nearby or using a humidity tray filled with pebbles and water.
- Fertilizing: Feed your orchid with a balanced orchid fertilizer during the growing season (spring and summer). Fertilize once every two weeks, and reduce feeding during the dormant period (fall and winter).
- Repotting: Orchids should be repotted every 1-2 years to refresh the growing medium and allow room for growth. If the coconut shell becomes too small or deteriorates over time, you can replace it with a new coconut shell or repot the orchid in a traditional orchid pot.
Conclusion: The Beauty of Orchids in Coconut Pots
Planting orchids in coconut shells offers a creative and natural way to grow these beautiful plants. Not only do coconut pots enhance the aesthetic of your space, but they also provide a sustainable, breathable environment for your orchids to thrive. With the proper care and attention, your orchid will flourish in its new home, blooming year after year. So, if you’re looking for an eco-friendly and stylish way to showcase your orchids, give coconut pots a try!


