If you’ve ever dreamed of having a garden full of beautiful, fragrant roses but thought it might be too difficult or expensive, you’re in for a treat! Planting roses with branches (or cuttings) is an easy and cost-effective way to grow new rose plants, and it requires minimal effort. With just a few simple steps, you can propagate your favorite rose varieties and watch them flourish in your garden.
In this article, we’ll walk you through the easy process of planting roses from cuttings, explaining the best techniques, tips, and tools to use. Get ready to enjoy the satisfaction of growing roses from branches and creating a stunning rose garden!
Why Planting Roses with Branches is a Great Idea
Growing roses from cuttings offers several benefits:
- Cost-effective: Rather than buying new rose plants, you can propagate cuttings from your existing roses or from a friend’s garden, saving you money.
- Variety: You can propagate your favorite rose varieties—even if they are not available locally or at your local nursery.
- Easy to Do: Unlike many other plants, roses are relatively easy to propagate with cuttings when the right method is used.
- Faster Results: When you propagate roses from cuttings, you’ll often see results much faster than when growing them from seeds, which can take longer.
The Best Time to Take Rose Cuttings
The ideal time to take rose cuttings is during the dormant season, typically in the late fall or early winter when the rose plant has slowed its growth. However, you can also take softwood cuttings (from newer growth) during the spring and summer months, though these may require a bit more attention and care.
Tip:
- Choose healthy, disease-free rose plants from which to take cuttings. Avoid selecting stems that are overly woody, diseased, or damaged.
Materials Needed for Planting Roses with Branches
To get started with planting roses from branches, you will need a few basic materials:
- Healthy Rose Cutting: Look for a strong, mature stem with at least 3-4 leaf nodes.
- Sharp Pruning Shears: To ensure a clean, precise cut.
- Rooting Hormone (optional): This helps encourage faster root growth.
- A Pot: A small container with good drainage holes.
- Soil: A well-draining potting mix, ideally a mix designed for cuttings or seed starting.
- Plastic Bag or Clear Plastic Cover: To create a mini greenhouse effect and maintain humidity.
- Water: For soaking and keeping the cutting hydrated.
Step-by-Step Guide to Planting Roses with Branches
1. Select and Prepare the Cutting
Choose a healthy, mature stem from your rose bush. The stem should be about 6-8 inches long and should be taken from a non-flowering branch. Avoid selecting stems that are too young or soft, as they are less likely to root.
- Tip: Ensure that the cutting has at least three leaf nodes. These nodes are where the roots will eventually form.
2. Make the Cut
Using your sharp pruning shears, cut the selected rose branch at a 45-degree angle just below a leaf node. This angled cut helps the cutting absorb water better and encourages faster rooting.
- Remove the lower leaves from the cutting, leaving only two or three leaves at the top. Be careful not to damage the leaf nodes, as they will be responsible for producing roots.
3. Apply Rooting Hormone (Optional)
While rooting hormone isn’t strictly necessary, it can speed up the rooting process. Dip the cut end of your rose cutting into the rooting hormone powder (available at garden centers), covering about an inch of the cutting.
- Tip: Be sure to tap off any excess rooting hormone, as too much can be harmful to the cutting.
4. Plant the Cutting
Fill a small pot with a well-draining potting mix, and make a small hole in the center using a stick or your finger. Insert the cutting into the hole, burying the cut end about 1–2 inches into the soil. Press the soil gently around the base to ensure good contact between the cutting and the soil.
- Tip: If you’re propagating multiple cuttings, space them at least 2–3 inches apart to allow them room to root and grow.
5. Water and Create a Humid Environment
After planting, water the soil thoroughly to settle it around the cutting. Place the pot in a warm, bright location, but avoid direct sunlight, which can scorch the cutting. To maintain humidity and encourage rooting, cover the pot with a plastic bag or a clear plastic dome.
- Tip: Make sure the plastic cover doesn’t touch the cutting. You can prop it up with sticks or small stones. If condensation forms inside the plastic, it’s a sign that the humidity is high enough.
6. Maintain Proper Care
Check the cutting regularly to ensure the soil stays moist but not waterlogged. Remove the plastic cover once the cutting begins to develop roots and new growth (this typically takes about 3–6 weeks). During this time, ensure the cutting gets bright, indirect light but isn’t exposed to harsh sunlight.
- Tip: You can gently tug on the cutting after a few weeks to check if it has rooted. If there’s resistance, that’s a good sign!
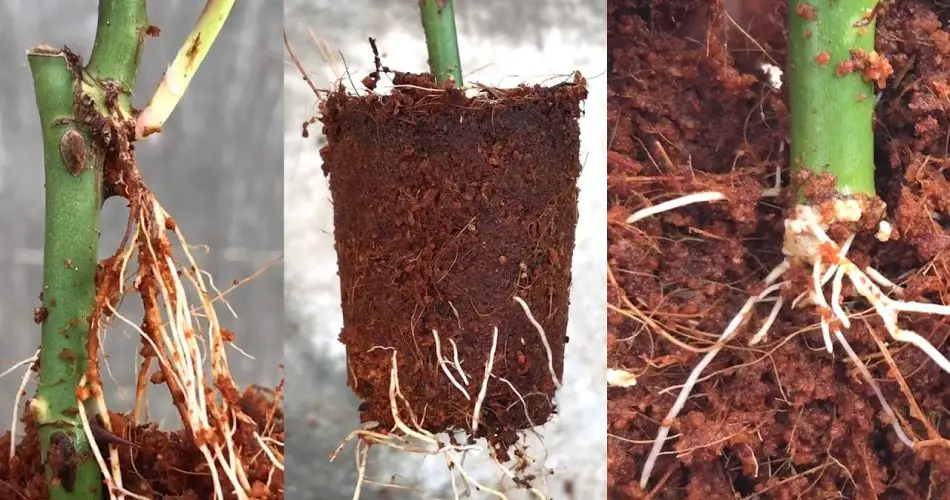
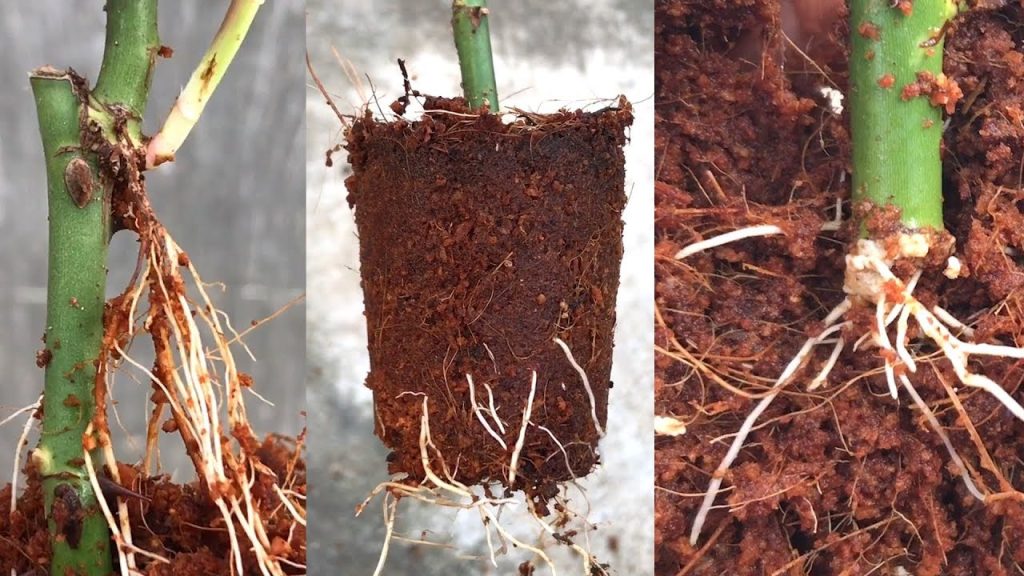
7. Transplanting the New Rose Plant
Once the rose cutting has developed a healthy root system, you can transplant it into a larger pot or directly into your garden. Ensure the soil is well-draining, and water the plant regularly as it settles into its new environment.
- Tip: Before planting outdoors, acclimate the cutting to the outside environment by gradually increasing its exposure to sunlight and wind over the course of a week or two.
Tips for Success in Planting Roses from Cuttings
- Choose the Right Rose Variety: Some rose varieties propagate more easily than others. Climbing roses and hybrid teas are typically good choices for propagation by cutting.
- Avoid Overwatering: While the cutting needs moisture, too much water can cause it to rot. Be sure the pot has good drainage and only water when the soil feels slightly dry.
- Use Clean Tools: Always sanitize your pruning shears or knives before making cuts to avoid transferring diseases to the cutting.
- Consider a Mist System: If you’re propagating multiple cuttings or prefer a more automated setup, you can use a misting system or a propagation tray to keep the environment humid.
Conclusion: Growing Beautiful Roses with Branches is Easy
Planting roses with branches (cuttings) is an easy and rewarding gardening project. Not only does it allow you to propagate your favorite rose varieties, but it’s also a cost-effective way to expand your rose garden. By following the simple steps outlined above and applying a little patience, you can enjoy the beauty of healthy, blooming roses that you grew from scratch.
Whether you’re a seasoned gardener or a beginner, propagating roses from cuttings is a fun and satisfying experience. So gather your rose branches and start planting — you’ll soon be rewarded with stunning blooms in your own backyard!


