Roses are one of the most beloved and elegant flowers, known for their vibrant colors, sweet fragrances, and timeless beauty. While purchasing roses from the store can be tempting, it’s surprisingly easy to grow roses from cuttings and enjoy the process of propagating your own beautiful blooms at home. If you’re interested in having a garden full of stunning roses without spending much, growing them from cuttings can be a rewarding experience. In this article, we’ll explore how you can successfully grow roses from cuttings and nurture them into healthy, blooming plants.
Why Grow Roses from Cuttings?
Growing roses from cuttings offers several advantages:
- Cost-effective: Instead of buying new rose plants every season, you can propagate your own, saving money.
- Variety: If you have a particular type of rose you adore, you can easily propagate it to get more of the same variety.
- Sentimental value: Growing roses from cuttings allows you to preserve special memories. For example, if you received a bouquet as a gift, you can use the cut flowers to propagate and grow them in your garden.
With a few simple steps, you can enjoy a beautiful rose garden right at home. Let’s dive into the process!
What You’ll Need to Grow Roses from Cuttings:
Before you start the propagation process, gather the necessary materials:
- Healthy rose stem: Choose a fresh, healthy rose from a store-bought bouquet or your garden.
- Sharp pruning shears: For cutting the stem cleanly.
- Rooting hormone: A powder or gel that stimulates root growth.
- Pot with drainage holes: For planting the cutting.
- Potting mix: A well-draining, light soil mixture designed for propagation.
- Plastic bag or plastic wrap: To create humidity for the cutting.
- Water: To keep the soil moist during the rooting process.
Step-by-Step Guide to Growing Roses from Cuttings
Here’s how you can easily grow roses from cuttings:
1. Choose the Right Cutting
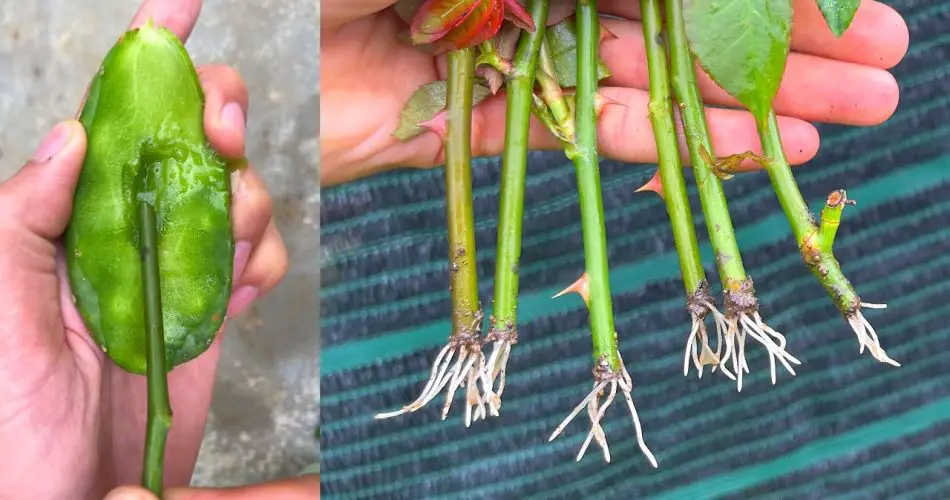
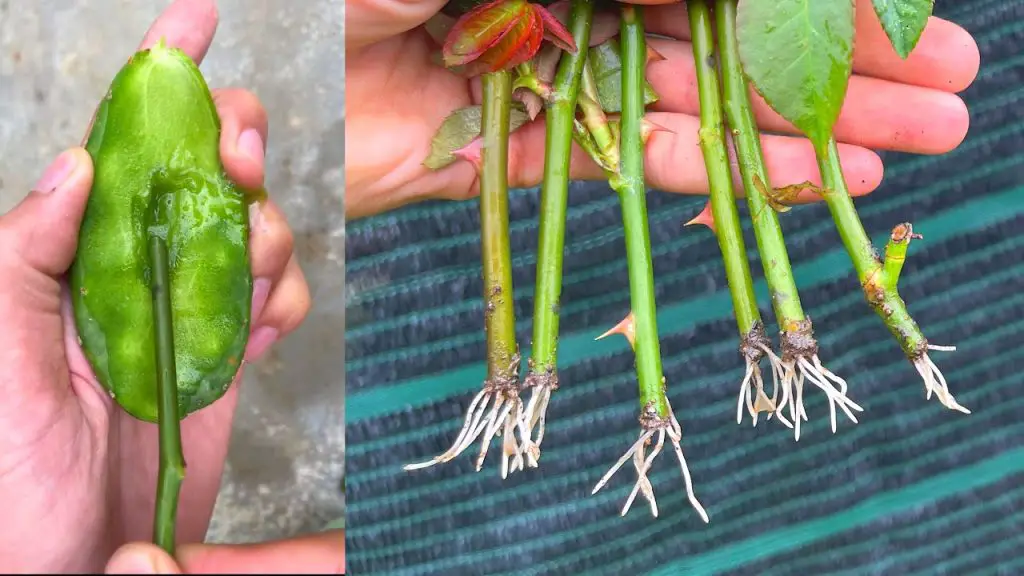
The first step is to select the perfect rose stem for propagation. A healthy cutting should be taken from a mature rose that’s not too young or too old. Look for a stem that is around 6 inches long with at least 3-4 leaf nodes. These nodes are where roots and new growth will form.
- Tip: Avoid using stems with flowers or buds, as they are not ideal for propagation.
2. Make the Cut
Use sharp pruning shears to make a clean cut just below a leaf node. Cut at an angle to help the cutting absorb water better.
- Remove any leaves from the bottom 2 inches of the stem to prevent them from touching the soil and rotting. Leave a few leaves at the top of the cutting.
3. Apply Rooting Hormone
To encourage faster root development, dip the cut end of the stem into rooting hormone. This helps stimulate the growth of new roots and improves the chances of successful propagation.
- Tip: Shake off any excess hormone before planting.
4. Prepare the Pot
Fill a pot with a well-draining potting mix. You can use a mix specifically designed for propagating, or create your own by combining equal parts of sand, peat, and perlite. Ensure the pot has good drainage to avoid waterlogging.
- Tip: If you’re using a small pot, make a hole in the soil with a pencil or stick to make planting the cutting easier.
5. Plant the Cutting
Insert the cut end of the rose cutting into the prepared soil. Gently press the soil around the cutting to secure it in place. Make sure the cutting is upright and stable.
- Tip: If you’re propagating multiple cuttings, space them a few inches apart to allow for air circulation.
6. Create a Humid Environment
To help the cutting root, it’s important to maintain high humidity. Cover the pot with a plastic bag or plastic wrap to create a mini greenhouse effect. Ensure the plastic doesn’t touch the cutting by using sticks or straws to prop it up.
- Tip: Open the plastic occasionally to let fresh air in and prevent mold.
7. Keep the Cutting Moist and Warm
Place the pot in a warm, bright location, but avoid direct sunlight, as it can overheat the cutting. Keep the soil lightly moist, but not soggy. Water it gently if the soil begins to dry out.
- Tip: A temperature between 65-75°F (18-24°C) is ideal for rooting.
8. Wait for Roots to Form
After about 4-6 weeks, you should start to see new roots developing. You can check this by gently tugging on the cutting. If it resists, it means roots are forming.
- Tip: Be patient! Rose cuttings can sometimes take longer to root, especially in cooler climates.
Transplanting Your New Rose Plant
Once your cutting has developed a good root system, it’s time to transplant it into a larger pot or into the garden:
- Gently remove the cutting from its pot and plant it in its new home with fresh potting soil.
- Continue to care for it by watering it regularly and ensuring it receives enough light.
- Gradually introduce your new rose plant to more sunlight, increasing exposure each day until it can handle full sun.
- Tip: Fertilize your new rose plant with a balanced, slow-release fertilizer to encourage healthy growth.
Conclusion
Growing roses from cuttings is an easy, cost-effective way to enjoy beautiful blooms in your garden. By following these simple steps and with a bit of patience, you’ll be able to propagate your favorite roses, whether they’re from the store or your own garden. Growing roses from cuttings allows you to enjoy more of the plants you love and create a personalized, thriving rose garden. Happy planting! 🌹


