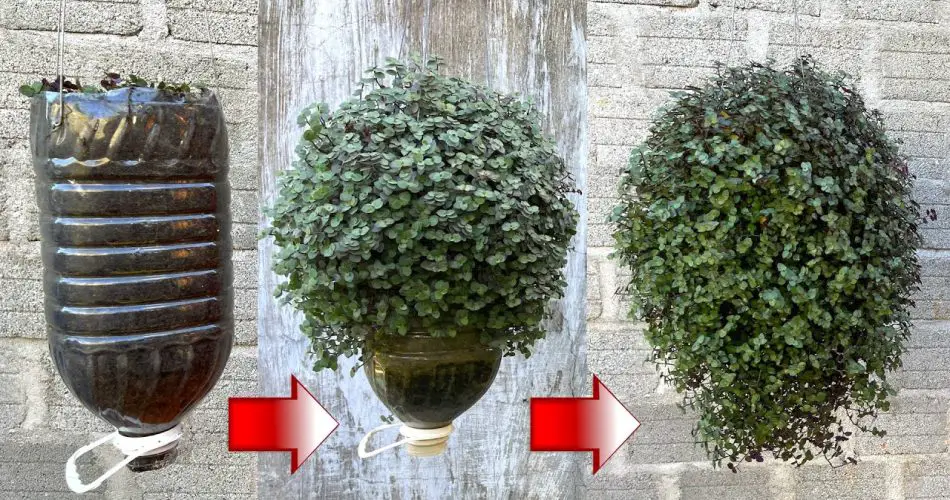
Gardening doesn’t always have to be about expensive planters or intricate pots. Sometimes, the most creative and eco-friendly solutions come from items you already have at home. One such idea is making a potted hair tree using a simple plastic bottle. Not only does this give your plants a unique and sustainable home, but it also allows you to repurpose waste materials in a fun and innovative way!

In this article, we’ll guide you step-by-step on how to make a potted hair tree using a plastic bottle, creating a stunning focal point in your home or garden.
What Is a Potted Hair Tree?
A potted hair tree is a plant that’s typically grown in a creative, non-traditional container, often resembling a tree or a bonsai. It’s called a “hair tree” because some variations of these plants look like they have “hair” growing out of their pots. These plants can be made from various materials, but today we’re going to use an upcycled plastic bottle to craft a unique and sustainable version of the potted hair tree.
Why Choose a Plastic Bottle?
Using plastic bottles as planters is not only a great way to recycle but also a smart option for saving space and creating something artistic for your home. Plastic bottles are:
- Affordable: You likely already have a plastic bottle at home.
- Eco-Friendly: Repurposing plastic reduces waste.
- Versatile: They can be cut, shaped, and customized to fit your vision.
- Lightweight: Easy to move around and hang if desired.
Materials You’ll Need:
- Plastic bottle (any size, but a larger bottle works best for creating a bigger tree)
- Scissors or a craft knife
- Potting soil
- Plants (choose small plants or a bonsai tree, succulent, or even moss to create the “hair” effect)
- Decorative elements (optional, like stones, pebbles, or moss for additional aesthetics)
- Watering can or spray bottle
- Marker or pen for drawing the design
Step-by-Step Guide to Make a Potted Hair Tree:
1. Prepare the Plastic Bottle
Start by cleaning the plastic bottle thoroughly, removing any labels or adhesive. Once clean, decide on the size of your potted hair tree. Use a marker to mark where you want to cut the bottle for the base and top of your planter.
- Cut the Bottle: Using scissors or a craft knife, cut the bottle vertically, leaving the bottom portion intact to serve as the base. The top part will be used to form the “hair” of the tree.
2. Create the Tree Structure
For the tree’s “trunk,” you can use the cut-off bottom portion of the bottle or leave the bottle whole for a larger trunk.
- Shape the Trunk: If you’re using a large bottle, you can also wrap it in twine, or decorative fabric, to make it look like a tree trunk. This adds to the rustic appeal of the potted hair tree.
3. Add Soil and Plant
Now, fill the bottom of the bottle with potting soil. For the “hair” effect, plant smaller plants or moss in the top portion of the bottle. You can create the appearance of flowing hair by planting succulents, ivy, or even moss that grows in all directions.
- Plant the Soil: Gently press the plants or moss into the soil, ensuring they have enough room to grow. You can plant multiple plants to create a fuller look or leave some spaces open for added visual interest.
4. Design the “Hair” of the Tree
For the “hair” of the tree, you can use a small plant like moss or ivy that grows over the top of the plastic bottle. Allow these plants to spread out, cascading down from the top to mimic the appearance of hair.
- Train the Growth: You can gently tie parts of the plant to encourage it to grow in a certain direction, or let it grow naturally for a more organic look.
5. Water and Care for Your Tree
After completing the design, water your potted hair tree thoroughly, ensuring the soil is evenly moist. It’s best to water your plants with a watering can or spray bottle to avoid over-wetting the soil.
- Maintenance: Make sure your potted tree is placed in an area that gets sufficient light for the plants you’ve chosen. Regularly prune the plants if necessary to keep them healthy and aesthetically pleasing.
Additional Creative Ideas:
- Add a Base: If you want to make your potted hair tree more stable or artistic, consider adding stones, colored pebbles, or moss around the base of the plastic bottle.
- Hanging Planter: You can turn the plastic bottle into a hanging planter by cutting holes on the sides and adding a string or chain to hang it in a window or from the ceiling.
- Decorate the Tree: For an added personal touch, consider decorating the tree with tiny fairy lights, or adding colorful ribbons around the bottle.
Benefits of Using a Plastic Bottle for Gardening
- Recycling: Using plastic bottles for your garden is an excellent way to recycle and reduce waste.
- Cost-Effective: Plastic bottles are often free, and you can make multiple planters without spending much money.
- Personalized Gardening: You can customize your potted tree design to fit your home decor, making it a fun project to show off to guests.
Conclusion
Creating a potted hair tree from a plastic bottle is a brilliant, creative way to recycle and add a unique touch to your home or garden. Whether you’re aiming for a decorative bonsai-style plant, a cascading succulent display, or just a fun DIY project, this gardening idea is both easy and environmentally friendly.
By turning waste materials into something beautiful, you can create a stunning piece of living art that not only looks great but also helps the planet. Get creative and start crafting your own potted hair tree today!


