Bougainvillea is one of the most vibrant and beautiful plants you can have in your garden, known for its stunning multicolored bracts that come in shades of pink, purple, orange, and red. Among the many ways to cultivate this ornamental plant, grafting is a popular technique to achieve a multicolored confetti effect. But how exactly do you graft bougainvillea to get those lovely, colorful flowers?
In this article, we’ll explore the art of grafting bougainvillea, step-by-step, and how you can create a multicolored display of bougainvillea in your own garden. Whether you’re an experienced gardener or a beginner, this guide will give you the tools you need to create beautiful, flowering masterpieces with grafting.
What is Grafting?
Grafting is a horticultural technique that involves joining two plants together so that they grow as one. The rootstock (usually a hardy bougainvillea plant) and the scion (a branch or stem from a different colored bougainvillea) are fused together to create a plant with multiple colors on a single vine or bush.
This process is commonly used to propagate bougainvillea and ensure you get the vibrant color combinations you want. In grafting bougainvillea, you’re essentially creating a multicolored confetti effect, with each scion bringing a different color to the plant.
Why Graft Bougainvillea?
There are several reasons why grafting bougainvillea can be a great gardening technique:
- Multicolored Display: You can graft different colored bougainvillea varieties onto one plant, resulting in a single plant with vibrant, multicolored blooms.
- Increased Resistance: Grafting a hardy rootstock onto a more delicate bougainvillea variety can help the plant grow more resilient in various climates.
- Faster Flowering: By grafting bougainvillea, you can often get the plant to bloom sooner than if it were grown from seed or cuttings.
- Aesthetic Appeal: Grafted bougainvilleas create an eye-catching effect, perfect for enhancing gardens, patios, or hanging baskets.
Step-by-Step Guide to Grafting Bougainvillea for a Multicolored Confetti Effect
Ready to graft your own bougainvillea and create a multicolored confetti of blooms? Here’s how to do it:
1. Gather Your Materials
To successfully graft bougainvillea, you will need a few essential tools and materials:
- Rootstock: Choose a healthy bougainvillea plant that is strong and vigorous. This will form the base of your grafting project.
- Scions: Select a few different-colored bougainvillea cuttings (the scions) from plants that you want to graft onto your rootstock. Make sure the scions are healthy and free from disease.
- Sharp Knife or Grafting Tool: A sharp knife will help you make clean cuts without damaging the plant tissues.
- Grafting Tape or Rubber Bands: To hold the scions and rootstock together while they heal.
- Rooting Hormone: Optional, but can help stimulate root growth at the grafting site.
- Sterilizer: Make sure your tools are sanitized to avoid introducing disease to the plants.
2. Prepare the Rootstock
Start by preparing the rootstock (the main plant that will be receiving the grafts). Choose a plant that has a healthy root system and is at least 1-2 years old.
- Make a Clean Cut: Use your sharp knife to cut the top of the rootstock at a slant, exposing the plant tissue where you will attach the scion.
- Shape the Cut: The cut should be smooth and even, as this will ensure a better connection between the rootstock and the scion.
3. Prepare the Scions
Now it’s time to prepare the scions (the stems with buds that will be grafted onto the rootstock):
- Choose Healthy Cuttings: Select young, healthy shoots from bougainvilleas that have vibrant, disease-free leaves and buds. The cuttings should be about 4-6 inches long.
- Cut the Scion: Make a clean, angled cut at the base of the scion, just below a leaf node. This will make it easier to attach the scion to the rootstock.
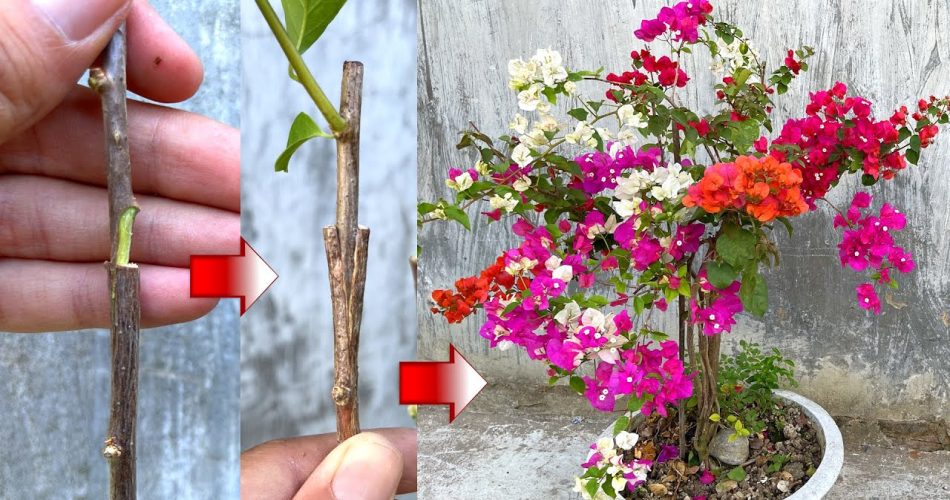
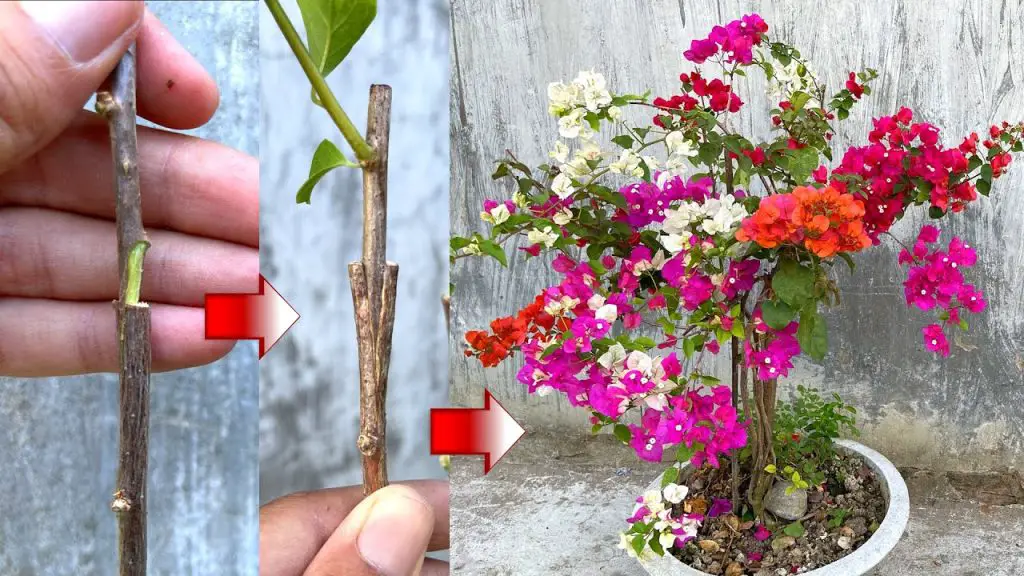
4. Make the Graft
The key to a successful graft is ensuring that the tissues of the scion and rootstock align properly. There are several methods of grafting, but one of the most common is the cleft graft.
- Create a Slit in the Rootstock: Make a vertical slit down the center of the cut surface on the rootstock. The slit should be about 1-2 inches deep.
- Insert the Scion: Take your prepared scion and carefully insert its base into the slit of the rootstock. The cut edges of the scion and rootstock should line up as closely as possible for the best chance of a successful union.
- Secure the Graft: Use grafting tape, rubber bands, or grafting clips to hold the scion in place while it heals. This will prevent the scion from shifting and ensure good contact with the rootstock.
5. Care for the Grafted Bougainvillea
Once the graft is made, you will need to provide proper care to ensure that the scion successfully joins with the rootstock.
- Keep the Graft Humid: If you’re grafting in a dry climate, you may need to cover the graft with a plastic bag to help retain moisture. Ensure that the graft site remains moist but not waterlogged.
- Monitor for Growth: Over the next few weeks, monitor the graft site for signs of healing. Once you see new growth or buds starting to develop on the scion, this indicates that the graft was successful.
- Remove Grafting Tape: Once the graft has healed and new shoots are emerging, carefully remove the grafting tape or rubber bands.
6. Enjoy Your Multicolored Bougainvillea
With a little patience, your grafted bougainvillea will begin to grow, and you’ll soon be able to enjoy a stunning array of multicolored blooms! Depending on the colors of your scions, you could have vibrant pinks, purples, oranges, and even white flowers all on a single bush or vine.
Tips for Grafting Bougainvillea Successfully
- Choose Compatible Varieties: While bougainvilleas are quite adaptable, it’s best to graft varieties that are closely related to ensure the best chance of success.
- Practice Grafting: Grafting can be tricky, so don’t be discouraged if it doesn’t work perfectly the first time. Keep practicing, and soon you’ll have the perfect multicolored bougainvillea.
- Graft in Spring or Summer: Grafting is typically done in the warmer months when the plant’s growth is at its peak.
Conclusion: Grafting Bougainvillea for a Stunning Multicolored Display
Grafting bougainvillea is a fantastic way to create a multicolored confetti effect in your garden. By combining different colors of bougainvillea onto a single plant, you can enjoy an explosion of vibrant blooms throughout the year. With a little care and attention, your grafting project can lead to a beautiful, colorful display that will brighten up any garden or patio.
Now that you know how to graft bougainvillea, why not try it for yourself? The results are sure to be stunning, and your garden will thank you for the extra pop of color! 🌸


