The snake plant (Sansevieria), also known as the mother-in-law’s tongue, is a popular houseplant admired for its toughness and air-purifying qualities. One of the easiest ways to propagate this resilient plant is by using snake plant leaves. Growing new plants from leaves is not only a cost-effective method but also a great way to expand your indoor garden. Here’s a step-by-step guide to successfully growing a snake plant from leaves.
1. Understanding Snake Plant Propagation
A. Why Use Leaves?
- Ease of Propagation: Snake plant leaves are particularly easy to propagate compared to other methods.
- Healthy Growth: Leaf cuttings can grow into strong and vigorous new plants if done correctly.
- No Special Equipment: You don’t need any specialized tools, just a few basic supplies.
B. Choosing the Right Leaves
- Health: Select healthy, mature leaves from the base of the plant. Avoid leaves that are yellowed, damaged, or diseased.
- Size: Choose leaves that are at least 4-6 inches long. Longer leaves have a better chance of developing root systems and growing into robust plants.
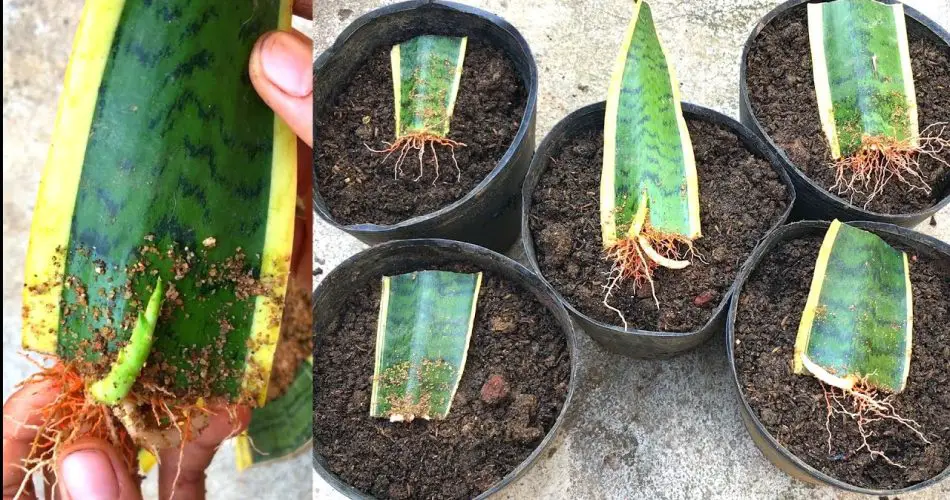
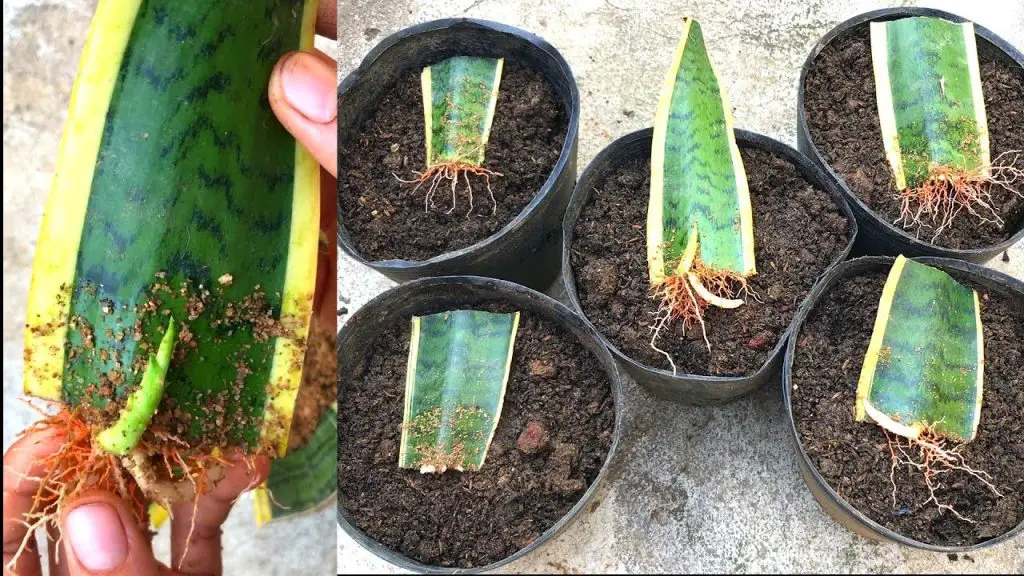
2. Preparing the Leaves for Propagation
A. Cutting the Leaves
- Sharp Tool: Use a clean, sharp knife or scissors to cut the leaves at the base of the plant.
- Angle: Cut the leaves at a slight angle to maximize the surface area for rooting.
B. Drying the Leaves
- Cure: Allow the cut ends of the leaves to dry for 1-2 days. This cures the cut ends and helps prevent rotting when placed in soil.
3. Rooting the Snake Plant Leaves
A. Preparing the Soil
- Soil Type: Use a well-draining potting mix, such as a cactus or succulent mix. You can also mix regular potting soil with sand or perlite.
- Container: Choose a small pot or container with drainage holes to prevent waterlogging.
B. Planting the Leaves
- Insert Leaves: Plant the dried ends of the leaves into the soil, burying them about 1-2 inches deep. Ensure the leaves are oriented the same way they were growing on the original plant (not upside down).
- Watering: Water the soil lightly. Keep it moist but not soggy. Overwatering can lead to root rot.
4. Caring for Rooting Leaves
A. Light and Temperature
- Light: Place the pot in bright, indirect light. Snake plants can tolerate lower light levels, but indirect light encourages faster growth.
- Temperature: Maintain temperatures between 60-75°F (15-24°C). Avoid placing the pot in drafts or cold spots.
B. Watering and Humidity
- Watering: Allow the soil to dry out between waterings. Water sparingly until roots are established.
- Humidity: Snake plants are adaptable to various humidity levels, but ensure good air circulation around the plant.
5. Transplanting and Ongoing Care
A. Checking for Roots
- Roots: After 6-8 weeks, gently pull on the leaves to check for resistance, which indicates root growth. You can also gently remove a leaf to check if it has developed a root system.
- Transplanting: Once roots are well-established, transplant the new plant into a larger pot if needed.
B. Long-Term Care
- Fertilizing: Feed your snake plant with a balanced fertilizer once a month during the growing season (spring and summer). Reduce feeding in the winter.
- Maintenance: Continue to provide bright, indirect light and water as needed. Remove any dead or yellowing leaves to keep the plant healthy.
6. Troubleshooting Common Issues
- Root Rot: Avoid overwatering and ensure proper drainage to prevent root rot.
- Pests: Watch for pests like mealybugs or spider mites. Treat with insecticidal soap or neem oil if needed.
- Leaf Problems: Yellowing or soft leaves can indicate overwatering or poor light conditions.
In Summary
Growing a snake plant from leaves is a straightforward and rewarding process. By selecting healthy leaves, allowing them to dry properly, and providing the right conditions for rooting, you can successfully propagate new snake plants. Follow these steps to expand your collection and enjoy the beauty and benefits of this low-maintenance houseplant. With a bit of care, your new snake plants will thrive and add a touch of green to your home.


