Hydrangea paniculata, known for its stunning pyramid-shaped blooms, is a popular choice for adding vibrant color and texture to gardens. Growing these hydrangeas from branches is a rewarding way to propagate this beautiful plant. Here’s a comprehensive guide on how to successfully grow hydrangeas with branches and enjoy lush, flowering shrubs in your garden.
Why Grow Hydrangea Paniculata from Branches?
Growing hydrangeas from branches offers several benefits:
- Cost-Effective Propagation: Using branches or cuttings is a more affordable way to expand your hydrangea collection.
- Consistency: Propagating from branches ensures that the new plants will have the same characteristics as the parent plant.
- Ease of Care: Hydrangea paniculata is known for its adaptability and ease of care, making it a great choice for propagation.
Materials Needed
- Hydrangea Paniculata Branches: Healthy, 4-6 inch long cuttings from a mature hydrangea plant.
- Potting Mix: A well-draining mix suitable for rooting cuttings.
- Pots or Containers: For planting the cuttings.
- Sharp Knife or Pruning Shears: For taking and preparing the cuttings.
- Rooting Hormone: Optional, but can enhance root development.
- Water: For keeping the cuttings hydrated.
- Plastic Bag or Humidity Dome: To maintain high humidity around the cuttings.
Steps to Grow Hydrangeas from Branches
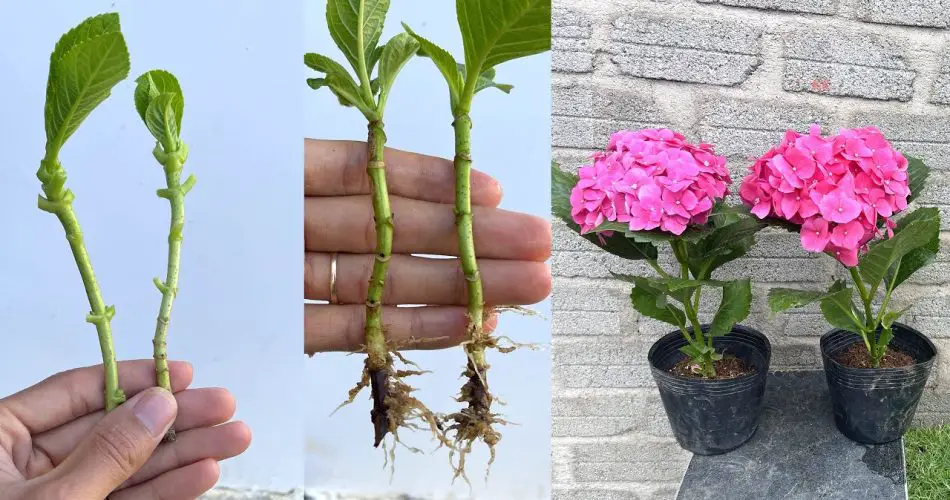
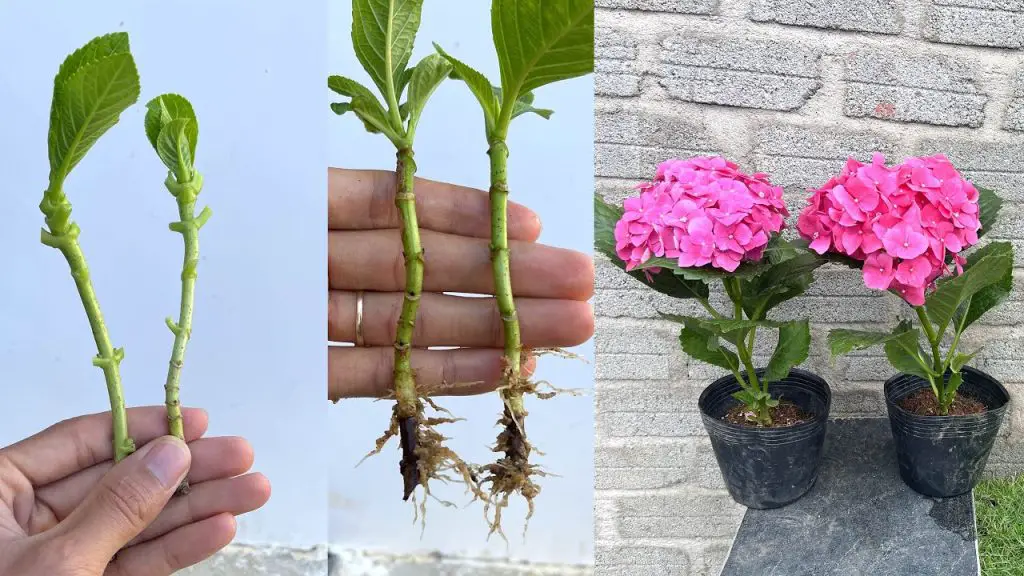
- Select and Prepare the Branches:
- Choose healthy, non-flowering branches from the Hydrangea paniculata plant. Each cutting should be 4-6 inches long and have at least a couple of sets of leaves.
- Using sharp, clean scissors or a knife, make a clean cut just below a leaf node. Remove any lower leaves from the cutting, leaving only a few leaves at the top.
- Apply Rooting Hormone (Optional):
- Dip the cut end of each branch in a rooting hormone powder. This step can promote faster and more successful root development but is optional.
- Prepare the Potting Mix:
- Fill pots or containers with a well-draining potting mix. You can use a mix of peat moss, perlite, and sand to ensure good drainage and aeration.
- Plant the Cuttings:
- Make small holes in the potting mix and place each cutting in the holes, ensuring that the cut end is buried in the soil. Gently firm the soil around the base of each cutting to secure it in place.
- Maintain Humidity:
- Cover the pots with a plastic bag or humidity dome to create a humid environment that helps the cuttings retain moisture. Ensure the cover does not touch the cuttings.
- Provide Proper Care:
- Place the pots in a location with indirect sunlight. Keep the potting mix consistently moist but not waterlogged. Remove the cover periodically to allow for air circulation and prevent mold.
- Monitor and Transplant:
- After a few weeks, check for root development by gently tugging on the cuttings. Once the cuttings have developed a healthy root system, they can be transplanted into larger pots or directly into the garden.
Benefits of Growing Hydrangeas from Branches
- Variety: Propagating from branches allows you to reproduce your favorite hydrangea varieties and create a cohesive garden design.
- Increased Blooms: Hydrangea paniculata is known for its prolific flowering, and growing new plants ensures you can enjoy these beautiful blooms in multiple areas of your garden.
- Personal Satisfaction: Successfully propagating hydrangeas from branches can be a gratifying gardening achievement.
Additional Tips
- Timing: The best time to take cuttings is during the plant’s active growing season, typically in late spring or early summer.
- Avoid Overwatering: Ensure the cuttings are not sitting in soggy soil, which can lead to root rot.
Growing hydrangeas from branches is a fulfilling and straightforward way to expand your garden with stunning Hydrangea paniculata. By following these steps, you can successfully propagate and cultivate new hydrangea plants, enhancing the beauty of your outdoor space with these elegant, flowering shrubs.
Copy
Show Comments


