
The snake plant (Sansevieria), also known as mother-in-law’s tongue, is a popular houseplant admired for its toughness, low-maintenance nature, and striking, architectural leaves. One of the best parts about snake plants is that they are incredibly easy to propagate from leaves, making them a great choice for gardeners who want to expand their plant collection without spending a lot of money. In this article, we’ll show you how to grow snake plant from leaves and enjoy healthy, vibrant plants in no time!
Why Propagate Snake Plant from Leaves?
Growing a snake plant from leaves is an affordable and rewarding way to expand your collection. Here are a few reasons why you might want to try propagating snake plants from leaves:
- Simple and Easy: Propagating from leaves is one of the easiest ways to grow a new plant. Snake plants are resilient and can thrive even with minimal attention.
- Cost-Effective: If you already own a snake plant, you can create new plants for free by using a single leaf cutting.
- Aesthetic Appeal: Snake plants are known for their vertical, sword-like leaves, which add a striking and elegant touch to any room or garden.
Step 1: Select a Healthy Snake Plant Leaf
The first step in growing a snake plant from leaves is choosing a healthy leaf to propagate. A strong, mature leaf will give you the best chances of success. Follow these tips when selecting a leaf:
- Choose a Healthy Leaf: Select a leaf that is firm, free from pests, and showing no signs of disease, yellowing, or rotting.
- Size Matters: Choose a longer, mature leaf for propagation. A leaf that is around 4-6 inches long is ideal. The bigger the leaf, the more chances of successful propagation you’ll have.
Step 2: Cut the Leaf for Propagation
Once you’ve chosen your leaf, it’s time to cut it. Use a sharp, clean pair of scissors or a sterilized knife to avoid introducing any bacteria or diseases.
- Cut the Leaf Cleanly: Cut the leaf as close to the base of the plant as possible, making sure to cut it straight across. This will ensure that the leaf has a clean base for the roots to develop.
- Cut the Leaf Into Sections: If you prefer, you can cut the long leaf into smaller sections (around 3-4 inches each). Make sure to label the top and bottom of each cutting so they are planted the right way up later. This is important because snake plant leaves have a distinct top and bottom, and they need to be placed in the right orientation for proper rooting.
Step 3: Let the Leaf Callous
After cutting the leaf, it’s essential to let the cut end callous over to reduce the risk of rot. This step is crucial for the successful rooting of the plant.
- Allow the Cut to Dry: Place the leaf cuttings in a dry, shaded area for 1-3 days. During this time, the cut end will form a protective layer, which helps to prevent moisture from entering and causing rot.
- Do Not Skip This Step: If you don’t allow the cut end to callous, the leaf may rot in the soil or water before it has a chance to root.
Step 4: Propagate Snake Plant in Water or Soil
Once your leaf cuttings have dried and the cut ends have formed a callous, it’s time to decide whether to propagate the snake plant in water or soil. Both methods are effective, and you can choose based on your preference.
Option 1: Water Propagation
Water propagation is a popular method because it allows you to see the roots as they develop, which can be a fun and rewarding process.
- Prepare the Water Container: Place your leaf cutting in a glass jar or vase filled with room temperature water. Make sure that the cut end of the leaf is submerged in the water, but avoid letting the leaves touch the water to prevent rot.
- Change the Water Regularly: To keep the water fresh and free from bacteria, change it every 2-3 days. You should start to see roots developing after about 2-3 weeks.
- Transplant When Roots Appear: Once your cutting has developed 2-3 inches of roots, it’s ready to be planted in soil.
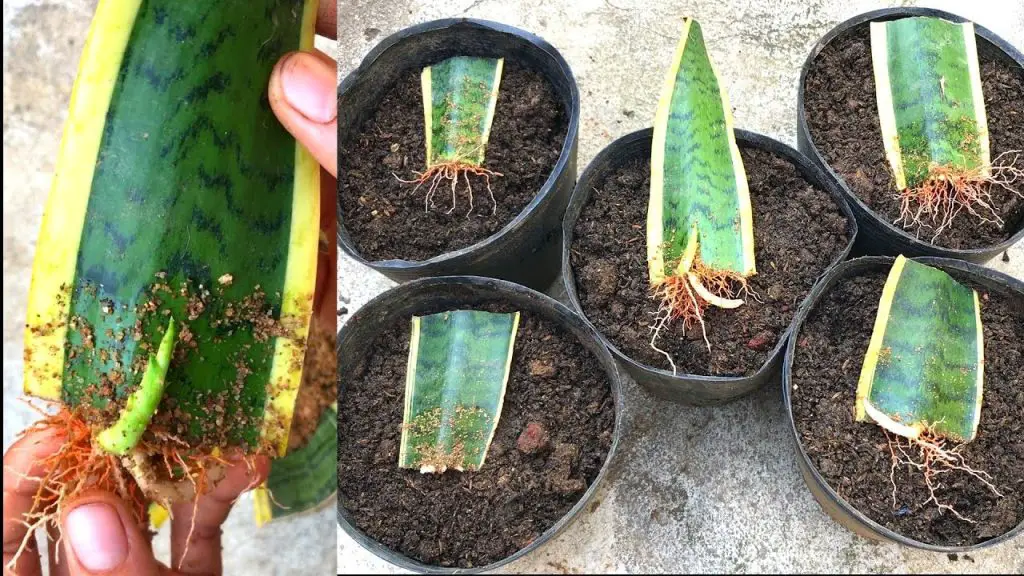
Option 2: Soil Propagation
Soil propagation is a more traditional method and might be better if you want your cutting to grow in a more natural environment.
- Prepare the Pot: Choose a small pot with good drainage and fill it with a well-draining soil mix. A mixture of cactus soil, perlite, and sand is ideal for snake plants.
- Plant the Cutting: Place the calloused end of the leaf cutting into the soil, burying it about 2-3 inches deep. Ensure that the cutting is upright and stable.
- Water Lightly: Water the soil lightly after planting, ensuring it is moist but not soggy. Keep the soil just damp enough to encourage rooting.
- Place in Indirect Light: Set the pot in a warm, bright spot with indirect light. Avoid direct sunlight, as it can scorch the cutting and hinder root development.
Step 5: Care for Your Snake Plant Cutting
Once your leaf cutting is in water or soil, it’s important to continue providing the proper care:
- Light: Keep the cutting in a bright, indirect light spot. Avoid direct sunlight, which can cause the leaf to dry out or burn.
- Temperature: Snake plants prefer warm temperatures between 60-85°F (15-29°C). Avoid placing the cutting in cold areas or near drafts.
- Watering: If propagating in water, make sure the water level is consistently maintained. If propagating in soil, allow the soil to dry out completely between waterings. Overwatering can cause the cutting to rot.
- Humidity: While snake plants are relatively tolerant of dry air, they will appreciate a bit of humidity. Consider placing a humidity tray under the pot or lightly misting the cutting if you live in a particularly dry climate.
Step 6: Transplanting Your New Snake Plant
After about 4-6 weeks, your snake plant cutting should have developed a healthy root system and may begin to show new growth at the top.
- Potting Up: Once the roots are well-established, transplant your snake plant into a larger pot with well-draining soil. Choose a pot that is just slightly larger than the root ball to give the plant room to grow but prevent the roots from becoming waterlogged.
- Care for Your New Plant: Continue to care for your new snake plant by providing bright, indirect light, watering only when the soil has dried out, and keeping it in a warm environment.
Common Issues When Growing Snake Plants from Leaves
While propagating snake plants from leaves is generally straightforward, there are a few things to keep in mind:
- Rotting: If the cutting is left in water or soil that is too wet for too long, it may rot. Be sure to allow the cutting to callous and keep the soil or water clean and not overly saturated.
- No Root Growth: If no roots develop after several weeks, the cutting might not have been healthy enough to propagate. You can try taking another cutting from the original plant and repeating the process.
- Slow Growth: Snake plant cuttings can sometimes be slow to root and sprout. Be patient, as they can take several months to fully establish.
Conclusion
Growing a snake plant from leaves is a fun and easy way to propagate these hardy, low-maintenance plants. By following these simple steps and taking care of your cuttings, you can create new snake plants that will thrive and beautify your home. Whether you choose to propagate in water or soil, snake plants are incredibly forgiving and make a great addition to any indoor garden. Happy planting!


