Philodendron, a stunning and popular houseplant, is renowned for its lush green foliage and ability to thrive in various environments. The Betel Nut (also known as Areca Nut) variety of Philodendron has distinctive leaves that can be propagated effectively through cutting techniques. One interesting method that often surprises people is propagating Philodendron from sawed leaves. This simple technique offers an easy way to expand your plant collection and enjoy a beautiful indoor garden.
In this article, we’ll explore how to propagate Philodendron using sawed leaves, a method that not many people know but proves to be effective and reliable.
Why Propagate Philodendron from Sawed Leaves?

Using sawed leaves for propagation may seem unusual, but it can actually be quite successful when done right. Some of the benefits of this propagation method include:
🌱 Faster Root Development – Sawing the leaves in the right way encourages rooting faster by providing more surface area for the plant to develop roots.
🌿 Less Stress on the Plant – This technique causes minimal damage to the plant and allows it to focus on growing new roots and leaves.
🌞 Healthy New Growth – This method produces stronger and healthier plants, resulting in more vigorous growth.
Materials Needed:
✔️ Philodendron plant (with healthy leaves)
✔️ Sharp knife or pruning scissors
✔️ Container with water (for rooting)
✔️ Small pots with well-draining soil (for transplanting)
✔️ Rooting hormone (optional, but can help in promoting faster root development)
✔️ Plastic cover or humidity dome (optional)
Step-by-Step Guide for Propagating Philodendron with Sawed Leaves
Step 1: Select the Right Plant
- Choose a healthy and mature Philodendron plant that has strong leaves. Make sure the plant is free of diseases or pests to ensure successful propagation.
Step 2: Prepare the Sawed Leaves
- Cut the leaves of the Philodendron using sharp scissors or a knife.
- Instead of cutting the leaf off at the base, saw the leaf in half horizontally or diagonally. You’ll want to ensure the cut is clean, as jagged cuts can impede the rooting process.
- Cutting the leaves in this way increases the surface area, allowing more roots to grow from the leaf segments.
Step 3: Apply Rooting Hormone (Optional)
- Dip the cut ends of the sawed leaves into a rooting hormone powder (optional) to encourage faster rooting. This step can enhance the chances of successful propagation, though some people prefer to skip this step and rely on natural rooting.
Step 4: Place the Sawed Leaves in Water
- Fill a container with clean water and place the sawed leaf segments in the water. Make sure the cut ends are submerged in the water, but the rest of the leaf remains above the surface.
- Place the container in a bright, indirect light location, but avoid direct sunlight, as it can scorch the leaves and stunt root growth.
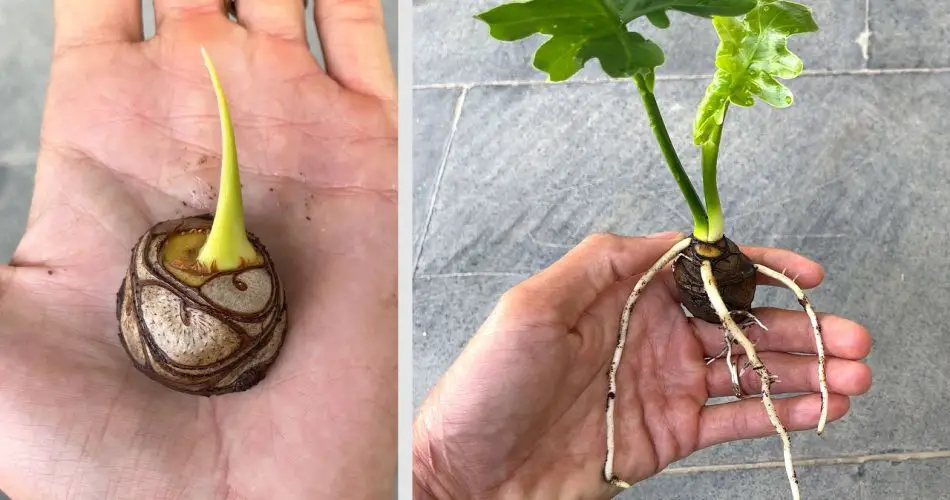
Step 5: Wait for Roots to Develop
- After about 2-4 weeks, you should begin to see roots forming at the cut ends of the sawed leaves. Keep the water level consistent and change it regularly to prevent stagnation and the growth of harmful bacteria.
Step 6: Transplant the Rooted Leaves
- Once the roots are around 1-2 inches long, carefully remove the leaf segments from the water and transplant them into small pots with well-draining soil.
- Gently place the rooted leaf into the soil and lightly press the soil around it to ensure good contact with the roots.
- Water the newly planted leaves lightly, making sure not to overwater, as too much moisture can cause the roots to rot.
Step 7: Provide Proper Care
- Place the newly propagated plant in a humid environment or cover it with a plastic dome to retain moisture, which will help the leaf establish new roots and grow faster.
- Continue to provide the plant with bright, indirect sunlight and avoid direct heat sources that can dry out the soil too quickly.
- Water the plant when the soil feels dry, but make sure the pot has good drainage to prevent waterlogging.
Caring for Your Newly Propagated Philodendron
Once your Philodendron cutting has established roots and begins growing leaves, continue to care for it by:
🌿 Providing optimal sunlight – Philodendron plants thrive in bright, indirect light, so place them in a location with plenty of light but out of direct sun.
🌱 Watering appropriately – Allow the soil to dry out slightly between waterings. Philodendrons do not like to sit in water, so ensure the pot has good drainage.
🌞 Fertilizing lightly – During the growing season, use a balanced fertilizer to promote healthy growth and leaf development. Avoid over-fertilizing, as this can harm the plant.
Conclusion
Propagating Philodendron using sawed leaves is a creative and simple technique that can yield impressive results. By following these steps and using the right care methods, you’ll be able to successfully grow new Philodendron plants from your existing one and enjoy their lush, green foliage for years to come. Not only will you have more beautiful plants, but you’ll also gain a deeper understanding of plant propagation and its possibilities.
Happy gardening! 🌱🌿


