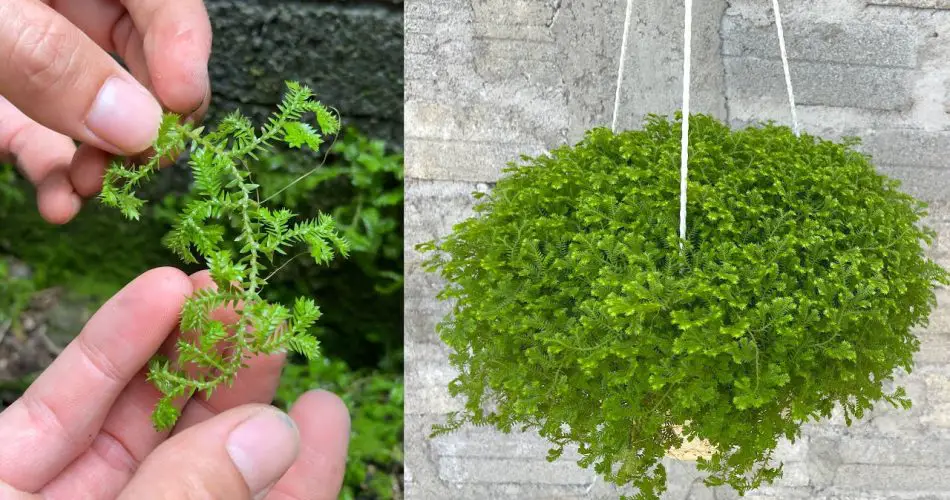
If you’ve ever admired the lush green beauty of moss creeping along a garden fence or wall, you may have wondered if you could grow it as a decorative feature indoors or in a container garden. One type of moss, coral moss (also known as Hypnum or Fern moss), is particularly prized for its delicate, feathery texture and vibrant green color, making it an ideal choice for creating a living moss tree or ornamental arrangement. The best part is that you can easily transplant coral moss from your fence and bring it into a pot to craft a beautiful, low-maintenance, nature-inspired centerpiece. Here’s how you can do it!

Step 1: Gather the Right Materials
Before you begin, gather all the necessary tools and materials to ensure the successful transplant of your coral moss. These include:
- Gardening gloves (to protect your hands)
- A sharp knife or garden shears (to carefully cut the moss)
- Small potted containers (for transplanting the moss)
- Sphagnum moss or peat moss (for potting mix, ensuring good moisture retention)
- A watering can (for gentle irrigation)
- A small decorative stick or wire (if you’re planning to create a moss tree shape)
Step 2: Identify the Best Coral Moss on the Fence
Start by selecting the coral moss growing on your fence. Coral moss is typically found in shady, damp areas, often thriving in humid conditions. You’ll want to find a section of moss that is healthy and vibrant, with no signs of dryness or rot. The moss should feel soft and plush to the touch.
- Look for moss that is growing densely, as this will give you a better chance of creating a full, lush display in your pot.
- Use a knife or shears to gently lift the moss off the fence, being careful not to tear it. If the moss is firmly attached, a bit of moisture on the fence or a gentle tug should loosen it up. Avoid pulling too aggressively as you don’t want to damage the delicate roots or structures of the moss.
Step 3: Prepare the Pot for Planting
Next, choose a small, shallow pot with drainage holes. Coral moss thrives in moist environments, so good drainage is essential to prevent the moss from sitting in stagnant water, which can lead to rot.
- Fill the pot with a moist, well-draining mix of peat moss and sphagnum moss, or you can also use a moss-specific soil mix that retains moisture while preventing it from becoming waterlogged.
- Lightly tamp the mix down to create a level surface, ensuring that the pot is not too tightly packed, as the moss will need some air circulation around its roots.
Step 4: Transplant the Coral Moss into the Pot
Gently place the coral moss into the pot. You can either spread it out across the surface of the soil or layer it in a more mound-like fashion, depending on the look you want to achieve. If you’re crafting a moss tree, you can use a small decorative stick or wire in the center of the pot as a support structure.
- Mound the moss around the stick to form a tree shape, layering the moss from bottom to top.
- Press the edges of the moss down gently to ensure it makes good contact with the soil below.
Step 5: Water and Maintain Moisture
Coral moss thrives in high humidity, so it’s crucial to keep the soil and the air around the moss consistently moist. Water the moss gently with a watering can, ensuring the moss does not dry out. If you are creating a moss tree or decorative arrangement, lightly mist the surface of the moss every day with a spray bottle to maintain moisture levels.
- Avoid soaking the moss directly, as too much water can cause the moss to rot. The goal is to keep the moss evenly moist, not wet.
Step 6: Provide Proper Light Conditions
Coral moss does best in indirect light. It prefers low to moderate light, so placing your moss tree or pot in a bright, shaded area or near a window with filtered sunlight will encourage healthy growth.
- Direct sunlight can scorch the moss, so it’s important to avoid placing it in full sun. If you’re growing the moss indoors, consider placing the pot in a well-lit bathroom or near a north-facing window where the light is softer.
Step 7: Care for Your Moss Tree or Ornamental Arrangement
Once transplanted, your moss will require minimal care. However, it’s important to monitor the following:
- Humidity: As moss is a moisture-loving plant, you may need to mist it regularly or place a humidifier nearby, especially during dry winter months.
- Watering: Keep an eye on the moisture levels. If the moss begins to feel dry or brittle, gently water it again to restore its lush texture.
- Cleaning: Occasionally, remove any debris that might collect on the moss surface, such as dust or fallen leaves, to maintain its clean, vibrant appearance.
Why Plant Coral Moss as an Ornamental Moss Tree?
Planting coral moss as a living ornamental moss tree offers a unique way to introduce natural greenery into your home or garden. Moss adds a textural depth and visual interest that can complement other plants or stand alone as a stunning focal point. Here are a few reasons to give it a try:
- Low Maintenance: Moss requires little attention beyond keeping it moist and in indirect light.
- Aesthetic Appeal: The soft, delicate fronds of moss can create a serene, tranquil atmosphere, perfect for Zen gardens, indoor plant displays, or fairy garden themes.
- Eco-Friendly: Mosses are eco-friendly and can help create a sustainable environment, as they require very little in terms of fertilizers or pesticides.
Conclusion
Planting coral moss from your fence into a pot to create a moss tree or ornamental arrangement is a creative and rewarding gardening project. By following the steps outlined above, you can bring a bit of nature’s quiet beauty into your home or garden. Whether you’re growing a living moss tree, creating a unique terrarium, or simply adding moss to your collection of indoor plants, the soft, ethereal look of moss will enhance any space and provide a sense of calm and tranquility. Happy planting!


