Planting roses with branches is a surprisingly easy and cost-effective way to expand your rose garden. By using cuttings from healthy rose branches, you can propagate new plants that will grow into vibrant, flowering bushes. Here’s a step-by-step guide to help you get started.
Why Plant Roses with Branches?
Using branches to grow roses allows you to create new plants from the best qualities of an existing rose bush. This method is known as propagation, and it’s a fantastic way to preserve your favorite rose varieties without buying new plants. It’s also a fun and rewarding gardening project!
What You’ll Need
- Healthy rose branches (6-8 inches long)
- Sharp pruning shears or scissors
- A small container with well-draining soil
- Rooting hormone (optional but helps encourage root growth)
- A clear plastic bag or a plastic container for humidity
Step-by-Step Guide to Planting Roses with Branches
- Select the Right Rose Branches
- Choose a healthy rose branch with no signs of disease or damage. It should be about 6-8 inches long, with at least 3-4 sets of leaves.
- Cut the branch just below a leaf node, which is the point where a leaf meets the stem.
- Prepare the Cutting
- Remove the lower leaves of the cutting, leaving just the top 2-3 sets of leaves.
- If you have rooting hormone, dip the cut end of the branch into it. Rooting hormone promotes faster root growth, though it is not strictly necessary.
- Plant the Cutting
- Fill a small container with well-draining soil. A mixture of potting soil and sand works well.
- Make a hole in the soil and gently insert the cutting, burying the bottom 2-3 inches. Press the soil around the cutting to secure it in place.
- Create a Humid Environment
- To encourage root growth, cover the cutting with a clear plastic bag or place it in a plastic container. This helps to maintain high humidity around the cutting, which is essential for root development.
- Ensure the plastic is not touching the leaves, as this could cause rot.
- Provide the Right Care
- Place the container in a location with indirect sunlight. Direct sunlight can dry out the cutting too quickly.
- Keep the soil moist but not soggy. Mist the cutting occasionally to maintain humidity, but avoid overwatering.
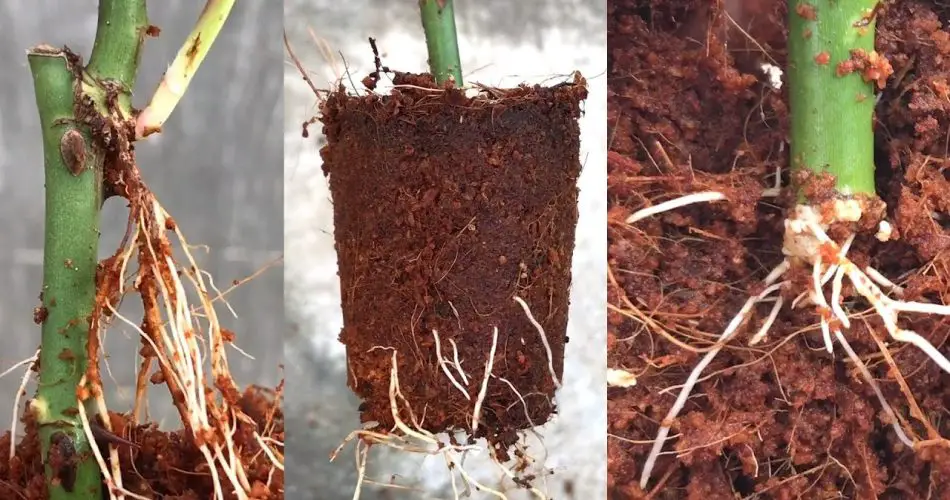
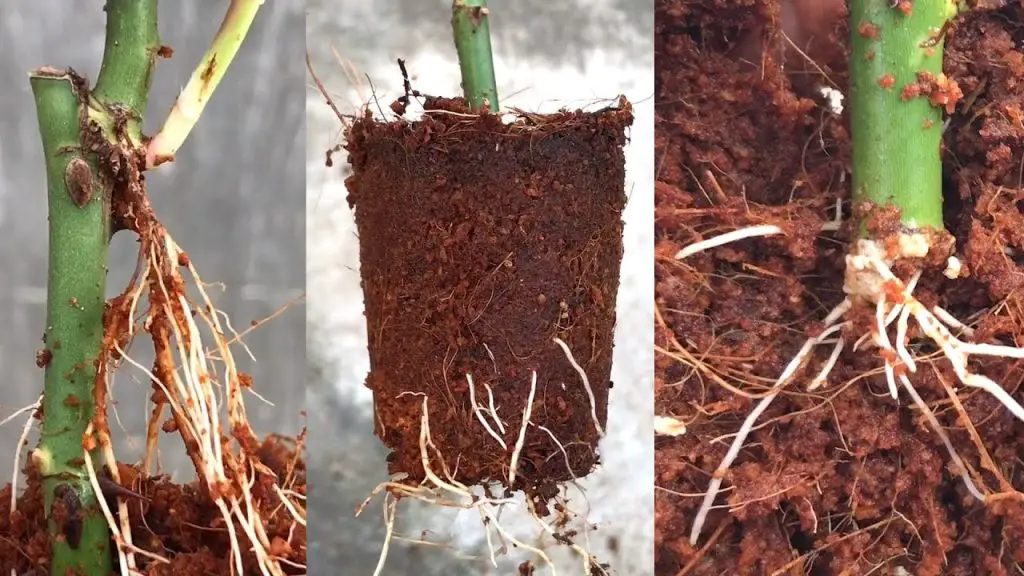
- After about 4-6 weeks, check for roots by gently tugging on the cutting. Once you feel resistance, the roots have developed.
The Results
With the right care, your rose cuttings will begin to root and grow. Over time, you’ll see new shoots forming, signaling the beginning of a healthy rose bush. Once the roots are strong enough, you can transplant the new rose into a larger pot or directly into your garden.
Why It Works
This method works because the rose cutting can develop roots on its own when placed in the right environment. By removing the lower leaves and planting the cutting in soil, it encourages the cutting to focus on root development. The high humidity helps prevent the cutting from drying out and promotes faster root growth.


