Rose gardening is a rewarding and satisfying hobby, especially when you see your favorite roses bloom year after year. If you have a rose bush that you love and want to propagate it to expand your garden or share it with friends, propagating roses by extracting branches is an easy and effective method. This process, known as stem cutting, allows you to grow new rose plants from the existing branches of a mature rose bush, without needing to buy new plants.

In this article, we will guide you through the steps to successfully propagate roses by extracting branches, ensuring you can grow new roses for your home garden effortlessly.
Why Propagate Roses by Extracting Branches?
Stem propagation from existing roses offers several benefits:
- Cost-Effective: You don’t need to purchase new plants when you can propagate your own roses.
- Preserve the Variety: This method ensures that the new plants will be identical to the parent plant, preserving the same color and flowering characteristics.
- Sustainability: Propagating roses helps you create new plants from existing ones, reducing the need to buy new ones and promoting self-sufficiency in your garden.
The Best Time to Propagate Roses
For best results, the ideal time to propagate roses from branches is during the early summer or late spring when the plant is actively growing but not yet in full bloom. This time frame ensures that the branches are healthy and flexible for cutting.
How to Propagate Roses by Extracting Branches
Here’s a step-by-step guide to help you propagate roses easily using cuttings from branches:
Step 1: Choose the Right Rose Branch
When selecting a branch to propagate, look for a healthy, mature stem that is not too old but also not too young. The ideal cutting should be a 6-8 inch long branch that is firm and free from disease or damage. The stem should have at least two nodes (the small bumps on the stem from which leaves and roots emerge).
Step 2: Cut the Branch
Using a clean, sharp pair of garden scissors or a pruning shears, make a clean cut at a 45-degree angle just below a node. This angle increases the surface area for rooting and reduces the chance of rotting. Remove any leaves or buds from the bottom 2-3 inches of the cutting, leaving the top leaves intact.
Step 3: Prepare the Cutting
After removing excess foliage, dip the cut end of the rose branch into rooting hormone. Rooting hormone encourages the growth of roots and increases the chances of successful propagation. While this step isn’t strictly necessary, it does significantly improve your chances of success, especially with more challenging rose varieties.
Step 4: Plant the Cutting in Soil
Next, prepare a pot or container with well-draining soil. You can use a mix of perlite and potting soil to ensure good drainage, which is essential for healthy root development. Insert the cut end of the stem about 2-3 inches deep into the soil, ensuring that at least one node is buried underground.
Step 5: Create a Humid Environment
After planting the cutting, create a humid environment to encourage root development. You can place a plastic bag or a clear plastic container over the cutting to retain moisture and heat, mimicking a greenhouse. Be sure to leave a small gap for airflow to prevent mold from developing.
Step 6: Water and Care for the Cutting
Place the pot in a bright, indirect sunlight location, but avoid direct sun exposure, as it can dry out the cutting. Water the cutting lightly to keep the soil moist but not soggy. Keep the cutting in this environment for several weeks. During this time, it’s important to check the soil regularly for moisture and ensure that the cutting does not get too dry.
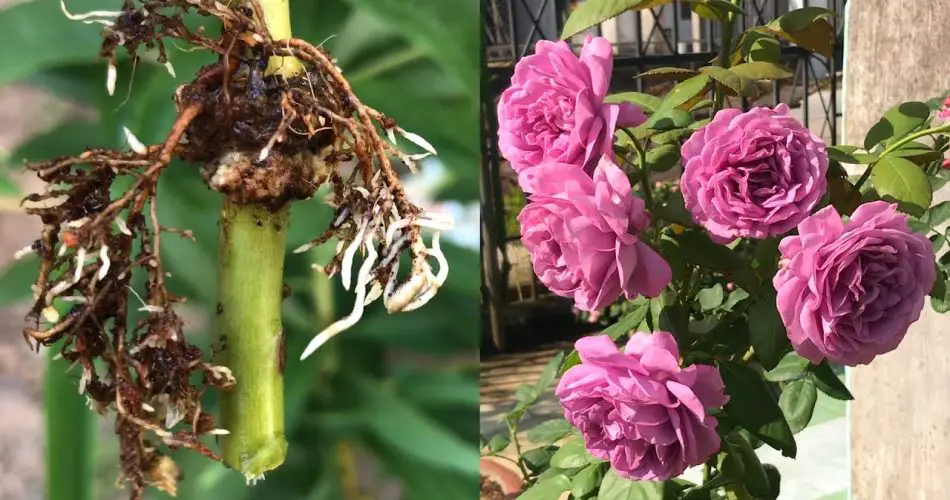
Step 7: Check for Root Development
After about 4-6 weeks, you can check for root development by gently pulling on the cutting. If you feel resistance, this is a sign that the roots are beginning to form. At this point, you can remove the plastic cover and let the cutting acclimatize to normal conditions.
Step 8: Transplant to a Larger Pot
Once the new rose plant has developed enough roots, you can transplant it into a larger pot or directly into the garden. If you choose to transplant it into the garden, make sure the soil is well-draining and that the plant is receiving sufficient sunlight.
Additional Tips for Successful Rose Propagation
- Watering: Keep the soil evenly moist but not waterlogged. Over-watering can lead to root rot, which can hinder the propagation process.
- Temperature: Ensure that the cutting is kept in a warm area. The ideal temperature for rose propagation is around 70°F (21°C).
- Patience: Rose propagation takes time. Don’t rush the process—give the cutting several weeks to root before transplanting.
Conclusion
Propagating roses by extracting branches is an easy, cost-effective, and rewarding way to expand your rose collection without needing to buy new plants. By following these simple steps, you can grow beautiful new rose bushes in your home garden and enjoy their vibrant flowers for years to come.
Whether you’re a seasoned gardener or just starting out, propagating roses using this method is a fun and educational way to enhance your garden. So, the next time you see a healthy rose bush, consider giving it a new life by taking a cutting and watching it bloom once again!


