Croton plants, known for their vibrant, colorful foliage, are a popular choice for gardens and indoor spaces. These plants come in a variety of shapes, sizes, and colors, with their striking yellow, red, green, and orange leaves adding a touch of tropical beauty. While crotons are often propagated through stem cuttings, they can also be successfully propagated using leaves. In this article, we’ll walk you through the process of propagating the garden croton plant with leaves, ensuring that you can grow healthy new plants for your garden or home.

1. Why Propagate Croton with Leaves?
Most gardeners are familiar with propagating plants through stem cuttings, but propagating a croton with leaves is an alternative method worth trying. This process offers a few benefits:
- Cost-effective: You can propagate new croton plants using existing leaves, saving you the cost of buying new plants.
- Simple process: Leaf propagation is an easy and straightforward method for beginners.
- Healthy growth: If done correctly, leaf propagation encourages strong, vibrant growth.
By following the right steps, you can grow new croton plants from the leaves of your existing plant.
2. Materials Needed for Propagating Croton with Leaves
Before you start, gather the following materials:
- Healthy croton plant: Choose a plant with vibrant leaves, free of disease or pests.
- Sharp knife or scissors: You will need a clean cutting tool to remove the leaves.
- Small containers or pots: These will hold the leaves as they root and begin to grow.
- Well-draining potting mix: Crotons need well-draining soil for healthy root development.
- Rooting hormone (optional): While not necessary, rooting hormone can help speed up the rooting process.
- Plastic bag or clear plastic dome: This will help create a humid environment for your new plant.
3. Step-by-Step Guide to Propagate Croton with Leaves
Step 1: Choose a Healthy Leaf
- Select a healthy, mature leaf from your croton plant. The leaf should be free from spots, diseases, or damage. Look for a leaf with vibrant color and no signs of rot or stress.
Step 2: Cut the Leaf
- Using a sharp knife or scissors, carefully cut the leaf from the plant’s stem. Be sure to leave a small portion of the stem attached to the leaf. This stem portion is important for the rooting process.
- Some gardeners prefer to cut the leaf into smaller sections, but the whole leaf can also be propagated successfully.
Step 3: Apply Rooting Hormone (Optional)
- Rooting hormone can help stimulate root growth and increase the chances of successful propagation. Lightly dip the cut end of the leaf’s stem into rooting hormone.
- This step is optional, but it can speed up the process and improve the chances of rooting.
Step 4: Prepare the Potting Mix
- Fill a small pot or container with well-draining potting mix. A mix designed for tropical plants or succulents will work well.
- Make sure the pot has drainage holes to allow excess water to escape. This prevents waterlogging and promotes healthy root development.
Step 5: Insert the Leaf into the Soil
- Insert the cut end of the leaf (the stem portion) into the soil about 1-2 inches deep. Press the soil gently around the leaf to ensure it stays in place.
- Make sure the leaf is positioned upright and is not buried too deeply.
Step 6: Create a Humid Environment
- Cover the leaf cutting with a plastic bag or clear plastic dome to create a humid environment. This helps retain moisture and encourages root growth.
- Ensure that the plastic does not touch the leaf directly, as this can cause rot. You can use small sticks or stakes to keep the plastic off the leaf.
Step 7: Place the Pot in a Bright Location
- Place the pot in a bright, indirect sunlight location. Crotons require lots of light to grow, but direct sunlight can scorch the leaves. The light will help stimulate the rooting process and encourage healthy growth.
- Avoid placing the cutting in a spot with direct sunlight or drafts, as these conditions can stress the cutting.
Step 8: Water and Care for the Leaf Cutting
- Water the cutting lightly to keep the soil moist, but not soggy. Too much water can cause rot, while too little can prevent the leaf from rooting.
- Check the cutting every few days for signs of growth or root development. Keep the soil moist and ensure the cutting remains in the humid environment until roots start to form.
4. How Long Does it Take for the Leaf to Root?
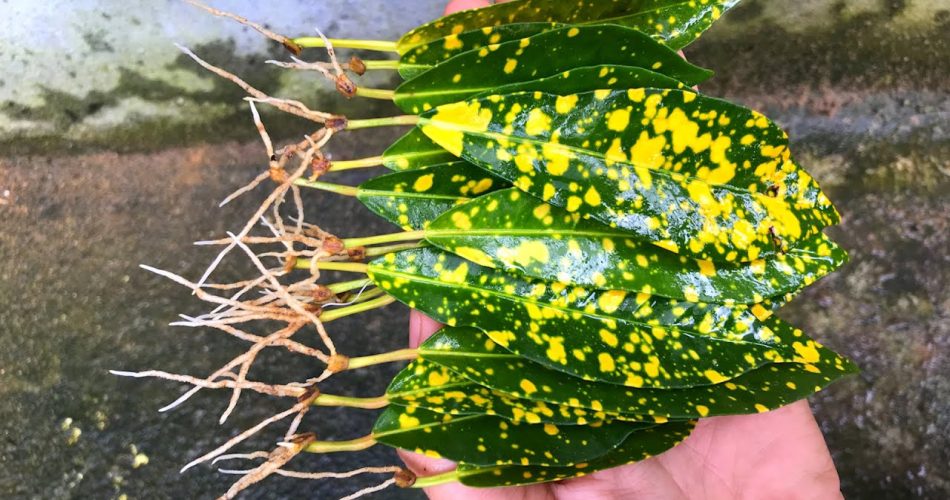
- It can take anywhere from 3 to 6 weeks for the croton leaf cutting to root, depending on the environment and conditions.
- During this time, you may notice small roots forming around the base of the stem. Once the roots are about 1-2 inches long, the cutting is ready to be transplanted into a new pot or garden.
5. Transplanting the Rooted Cutting
Once your croton cutting has established roots, it’s time to transplant it into a larger pot or directly into your garden.
Step 1: Prepare a New Pot
- Choose a pot that is slightly larger than the cutting’s root ball. The new pot should have drainage holes to prevent water from accumulating at the bottom.
- Fill the pot with well-draining potting mix, suitable for tropical plants.
Step 2: Transplant the Rooted Leaf
- Carefully remove the rooted cutting from the original container. Handle it gently to avoid damaging the delicate roots.
- Place the cutting into the new pot, ensuring the roots are well-covered with soil. Press the soil gently around the base of the cutting to secure it.
Step 3: Water and Care
- Water the new plant thoroughly to settle the soil around the roots.
- Place the pot in a bright, indirect light location to encourage healthy growth.
- Fertilize lightly with a balanced fertilizer every few weeks to promote growth and new foliage.
6. Tips for Successful Croton Leaf Propagation
- Humidity is key: Keeping the cutting in a humid environment is essential for successful rooting. If the air in your home is dry, consider using a humidifier or misting the leaves regularly.
- Don’t overwater: Watering too much can lead to root rot. Allow the soil to dry out slightly between waterings.
- Be patient: Leaf propagation can take time, and not every cutting will successfully root. Stay patient, and keep an eye on the cutting’s progress.
7. Conclusion
Propagating the garden croton plant with leaves is an easy and rewarding process that allows you to grow new plants from your existing croton. By following the right steps and providing the proper care, you can successfully create new, healthy croton plants that will add even more beauty to your garden or home. Whether you’re propagating a croton for personal use or to share with others, this method is a great way to expand your collection of these vibrantly colored plants.


