
Are you looking to expand your garden with beautiful roses? Propagating rose branches in sand is a simple and effective method that can lead to strong root development. This technique is perfect for both novice and experienced gardeners. Here’s a step-by-step guide on how to successfully propagate roses using sand and ensure your plants thrive!
Why Propagate Roses in Sand?
Using sand for propagation offers several advantages:
- Excellent Drainage: Sand provides excellent drainage, preventing root rot and allowing for better air circulation around the roots.
- Ideal Texture: The coarse texture of sand promotes healthy root growth, giving young plants a strong foundation.
- Easy to Control Moisture: Sand retains moisture without becoming waterlogged, making it easier to maintain the right level of humidity for rooting.
Materials Needed
To start propagating rose branches in sand, gather the following materials:
- Healthy rose branches (cuttings)
- Coarse sand (or a mix of sand and perlite)
- Clean containers (pots or trays)
- Rooting hormone (optional)
- Water
Step-by-Step Guide to Propagating Roses
1. Select the Right Cuttings
- Choose Healthy Branches: Look for healthy, disease-free rose branches that are about 6 to 8 inches long. Select stems that have new growth and at least 2-3 sets of leaves.
- Cut at an Angle: Use sharp, clean pruning shears to cut the stems at a 45-degree angle just below a leaf node. This encourages better water absorption.
2. Prepare the Cuttings
- Remove Lower Leaves: Trim off the lower leaves, leaving only 1-2 leaves at the top. This reduces moisture loss and directs energy to root development.
- Optional Rooting Hormone: Dip the cut end of the stem into rooting hormone to promote faster root growth. This step can enhance success rates, especially for challenging varieties.
3. Prepare the Sand
- Fill Containers: Fill your clean containers with coarse sand. You can use 100% sand or mix it with perlite for improved aeration.
- Moisten the Sand: Lightly moisten the sand before planting the cuttings, ensuring it’s damp but not soggy.
4. Plant the Cuttings
- Create Holes: Use a pencil or your finger to create small holes in the sand for each cutting.
- Insert the Cuttings: Gently place each cutting into the holes, ensuring that at least one leaf node is buried in the sand. Firm the sand around the base to provide support.
5. Water and Cover
- Water Lightly: After planting, give the cuttings a light watering to settle the sand around them.
- Create Humidity: To maintain humidity, cover the containers with a clear plastic bag or a plastic dome. This will help retain moisture and create a greenhouse effect.
6. Provide Proper Care
- Place in Indirect Light: Position the containers in a location with indirect sunlight. Avoid direct sunlight, as it can scorch the cuttings.
- Monitor Moisture: Check the sand regularly to ensure it remains moist but not waterlogged. Remove the cover occasionally to allow for air circulation.
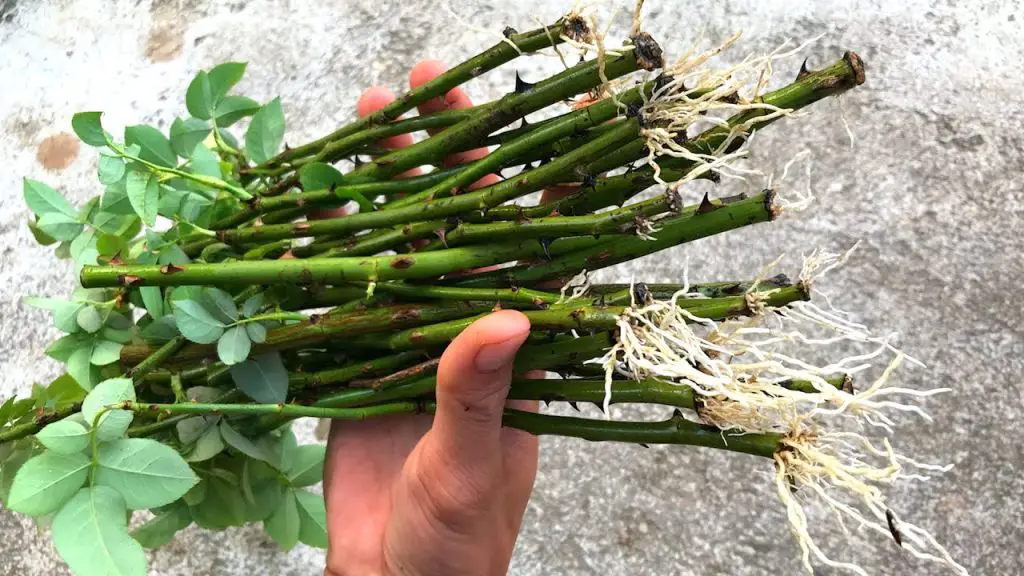
Waiting for Roots
After about 4 to 6 weeks, your rose cuttings should start developing roots. You can check for resistance when gently tugging on the cuttings, which indicates root formation. Once they have a good root system, you can transplant them into pots with potting soil or directly into your garden.
Conclusion
Propagating rose branches in sand is an effective way to grow new plants with strong root systems. By following these steps, you can enjoy the beauty of blooming roses in your garden. With patience and proper care, you’ll soon have a thriving collection of roses that will bring joy and color to your outdoor space. Start propagating today and watch your garden flourish!


