Coral moss, with its lush, vibrant appearance and easy-care nature, has become a favorite among garden enthusiasts and interior decorators alike. This moss is known for its ability to thrive in a variety of environments, and its striking green color and texture make it an excellent choice for adding beauty to your garden or home decor. If you’re looking for a way to incorporate moss into your garden, consider pulling up coral moss from your fence and planting it in a pot as a decorative ornamental plant.
In this article, we’ll guide you through the process of growing moss in a pot, transforming your coral moss into a stunning moss tree or another form of ornamental decor for your living space.
What Is Coral Moss?
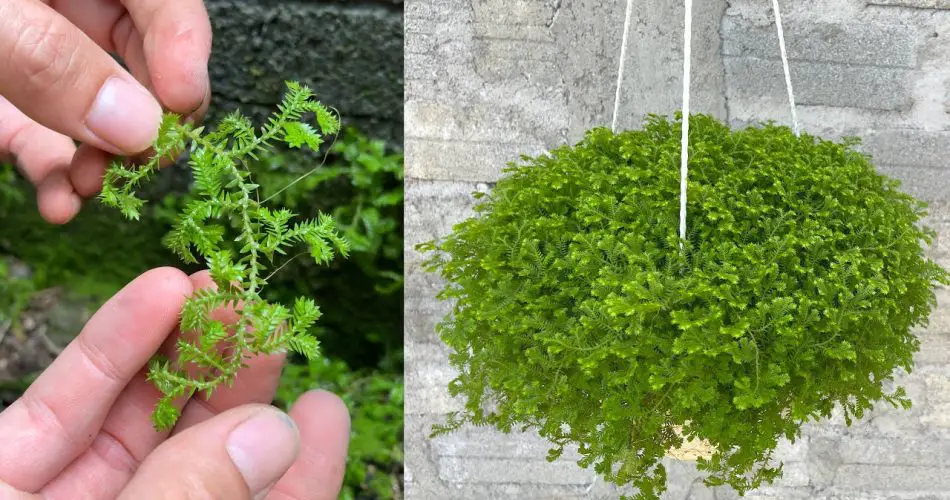
Coral moss (often called Cladonia), known for its beautiful branching structure, resembles a tiny coral reef, which is where it gets its name. It is a type of lichen that typically grows in damp, shaded environments like fences, tree trunks, and the forest floor. Coral moss features a unique appearance, with forked, red-tipped stems and a soft, velvety texture, making it an intriguing addition to any plant collection. The moss is a low-maintenance plant that thrives in cool, shaded environments with plenty of humidity.
Why Grow Coral Moss in a Pot?
If you have coral moss growing on your fence or elsewhere in your yard, why not transform it into a potted ornament? Growing moss in a pot offers several benefits:
- Versatility: You can place your moss tree indoors or outdoors. It works well in home decor, on patios, or even as a unique addition to your garden.
- Low Maintenance: Moss requires minimal care once established, making it a perfect plant for beginners or anyone who wants a low-effort yet beautiful addition to their space.
- Aesthetic Appeal: Coral moss can add an interesting and natural texture to your garden or home, creating a tranquil and calming atmosphere.
- Sustainability: Using moss is an eco-friendly way to create beautiful decorations without harming the environment, as moss is naturally occurring and can thrive in almost any setting.
How to Pull Up Coral Moss from the Fence
Before you can plant coral moss in a pot, you need to collect it from your fence or another location where it’s growing. Here’s how you can do it:
- Select a Healthy Patch of Moss: Look for a healthy section of coral moss on your fence that appears lush and vibrant. Avoid patches that are dry, discolored, or showing signs of damage.
- Use Gentle Tools: Use a small garden trowel, spade, or even your hands to gently lift the moss from the surface of the fence. Be careful not to damage the moss, as it’s delicate and can easily break apart.
- Preserve the Root System: Although moss doesn’t have deep roots like traditional plants, it does have a root-like structure called rhizoids that help anchor it to surfaces. Try to preserve these rhizoids to help the moss establish itself in its new home.
- Soak the Moss (Optional): If the moss is dry or brittle, you can soak it in lukewarm water for about 15 minutes to rehydrate it before transplanting.
Planting Coral Moss in a Pot
Once you’ve collected your coral moss, it’s time to plant it in a pot. Follow these simple steps to create a beautiful moss tree or moss arrangement:
1. Choose a Suitable Pot
Select a shallow pot or container that is wide enough to accommodate the moss. The pot doesn’t need to be deep since moss doesn’t have extensive root systems. Ensure the pot has proper drainage holes to prevent water from accumulating and causing rot.
2. Prepare the Base for the Moss
For a moss tree or ornamental arrangement, you’ll need to create a suitable base for the moss to grow on. You can use a mixture of soil and pebbles for a natural look or opt for a hydroponic moss base. If you’re creating a moss tree, you might also want to incorporate a small branch or wire frame to act as the trunk of your tree.
- Soil Option: Spread a layer of moist, well-draining soil at the bottom of the pot to provide nutrients for the moss.
- Hydroponic Option: If you prefer a soil-free setup, you can place hydroponic moss on a base such as gravel, rocks, or even wood. This method works well for creating a more artistic, minimalist look.
3. Plant the Coral Moss
Gently press the coral moss into the base of the pot. You can arrange it to create the desired aesthetic, such as covering the entire surface or forming small clusters of moss. If you’re creating a moss tree, wrap the moss around the frame or stick it onto a branch to give it a tree-like appearance.
4. Water the Moss
After planting the moss in the pot, water it lightly to settle the moss in place. Be careful not to overwater, as excess moisture can cause the moss to rot. Moss thrives best in moist, humid conditions, so regular misting or placing the pot in a humid environment will keep the moss healthy.
5. Place the Pot in the Right Location
Moss prefers low to medium light conditions, so place your moss pot in a shaded or indirect light spot. Avoid direct sunlight, as it can cause the moss to dry out or become discolored.
For indoor pots, a bathroom or kitchen with high humidity is a great location for your moss arrangement. For outdoor moss trees, a cool, shaded area in your garden or on a patio will provide the right environment for growth.
Maintaining Your Coral Moss Pot
Once your coral moss is settled in its pot, maintaining it is fairly simple:
- Watering: Keep the moss moist by lightly misting it with water every few days, depending on the climate. The moss should not sit in standing water, as this can cause it to rot.
- Humidity: Moss thrives in high humidity, so if you live in a dry climate, consider placing your moss pot in a humidity tray or use a humidifier nearby.
- Pruning: While moss doesn’t need much maintenance, you may occasionally need to trim back any dead or dry sections to keep the pot looking fresh and vibrant.
- Replanting: Over time, the moss may spread and fill the pot. If it outgrows its container, you can transplant it into a larger pot or divide it into smaller sections to create more moss trees or ornamental displays.
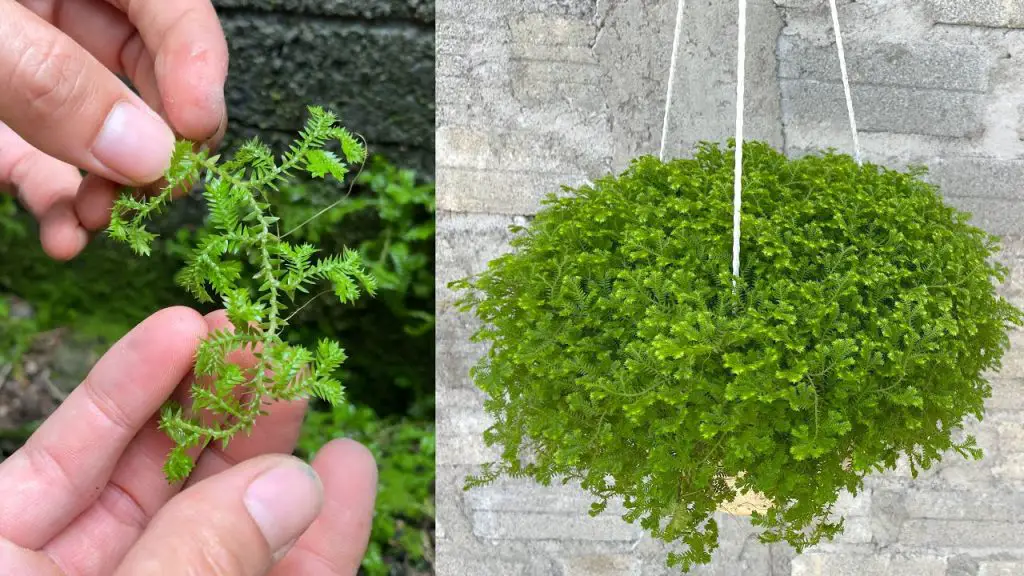
Creative Ideas for Using Coral Moss
Here are some creative ways to display your newly planted coral moss:
- Moss Tree: Create a mini moss tree by using a small branch or frame and wrapping the moss around it. This works beautifully as a centerpiece for tables or as an indoor garden decoration.
- Terrariums: Add moss to your terrariums for a natural touch. Combine the moss with small succulents, ferns, or other plants for a charming, low-maintenance garden.
- Moss Walls: You can also create a moss wall by placing several pots or trays of moss together to form a living, growing art piece for your home or garden.
- Moss Basket: Plant coral moss in a hanging basket for a green, airy decoration. The cascading moss will add a soft, ethereal look to any space.
Conclusion
Growing coral moss in a pot and using it as an ornamental plant is a simple, eco-friendly way to add beauty and texture to your garden or home decor. Whether you’re creating a moss tree, arranging the moss in a terrarium, or using it as a decorative accent, this easy-to-care-for plant will thrive in a variety of settings with the right care. So, next time you see coral moss on your fence, pull it up and start creating your very own moss tree or other unique plant arrangements for a beautiful, sustainable addition to your space.


