Grafting is an excellent way to create a stunning display of multicolored roses on a single tree. This technique allows you to enjoy various rose varieties while saving space in your garden. Here’s a step-by-step guide on how to successfully graft rose eyes and some essential tips for achieving vibrant results!
1. Understand the Basics of Grafting
Before you start, it’s crucial to understand what grafting involves:
- Grafting is the process of joining two plants so they grow as one.
- The rootstock is the plant that provides the root system, while the scion is the part that you want to grow, which in this case are the rose eyes (buds).
2. Select Your Materials
Gather the necessary materials for grafting:
- Healthy Rootstock: Choose a robust rootstock that is compatible with your rose varieties.
- Scion Wood: Collect healthy shoots from the rose varieties you wish to graft. Make sure these are taken from well-established plants to ensure success.
- Grafting Knife: A sharp, sterile knife is essential for making clean cuts.
- Grafting Tape or Wax: This helps secure the graft and protect it from moisture and infection.
3. Timing Is Key
The best time to graft roses is during the dormant season (late winter to early spring) when the plants are not actively growing. This ensures a better success rate, as the plants can focus their energy on healing and establishing new growth.
4. Prepare the Rootstock
Follow these steps to prepare the rootstock:
- Make a Clean Cut: Using your grafting knife, make a clean cut at a 45-degree angle on the rootstock about 12 inches above the ground.
- Create a Cleft or Whip Cut: Depending on your grafting method, you can either create a cleft (for thicker rootstocks) or a whip cut (for thinner ones) to insert your scion.
5. Prepare the Scion
Now, prepare your scion wood:
- Cut the Scion: Take a healthy shoot and cut it into sections, each with one or two buds (eyes).
- Angle the Cut: Make a similar 45-degree cut on the bottom of the scion to match the angle of the rootstock cut.
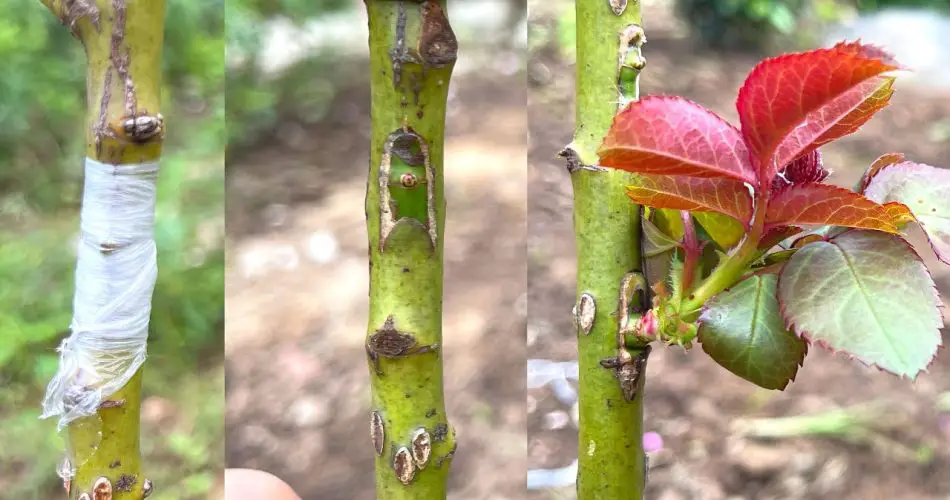
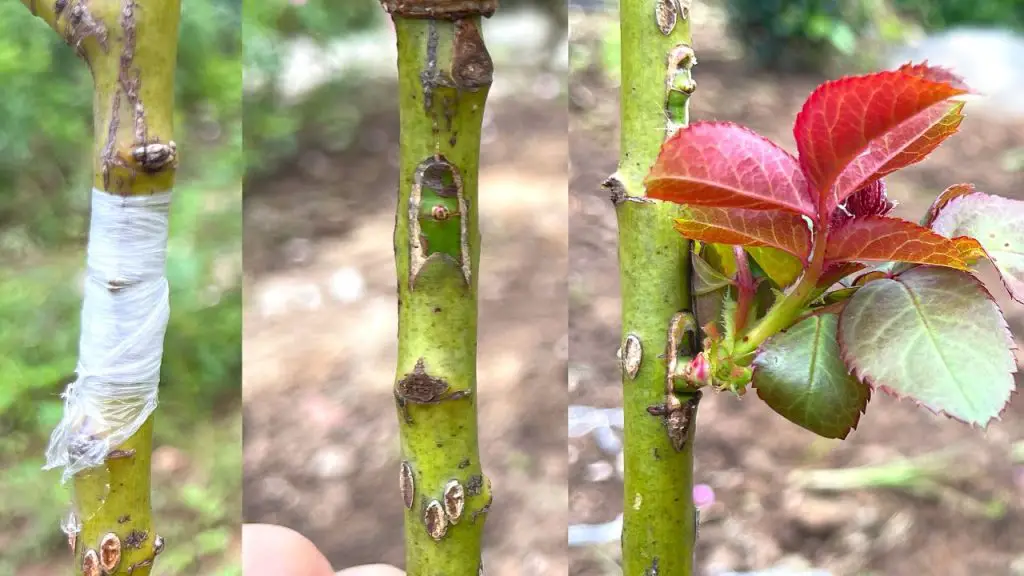
6. Grafting Process
Here’s how to graft your rose eyes:
- Join the Scion and Rootstock: Carefully fit the cut surface of the scion against the rootstock. Ensure that the cambium layers (the green tissue just beneath the bark) of both pieces are aligned for the best chance of success.
- Secure the Graft: Use grafting tape or wax to tightly bind the graft junction. This protects the graft from moisture loss and pests.
7. Aftercare and Maintenance
Once grafted, proper care is essential:
- Watering: Keep the grafted area moist but not soggy. Water the rootstock to encourage growth without overwatering.
- Sunlight: Place the grafted plant in a location with filtered sunlight to reduce stress on the graft.
- Monitor Growth: Check the graft regularly for signs of growth. Once new leaves appear, it’s a good indication that the graft has taken.
8. Pruning and Training
As the new roses begin to grow:
- Prune Wisely: Remove any suckers that emerge from the rootstock to ensure the energy is directed to the grafted roses.
- Train the Branches: Use stakes or ties to guide the growth of the new rose branches, ensuring they develop a strong structure.
Conclusion
Grafting multicolored roses onto the same tree is a rewarding project that can enhance the beauty of your garden. By following these tips and techniques for grafting rose eyes, you can create a vibrant display that showcases a variety of stunning blooms. Enjoy the process and the breathtaking results of your grafting efforts! Happy gardening!


