If you’ve ever wanted to propagate branches of a tree or plant, you may have heard about the technique of growing roots in water. This simple and effective method allows you to observe the growth of roots in real-time and can help you propagate various types of trees and plants. Rooting branches in water is an excellent way to increase the number of plants you have without needing to rely on seeds or complex planting techniques.

In this article, we will guide you through the process of propagating branches by using water, explaining how to check if your tree cuttings have developed roots and how to successfully nurture them into healthy, thriving plants.
What You Need for Water Propagation of Tree Branches
Before starting the water propagation process, ensure you have the following materials:
- Tree cutting (a healthy branch from the parent tree)
- A clear glass jar or container (to observe root growth)
- Water (preferably room temperature)
- Pruning shears (for cutting the branch)
- Rooting hormone (optional, but can help encourage faster rooting)
- A sunny spot (to place the jar with the cutting)
Step-by-Step Process for Water Propagation
1. Select a Healthy Tree Cutting
Choose a healthy, non-flowering branch from your tree. Make sure that the cutting has a few leaf nodes (where the leaves sprout from the stem). These nodes are important for the formation of new roots. The cutting should be around 4 to 6 inches long.
2. Prepare the Cutting
Using pruning shears, make a clean cut just below a leaf node. If the tree has any flowers or leaves near the bottom of the cutting, remove them to avoid rotting in the water. The cutting should be leafless for about 2-3 inches at the bottom to ensure that no part is submerged in water.
- Tip: If you want to speed up the rooting process, you can dip the bottom end of the cutting in rooting hormone. This helps to stimulate the growth of roots.
3. Place the Cutting in Water
Place the cutting into a clear jar or glass container filled with enough room-temperature water to cover the leafless section of the cutting. Ensure that the leaf nodes remain above the waterline to prevent rot.
- Tip: Use a container that allows you to observe the root growth over time. A clear jar or glass is ideal for this.
4. Position the Jar in a Bright Spot
Place the jar with the cutting in a bright spot where it will receive indirect sunlight. Avoid direct sunlight, as this can lead to excessive heat, causing the water to evaporate too quickly or stressing the cutting.
- Tip: A windowsill with indirect sunlight is perfect for this process.
5. Change the Water Regularly
For the cutting to thrive and develop roots, it’s important to change the water every few days to keep it fresh and free from bacteria or algae. Clean water helps to promote the healthy growth of roots.
6. Wait for Roots to Form
Over the next few weeks, keep an eye on the cutting to check for root development. The first signs of root growth may take anywhere from 2 to 6 weeks, depending on the tree species and the environment.
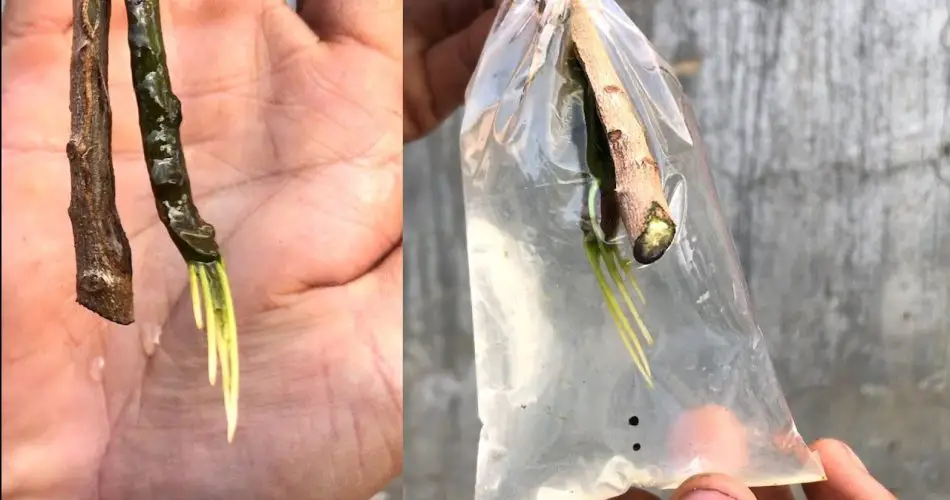
- Tip: When the roots begin to appear, you’ll notice tiny white or green roots sprouting from the bottom of the cutting. Let these roots grow until they are about 2 to 3 inches long before transplanting the cutting into soil.
How to Check If the Cutting Has Roots
To determine if your tree cutting has developed roots, carefully examine the bottom of the cutting after a few weeks. You can gently pull the cutting out of the water to inspect the root development. Here’s what you should look for:
- Tiny white roots: The roots should be white and firm, signaling healthy growth.
- Root length: If the roots are 2 to 3 inches long, it’s a good time to move the cutting into the soil.
- Healthy appearance: The roots should appear healthy and not mushy or discolored, which indicates the cutting may have rotted.
Transplanting the Rooted Cutting into Soil
Once your cutting has developed strong, healthy roots, it’s time to move it from water to soil:
- Prepare a pot with well-draining potting soil.
- Carefully plant the rooted cutting into the soil, making sure the roots are well spread out.
- Water the newly planted cutting thoroughly, ensuring the soil stays moist but not soggy.
- Place the pot in a location with indirect sunlight and continue to care for the plant as it grows.
Advantages of Propagating Tree Branches in Water
- Observe root growth: Water propagation allows you to visibly track the root development, ensuring you know exactly when to move your cutting into the soil.
- Fewer risks: It’s easier to control water quality and conditions for the cutting in a jar than in soil, reducing the chances of rot or disease.
- Cost-effective: This method is inexpensive since it only requires water and a container, and you can use cuttings from your existing tree.
Conclusion
Water propagation is a simple and effective method to propagate tree branches and encourage root development. By following these steps and ensuring proper care, you can grow healthy, thriving plants and trees right from a branch. Whether you’re looking to multiply your favorite tree or simply try something new, propagating tree cuttings in water is an exciting and rewarding process that anyone can try.