Grafting is a fascinating gardening technique that allows you to combine different varieties of plants into one, creating unique displays of color and beauty. If you love hibiscus flowers, you can take this technique to the next level by grafting multi-colored hibiscus flowers on a single stem. Here’s a step-by-step guide on how to do it successfully!
Understanding Hibiscus Grafting
What is Grafting?
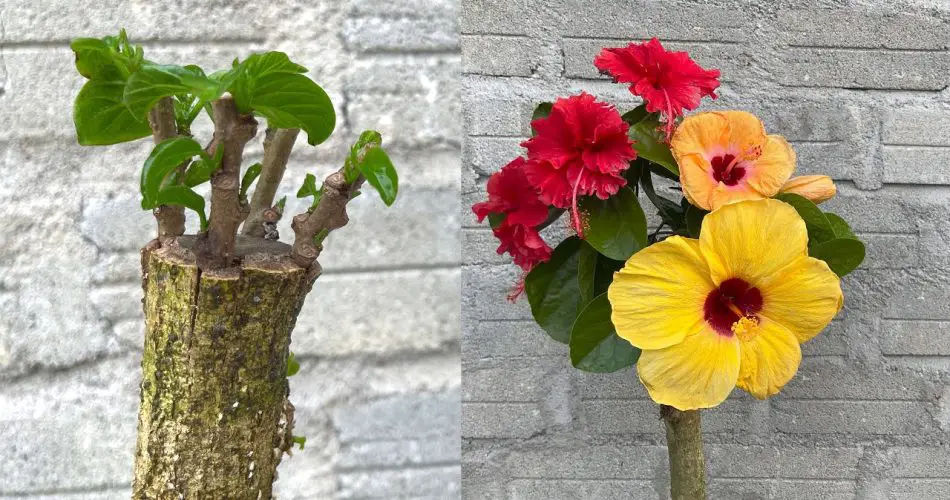
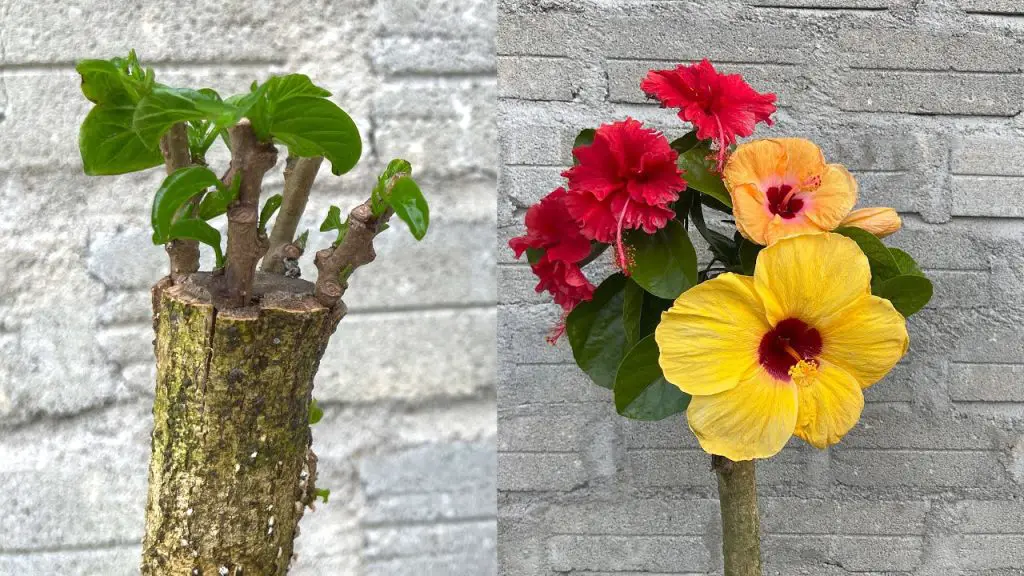
Grafting is the process of joining two plants together so they grow as one. In hibiscus, this means attaching a scion (the desired variety) to a rootstock (the base plant) that provides strength and nourishment. This method allows you to create a vibrant plant that showcases multiple colors of hibiscus flowers.
Benefits of Grafting Multi-Colored Hibiscus
- Diversity: Enjoy a variety of blooms on a single plant, enhancing your garden’s visual appeal.
- Space-Saving: Perfect for small gardens or pots where you want a lush display without taking up much space.
- Hardiness: Grafting onto a robust rootstock can increase the plant’s resilience to pests and diseases.
How to Graft Multi-Colored Hibiscus
Selecting Your Plants
- Choose Your Varieties: Select a strong rootstock and the desired scions (the varieties you want to graft). Popular hibiscus colors include red, pink, yellow, and white.
- Timing: The best time for grafting hibiscus is in early spring, when the plants are beginning to show new growth.
Grafting Techniques
- Cleft Grafting:
- Prepare the Rootstock: Cut the rootstock at a slight angle to create a flat surface.
- Make a Cleave: Use a knife to split the top of the rootstock vertically, about 2-3 inches deep.
- Prepare the Scion: Cut the scion into a wedge shape.
- Insert the Scion: Insert the wedge-shaped scion into the cleft of the rootstock, ensuring good contact with the cambium layer.
- Secure: Use grafting tape to hold the scion in place and protect it from moisture loss.
- T-Budding:
- Make the T-Cut: Create a T-shaped incision on the rootstock.
- Insert the Bud: Take a bud from the scion and insert it into the T-cut.
- Wrap It Up: Secure with grafting tape and ensure the bud is snugly fitted.
Aftercare for Grafted Hibiscus
- Watering: Keep the grafted area moist but avoid overwatering. Consistent moisture helps the graft take successfully.
- Protection: Shield the graft from harsh sunlight and wind. Consider placing it in a partially shaded area until the graft has taken.
- Monitoring: Check regularly for signs of new growth on the scion. This indicates that the graft has been successful.
Caring for Your Hibiscus Plant
Essential Care Tips
- Sunlight: Hibiscus plants thrive in full sun, so ensure they receive at least 6-8 hours of sunlight daily.
- Soil Quality: Use well-draining soil rich in organic matter to promote healthy growth. A mixture of potting soil and compost works well.
- Fertilization: Fertilize your hibiscus with a balanced, slow-release fertilizer during the growing season to encourage vibrant blooms.
- Pest Management: Keep an eye out for pests like aphids and spider mites. Use organic pest control methods to protect your plants.
Seasonal Care
- Spring: Focus on watering and fertilizing as the plant begins to grow.
- Summer: Monitor moisture levels and deadhead spent blooms to encourage more flowers.
- Fall: Prepare for winter by reducing watering and protecting the plant from frost.
Conclusion
Grafting multi-colored hibiscus flowers on one stem is a rewarding gardening project that can bring vibrant beauty to your landscape. With the right techniques and care, you’ll be able to enjoy a stunning display of colors throughout the blooming season. Happy gardening!


