If you love roses and want to expand your garden without spending a fortune, propagating roses from cuttings is a great way to grow more plants. The good news is that you don’t always need to buy expensive rose plants from a nursery—buying roses at the market is often all it takes to start your own collection! Here’s a simple guide on how to buy roses at the market and propagate them successfully from cuttings.

1. Why Propagate Roses from Cuttings?
Propagating roses from cuttings is an affordable and rewarding way to get more of your favorite flowers. When you take a cutting from a healthy rose plant, you can essentially grow a genetically identical copy of that plant. This means you can have more roses in the same colors, scents, and growth habits you love.
The process also allows you to:
- Create new rose bushes from existing plants.
- Preserve a variety of roses that might be hard to find.
- Share your favorite roses with friends and family.
2. Choosing the Right Roses at the Market
When you head to the market to buy roses, it’s important to choose the right flowers for propagation. Not all roses are suitable for cuttings, so keep an eye out for healthy, disease-free blooms. Here’s what to look for:
- Healthy Flowers: Choose roses that are fresh, vibrant, and free of pests or disease. Avoid buying roses with signs of fungal infections, black spots, or pests.
- Strong Stems: Select roses with sturdy, thick stems. Thin or weak stems might not root as well.
- Variety: If you want to propagate specific types of roses (like hybrid teas, climbers, or shrubs), make sure you know what you’re looking for before you go to the market.
3. How to Take Rose Cuttings
Once you’ve selected your roses, it’s time to take your cuttings. Follow these steps to ensure a successful propagation:
- Step 1: Choose a healthy, non-flowering stem that is about 6-8 inches long. The best time to take cuttings is during the growing season (spring or early summer) when the plant is actively growing.
- Step 2: Using sharp, clean pruning shears, cut the stem just below a leaf node (the small bump on the stem where leaves are attached). Make sure the cutting is taken from a softwood or semi-hardwood stem—these are the best for rooting.
- Step 3: Remove the lower leaves of the cutting, leaving 2-3 leaves at the top. You want to keep the cutting relatively clean and free of excess leaves that could rot in the soil.
- Step 4: Optionally, dip the cut end of the rose stem in rooting hormone to encourage faster root growth. This isn’t strictly necessary, but it can improve your chances of success.
4. Rooting the Rose Cuttings
Now that you have your cuttings, it’s time to encourage them to grow roots. You can root your rose cuttings in a few different ways:
Method 1: Water Propagation
- Step 1: Place your cuttings in a glass of water, ensuring that the cut end is submerged but the leaves are not.
- Step 2: Put the glass in a bright, indirect light location. Change the water every few days to prevent it from becoming stagnant.
- Step 3: After a few weeks, you should see roots beginning to form. Once the roots are about 2 inches long, you can transfer the cutting to soil.
Method 2: Soil Propagation
- Step 1: Prepare small pots with a well-draining soil mix, such as a combination of peat moss, perlite, and sand.
- Step 2: Insert the cut end of the rose cutting into the soil about 2 inches deep, and gently firm the soil around it.
- Step 3: Cover the pot with a plastic bag or clear plastic dome to create a humid environment that helps the cutting root. Be sure to poke a few holes in the plastic to allow for some airflow.
- Step 4: Keep the cutting in a warm, bright spot with indirect sunlight. Water gently to keep the soil moist but not soggy.
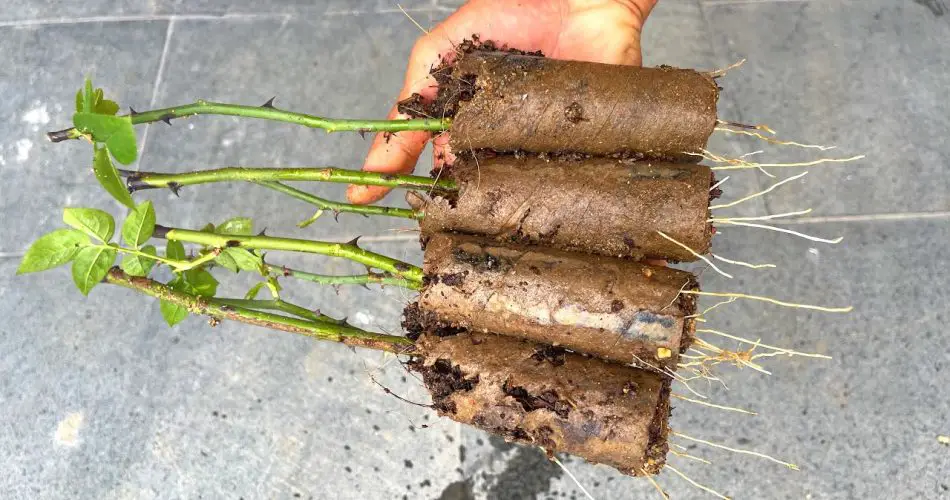
- Step 5: After a few weeks, check for roots by gently tugging on the cutting. Once you see strong roots forming, you can transplant the rose into a larger pot or directly into your garden.
5. Caring for Your New Rose Plant
Once your rose cutting has rooted and is ready to be planted, there are a few care tips to help it grow into a strong, healthy plant:
- Sunlight: Ensure your newly propagated rose gets plenty of indirect light until it becomes established. Gradually introduce it to more direct sunlight once it’s growing stronger.
- Watering: Keep the rose cutting moist but not waterlogged. A consistent watering schedule is important, especially in the early stages of growth.
- Transplanting: Once your rose cutting has grown enough roots and new leaves, you can transplant it into a larger container or directly into your garden. Choose a sunny location with well-draining soil for the best results.
6. Troubleshooting Common Problems
While propagating roses from cuttings is relatively easy, sometimes things can go wrong. Here are a few common problems and how to address them:
- No Roots: If your rose cutting doesn’t develop roots after several weeks, it could be due to too much moisture, not enough light, or using an old or damaged cutting. Be patient and try again with a fresh cutting.
- Cutting Rot: If your cutting starts to rot, it might be getting too much water or humidity. Remove the affected cutting and try again with fresh, healthy material. Ensure your pots and containers have good drainage.
- Slow Growth: If your rose is growing slowly, it could be due to poor soil, lack of nutrients, or not enough light. Ensure it’s in a fertile soil mix and receiving adequate sunlight.
In Summary:
Buying roses at the market and propagating them from cuttings is an easy, cost-effective way to expand your rose collection. By selecting healthy roses and following the proper steps for taking and rooting cuttings, you can successfully grow your own roses without breaking the bank. Whether you choose to propagate roses in water or soil, the process can be incredibly rewarding, and soon you’ll have a garden full of beautiful, self-grown roses to enjoy. Happy propagating!


