
Grafting different rose varieties onto a single tree is a creative and rewarding gardening technique. This process allows you to enjoy a diverse range of roses on one plant, creating a visually stunning and unique floral display. Whether you’re a seasoned gardener or a beginner, learning how to graft rose branches can add beauty and variety to your garden. Here’s a step-by-step guide to help you successfully graft roses onto one tree.
What is Grafting?
Grafting is a horticultural technique where two plants are joined together so that they grow as one. In the case of roses, this typically involves attaching a rose stem (called the scion) to a rootstock—the main plant that provides nutrients and support. The goal is to allow the scion to grow and produce flowers from different rose varieties on a single rootstock.
Why Graft Different Rose Varieties?
- Unique Aesthetic: Grafting different types of roses, such as hybrid teas, climbing roses, and floribundas, onto one tree creates a unique, multicolored display of blooms. You can enjoy a variety of colors and shapes without needing multiple plants.
- Maximize Space: If you’re limited on space, grafting multiple rose varieties onto one tree allows you to grow more flowers in a small area. It’s ideal for small gardens or those who want to experiment with various rose types.
- Stronger Plant: The rootstock you choose for grafting is often hardier and more disease-resistant than the scion. This means your rose tree will likely be more resilient to pests, diseases, and adverse weather conditions.
How to Graft Rose Branches: Step-by-Step Guide
Materials You’ll Need:
- Healthy rose rootstock (often a hardy rose variety)
- Scions (branches or buds from different rose varieties)
- Sharp pruning shears
- Grafting knife
- Grafting tape or rubber bands
- Sealant (optional, for protecting grafts)
- Scissors (for trimming)
1. Select the Right Rootstock
Choose a healthy rootstock that is compatible with the rose varieties you want to graft. Popular rootstocks for roses include Rosa multiflora and Rosa chinensis, as they provide strong root systems and good disease resistance. The rootstock should be about the same thickness as the scion to ensure a secure graft.
2. Choose Your Rose Varieties (Scions)
Pick the rose varieties you want to graft onto the rootstock. Scions can be taken from mature rose bushes that are in their dormant phase (usually in late winter or early spring). Select healthy, disease-free branches with at least two or three buds.
3. Prepare the Rootstock
Cut the rootstock about 6-12 inches above the ground. Make a clean, horizontal cut at the top of the rootstock to expose the fresh cambium layer (the green tissue beneath the bark). This is where the graft will take place.
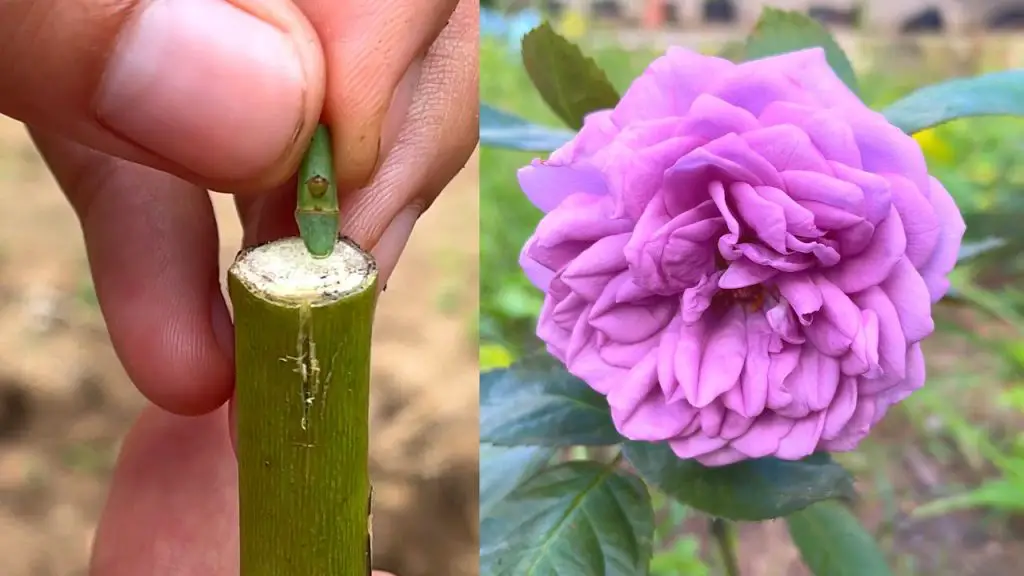
4. Prepare the Scions
Cut the scion at a diagonal angle to match the cut on the rootstock. The cut should be about 1-2 inches long, with a few buds intact. It’s essential that the scion is fresh and the cambium layer is visible. This layer will need to align with the cambium layer of the rootstock for a successful graft.
5. Join the Scion and Rootstock
There are several grafting methods, but the most common for roses are whip and tongue grafting and bark grafting. Here’s how to do whip and tongue grafting:
- Make a diagonal cut on both the rootstock and the scion, about the same length.
- Create a small tongue-like slit on both cuts, allowing the two pieces to interlock.
- Ensure the cambium layers (the green layers under the bark) of both the rootstock and scion are aligned when they’re pressed together.
6. Secure the Graft
Once the scion and rootstock are aligned, use grafting tape or rubber bands to secure the graft tightly. This will hold the two pieces together while they heal and encourage the cambium layers to fuse. Ensure the graft is covered but not too tight, as it could damage the plant.
7. Seal the Graft (Optional)
To protect the graft from moisture loss and potential infection, you can apply a sealant to the grafting area. This step isn’t always necessary but can provide extra protection, especially in wet or humid climates.
8. Care for Your Grafted Rose
Place the grafted rose in a location with indirect sunlight and maintain consistent moisture. Keep an eye on the graft to ensure that it remains secure and that the scion is starting to grow. You may see signs of growth within a few weeks.
Aftercare Tips for Grafted Roses
- Prune the Graft: Once the scion begins to grow, you can carefully prune away any unwanted growth from the rootstock to ensure the grafted branches thrive. This will allow the grafted roses to take priority and flourish.
- Water Regularly: Keep the soil moist but not waterlogged. Regular watering encourages the scion to take root and grow strong.
- Fertilize: After the graft has taken, you can start fertilizing your rose tree with a balanced fertilizer to encourage continuous blooming.
- Monitor Growth: As your rose tree grows, be sure to monitor the development of each scion. Some rose varieties may grow faster than others, so regular pruning and shaping will ensure a balanced, beautiful tree.
Conclusion
Grafting different rose varieties onto one tree is a fun and creative way to enhance your garden. By following the proper steps—choosing the right rootstock, preparing the scions, and ensuring the grafts are secure—you can create a stunning, multi-colored rose tree that produces a variety of blooms. Whether you’re grafting for aesthetic reasons or to maximize space, this technique will allow you to enjoy roses in a unique and exciting way!


