Roses are a classic symbol of beauty, romance, and love, and growing them at home can bring charm to any garden. One of the easiest and most cost-effective ways to expand your rose collection is by multiplying roses through a method known as cutting and rooting. This process allows you to produce new rose plants that are genetically identical to the parent plant, ensuring that you get the same beautiful flowers. Whether you’re a seasoned gardener or a beginner, rooting rose cuttings is simple and rewarding. Here’s how to do it effectively to grow a flourishing rose garden!
Why Multiply Roses by Rooting?
- Cost-Effective: Instead of buying new rose plants, you can grow multiple roses from a single plant.
- Preserve the Variety: Rooting cuttings ensures that the new plants retain the exact same characteristics (color, fragrance, etc.) as the original rose.
- Fast Expansion: By rooting cuttings, you can quickly expand your rose garden without waiting for seeds to mature.
Steps to Multiply Roses by Rooting:
1. Choose a Healthy Rose Plant
Start by selecting a healthy, disease-free rose bush. The best time to take cuttings is during the early summer when the plant is actively growing and producing new shoots. Opt for a blooming variety to get the same stunning flowers on the new plants.
2. Prepare the Tools
You’ll need a few tools to successfully root rose cuttings:
- Sharp garden shears or pruning scissors
- A clean container with water or a pot with well-draining soil
- Rooting hormone (optional but recommended)
- Plastic bag or plastic wrap (for humidity control)
- Healthy soil mix (potting soil, perlite, or sand)
3. Take Cuttings from the Rose Plant
- Look for healthy stems that are about 6 to 8 inches long, coming from the current year’s growth. The ideal cutting is from a non-flowering shoot, as flowers can divert energy from root development.
- Cut the stem just below a leaf node (where the leaves attach to the stem). Make sure the cutting has at least 3-4 leaves attached.
- Remove the lower leaves from the cutting, leaving the top 1 or 2 leaves. Be careful not to damage the delicate stem.
4. Use Rooting Hormone (Optional)
- To encourage quicker root growth, dip the cut end of the rose cutting into rooting hormone. This powder helps stimulate root development, increasing your chances of success. If you don’t have rooting hormone, you can still root roses without it.
5. Prepare the Planting Medium
- Fill a small pot with a well-draining soil mix. You can use a combination of potting soil, perlite, or sand to create a light, airy medium that allows the cutting to develop roots without becoming waterlogged.
- Alternatively, you can root rose cuttings directly in water. If using water, place the cuttings in a clear container to observe root development.
6. Plant the Cutting
- For soil rooting: Insert the rose cutting into the soil about 2-3 inches deep, ensuring that the cut end is buried in the soil. Firm the soil around the stem to eliminate air pockets.
- For water rooting: Place the cut end of the stem in water, ensuring that only the lower part of the cutting is submerged. Change the water regularly to keep it fresh.
7. Create a Humid Environment
- Roses need humidity to root successfully. To create a humid environment, cover the pot or container with a plastic bag or clear plastic wrap to trap moisture. Make sure the plastic doesn’t touch the leaves by propping it up with sticks or wire.
- If using water, ensure the container is placed in a warm, bright spot (but out of direct sunlight) to encourage root growth.
8. Maintain Proper Care
- Place your cuttings in a location with indirect sunlight. Direct sunlight may dry out the cuttings or burn them, while too little light will slow down the rooting process.
- Keep the soil or water slightly moist, but never waterlogged. Mist the cuttings regularly with water to maintain humidity.
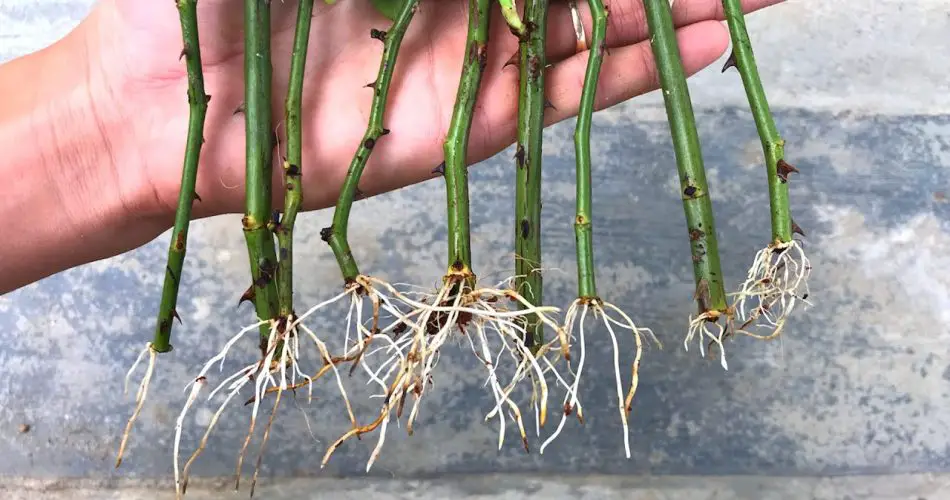
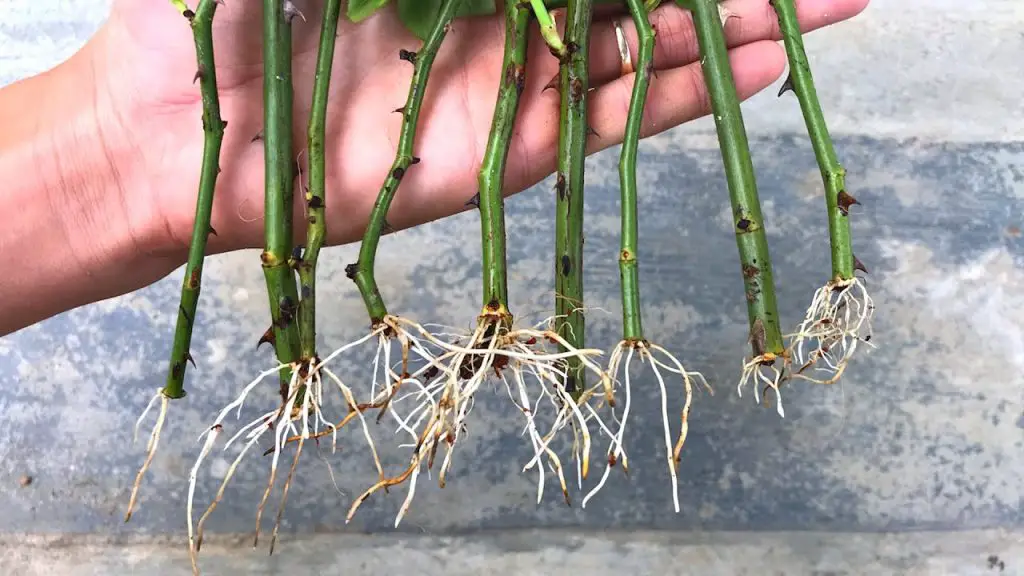
- Check for roots after about 3 to 4 weeks. You can gently tug on the cutting to see if there is any resistance, indicating that roots are starting to form.
9. Transplant the Rooted Cuttings
Once your rose cuttings have established healthy roots (this can take anywhere from 4 to 8 weeks), it’s time to transplant them into larger pots or directly into the garden.
- If you’ve been rooting in soil, carefully transplant the rooted cutting into a larger pot with well-draining soil.
- If you’ve been rooting in water, wait until the roots are a few inches long before transferring the cutting into soil.
- Water the new plants well and keep them in a shaded location for a few days to help them acclimate to their new environment.
Caring for Rooted Rose Plants
After transplanting, it’s essential to provide proper care for your newly rooted rose plants:
- Water regularly to keep the soil moist, but not soggy.
- Provide indirect sunlight for the first few weeks until the plant is established.
- As the plant grows, consider adding fertilizer (preferably one designed for roses) to encourage strong root and flower development.
- Once established, you can gradually introduce your roses to full sun.
Common Problems When Rooting Roses
- Rotting cuttings: If your rose cutting turns soft and mushy, it could be due to overwatering or poor drainage. Be sure the soil or water is not stagnant and has proper air circulation.
- No root development: If roots don’t develop after several weeks, it could be due to inadequate humidity, low temperatures, or weak cuttings. Make sure the conditions are optimal for rooting.
Conclusion
Multiplying roses by rooting is a simple and rewarding process that allows you to grow more roses for your garden without spending a lot of money. By following these easy steps, you can create a beautiful rose garden filled with colorful, fragrant blooms in no time. Rooting roses through cuttings not only helps you expand your collection but also allows you to preserve your favorite varieties, ensuring that you have a garden full of your beloved roses year after year. Happy gardening! 🌹


