Kalanchoe, specifically Bryophyllum calycinum, is a hardy, low-maintenance succulent that thrives in a variety of conditions. Known for its unique ability to grow from leaves, Kalanchoe offers an easy and fun propagation method. One innovative way to plant and propagate Kalanchoe leaves is by using plastic bottles, a creative and eco-friendly approach that allows for efficient space management. In this article, we’ll guide you through the process of planting Kalanchoe leaves in plastic bottles, helping you grow a thriving, beautiful plant.
What is Bryophyllum Calycinum?
Bryophyllum calycinum, commonly known as Chandelier Plant or Mother of Thousands, is a species of Kalanchoe renowned for its distinctive fleshy leaves and small offshoots (called plantlets) that grow along the edges of the leaves. These plantlets can easily take root and develop into new plants, making Kalanchoe one of the best succulents for propagation.
This succulent is easy to care for and can thrive in indoor environments with bright indirect light. It’s an excellent choice for gardeners looking to propagate plants at home without much hassle.
Why Use Plastic Bottles for Planting Kalanchoe?
Plastic bottles are a great option for propagating Kalanchoe leaves for several reasons:
- Eco-friendly: Using recycled plastic bottles helps reduce waste and contributes to a sustainable gardening practice.
- Space-saving: Plastic bottles provide a compact environment for growing succulents, perfect for small spaces like windowsills or apartment balconies.
- Easy to monitor: The clear plastic allows you to observe the root development and the overall health of the plant easily.
Steps to Plant Kalanchoe Leaves in Plastic Bottles
Follow these simple steps to propagate Kalanchoe Bryophyllum calycinum leaves in plastic bottles:
Step 1: Prepare Your Plastic Bottles
Start by gathering empty plastic bottles. Choose bottles that are clear, as this will allow you to monitor the plant’s progress. You can use water bottles or soda bottles, just make sure to wash them thoroughly to remove any residues.
Next, cut the bottle in half, leaving the bottom part for planting. The cut should be around one-third of the bottle, making sure it’s wide enough to fit the Kalanchoe leaves comfortably.
Step 2: Create Drainage Holes
To prevent waterlogging, which can lead to root rot, it’s essential to create drainage holes at the bottom of the bottle. Use a sharp object (like a knife or a drill) to puncture several holes in the base. This will allow excess water to escape, ensuring the roots aren’t sitting in stagnant water.
Step 3: Add a Layer of Pebbles or Small Stones
Place a layer of pebbles or small stones at the bottom of the bottle. This will help with drainage and provide stability for the plant. It also prevents the soil from compacting and allows air to circulate around the roots.
Step 4: Add Succulent Soil
Fill the bottle with well-draining succulent soil or cactus mix. Succulents, including Kalanchoe, require soil that drains quickly to prevent the roots from getting waterlogged. You can also mix some sand or perlite into the soil to improve drainage.
Step 5: Prepare the Kalanchoe Leaves
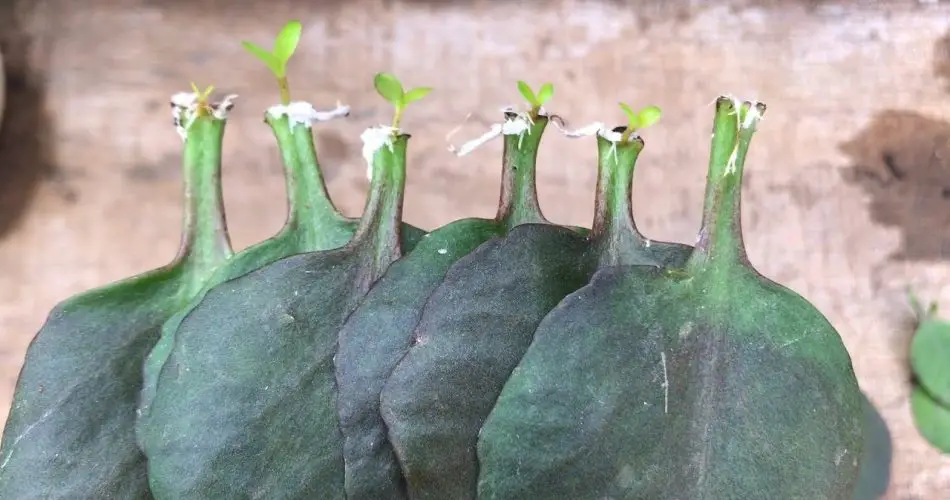
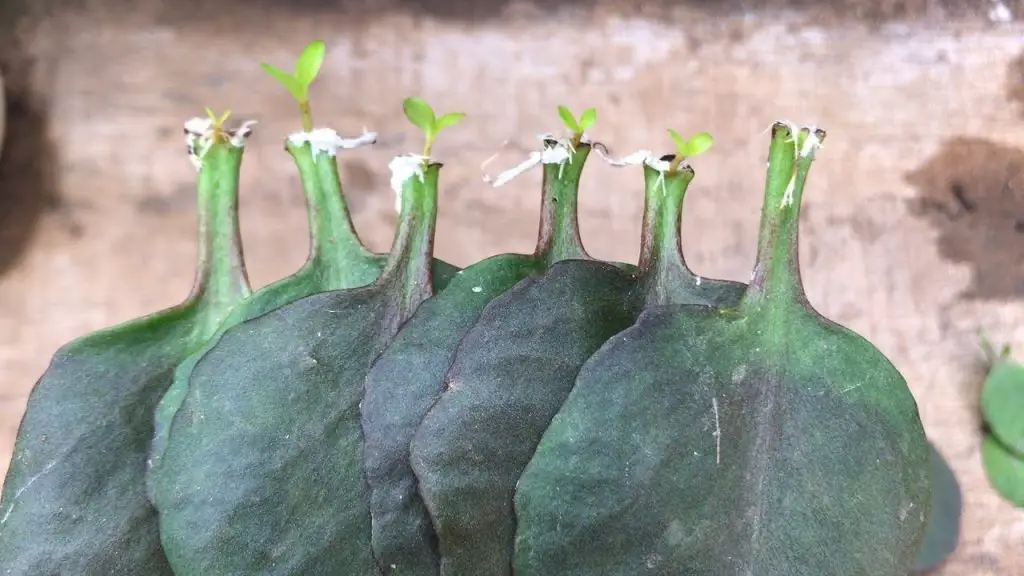
Carefully cut a healthy leaf from the mother plant. Kalanchoe leaves have the ability to regenerate and form roots when placed in the right conditions. If you’re using leaves with plantlets (tiny baby plants along the edges), those are even better, as they will root faster.
Let the cut edge of the leaf dry for a day or two. This helps to prevent rot and allows the leaf to form a protective callus.
Step 6: Plant the Kalanchoe Leaf
Once the leaf has dried, gently place it on the surface of the soil in the plastic bottle. You don’t need to bury it too deeply—simply press it down lightly so that it makes contact with the soil. If you’re using a leaf with plantlets, make sure the plantlets are facing up.
Step 7: Watering and Care
Lightly water the soil to moisten it, but avoid soaking it. Kalanchoe leaves are succulent, so they don’t need a lot of water. Water once every few days, allowing the soil to dry out completely between waterings.
Place the plastic bottle in a location with bright, indirect light. Direct sunlight can scorch the leaves, so it’s best to keep the plant in a bright room with filtered sunlight.
Step 8: Wait for Roots to Form
With patience, you will start seeing roots forming in the coming weeks. After some time, tiny baby plants will emerge from the base of the leaves. These can be carefully separated and potted into new containers, and your Kalanchoe propagation journey will be complete!
Tips for Success
- Avoid overwatering: Overwatering is a common mistake when propagating succulents. Kalanchoe leaves should never sit in water for too long. Ensure that the soil is well-drained and only lightly watered.
- Proper temperature: Kalanchoe thrives in warm temperatures between 65°F (18°C) and 85°F (29°C). Keep your plants in an area that is not too cold.
- Air circulation: Ensure good air circulation around your plants to avoid fungal diseases. Avoid placing them in overly humid areas.
Conclusion
Planting Kalanchoe Bryophyllum calycinum leaves in plastic bottles is an easy and effective way to propagate this beautiful succulent at home. With minimal effort and resources, you can create a thriving, lush plant that will bring color and beauty to your space. Plus, it’s an eco-friendly way to reuse plastic bottles, making your gardening practice more sustainable.
So, gather your plastic bottles, cut your Kalanchoe leaves, and get started with this simple propagation project today! Happy gardening!


