If you’re looking for a fun and eco-friendly way to spruce up your garden or home décor, creating a heart-shaped flower pot from a plastic bottle is an easy and creative DIY project. Not only will you be reusing a plastic bottle, but you’ll also end up with a beautiful, personalized flower pot that can add charm to any space. Here’s a step-by-step guide on how to make your own heart-shaped flower pot using materials you already have at home.
Why Use a Plastic Bottle for a Heart-Shaped Pot?
Before we dive into the how-to, let’s talk about why this is such a great idea:
- Eco-Friendly: By reusing plastic bottles, you are helping to reduce waste and repurpose materials that would otherwise end up in the landfill.
- Cost-Effective: You don’t need to buy a fancy pot from the store when you can create your own for free, using items you already have at home.
- Customizable: You can decorate your heart-shaped flower pot in countless ways – paint it, add decorations, or wrap it with twine or fabric. It’s a perfect way to showcase your creativity.
- Unique Design: A heart-shaped pot is a charming, eye-catching feature that’s sure to stand out in your garden or indoor space. Plus, it makes for a wonderful gift for a loved one!
Materials Needed:
- Plastic bottle (1 or 2-liter size works best)
- Scissors or craft knife
- Hot glue gun (or strong adhesive)
- Paint or decorative materials (optional)
- Soil
- Small plant or flowers (succulent, herb, or small flowering plant)
Steps to Create a Heart-Shaped Flower Pot from a Plastic Bottle:
Step 1: Prepare the Plastic Bottle
- Clean the Bottle: Start by thoroughly washing and drying the plastic bottle. Remove any labels and residue using soap and water.
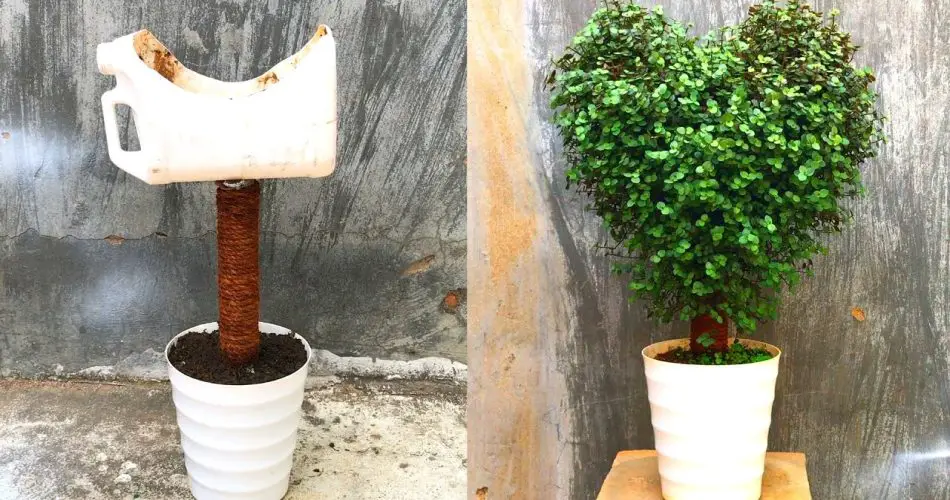
- Cut the Bottle: Using scissors or a craft knife, carefully cut the plastic bottle in half lengthwise. This will give you two long pieces that can be shaped into a heart. You can use one half or both halves, depending on the size of your desired pot.
Step 2: Create the Heart Shape
- Shape the Bottle: Take the bottom part of the bottle and use scissors to cut it into a heart shape. Begin by marking the middle of the bottle and then drawing two equal curves on either side to create the top lobes of the heart. Once you’re happy with the shape, cut along your outline carefully. You can also round the bottom to make the heart look more symmetrical.
- Attach the Two Pieces (Optional): If you want a deeper heart-shaped pot, you can attach both halves together. Use a hot glue gun or strong adhesive to bond the two pieces at their edges. This will create a fuller heart shape.
Step 3: Secure the Shape and Add Drainage
- Glue the Edges: If you’re using just one half of the bottle, use a hot glue gun to glue the edges together to form the base of the heart. Ensure that it holds firmly and that no gaps are left where soil could fall out.
- Create Drainage Holes: It’s important for the plant to have proper drainage to prevent water from accumulating at the bottom. Use a craft knife or scissors to carefully poke several small holes in the base of the heart-shaped pot.
Step 4: Decorate Your Pot (Optional)
- Paint and Decorate: Now that your heart-shaped pot is ready, you can give it a personal touch. Paint it with your favorite colors or patterns – you could even use acrylic paint to create a fun design, such as polka dots or stripes.
- Add Twine or Fabric: If you prefer a more rustic look, you can wrap the outside of the pot with twine or jute rope. Simply apply some glue and wrap the twine around the pot in layers for a charming, handmade finish.
- Add Stickers or Gems: For an extra touch of sparkle, consider decorating your pot with stickers, gems, or buttons to give it a more customized appearance. You can even paint a personal message on it, such as “Love” or “Home.”
Step 5: Plant Your Flowers
- Prepare the Soil: Fill the heart-shaped pot with well-draining soil, leaving enough space at the top for your plant to sit comfortably.
- Choose Your Plant: Pick a small plant that fits well in the heart-shaped container. Some great options include succulents, herbs, or small flowering plants like pansies, violets, or petunias. If you’re planting a succulent, ensure that the soil is extra well-drained.
- Plant and Water: Gently place the plant into the pot and fill around it with more soil. Water the plant lightly, being careful not to overwater, as plastic can hold moisture and prevent proper drainage.
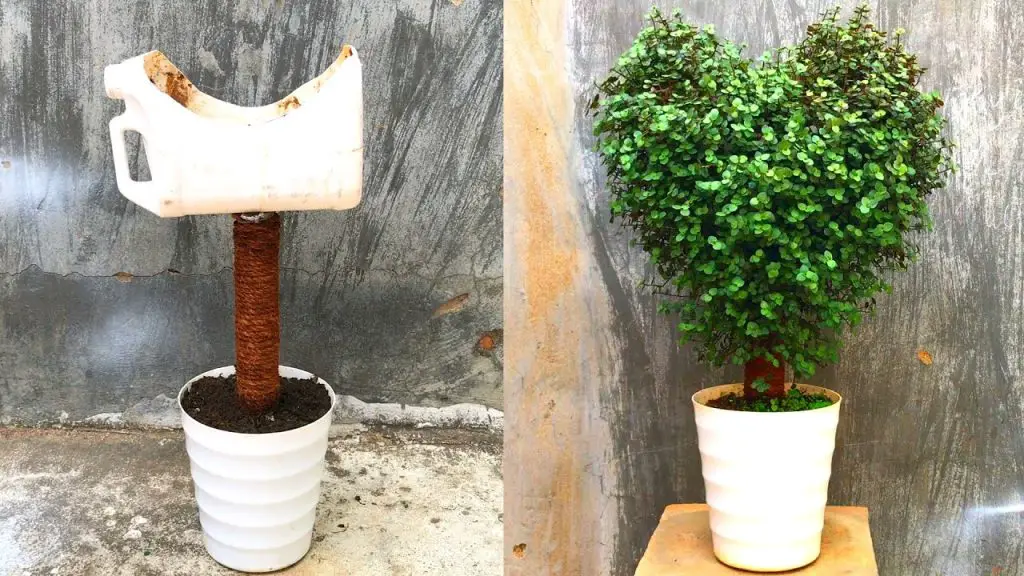
Step 6: Display Your Heart-Shaped Pot
- Find the Perfect Spot: Now that your heart-shaped flower pot is complete, display it in your garden, on your balcony, or as a centerpiece in your home. It makes a wonderful addition to a romantic garden, a Valentine’s Day display, or a gift for someone special.
- Care for Your Plant: Just like any other plant, your new flowers or succulents will need proper care. Make sure they receive adequate light, water them as needed, and enjoy watching them bloom in their new heart-shaped home!
Benefits of Using a Plastic Bottle for a Heart-Shaped Flower Pot
- Eco-Friendly: Repurposing plastic bottles reduces waste and gives them a second life.
- Cost-Effective: No need to spend money on decorative pots when you can make your own.
- Creative and Fun: This is a great DIY project that allows you to express your creativity.
- Personalized Gift: A heart-shaped pot makes a thoughtful and unique gift for friends or loved ones.
Conclusion
Creating a heart-shaped flower pot from a plastic bottle is a simple yet creative way to add charm to your garden or home. Not only will you reduce waste, but you’ll also create a beautiful and personalized piece of décor that can showcase your favorite plants. Whether you paint it, wrap it in twine, or decorate it with gems, your heart-shaped pot will surely become a lovely focal point in your space. Happy crafting! 🌱💖


