Begonia grandis, also known as the hardy begonia, is a stunning perennial that stands out in any garden with its showy flowers and vibrant foliage. Unlike many begonias, Begonia grandis is hardy and can thrive outdoors in cooler climates, making it a perfect addition to your garden if you’re looking for a plant that can offer beauty through all seasons. This plant features branching stems that produce delicate flowers in shades of pink, white, or red, set against lush, green leaves with an attractive silver sheen.
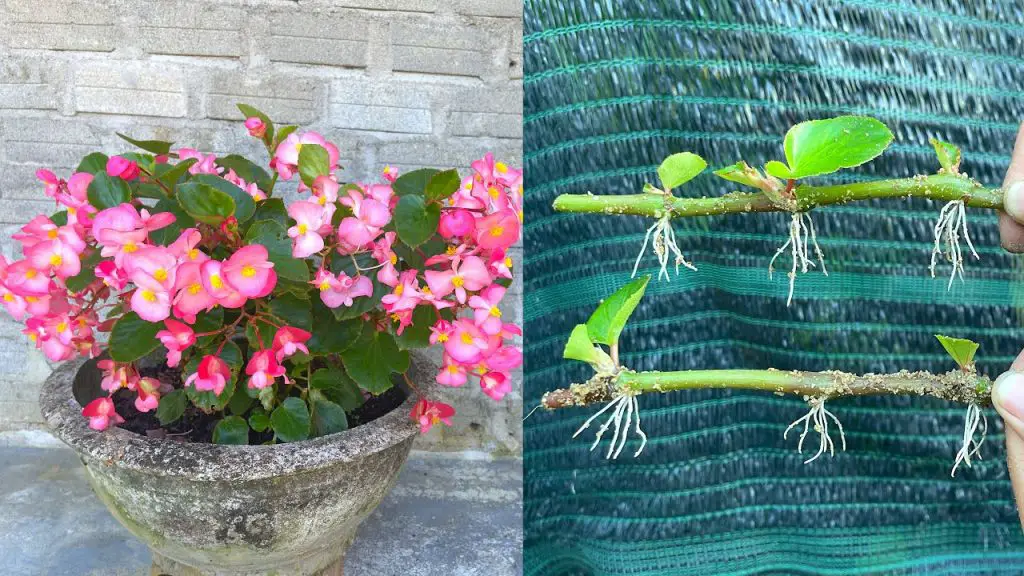
In this article, we’ll guide you through the process of growing Begonia grandis flowers from branches, covering everything from propagation to care tips for ensuring healthy, vibrant blooms year after year.
Why Choose Begonia Grandis for Your Garden?
Before we dive into growing Begonia grandis, it’s worth understanding why this perennial is so popular among gardeners:
- Hardiness: Unlike many begonias that are sensitive to cold, Begonia grandis can survive in USDA hardiness zones 6-9, making it a great option for gardeners in cooler climates.
- Elegant Flowers: The pendulous flowers bloom in late summer to early fall, adding a pop of color to your garden when other plants are starting to fade.
- Attractive Foliage: The leaves of Begonia grandis are large and glossy, often with silver spots, making them a stunning addition even when the plant is not in bloom.
- Easy to Grow: Begonia grandis is relatively low-maintenance once established, making it ideal for gardeners of all experience levels.
How to Propagate Begonia Grandis from Branches
Begonia grandis is typically propagated through stem cuttings or branches. Here’s a step-by-step guide on how to grow these flowers from branches successfully:
1. Choose the Right Branches for Cutting
To start propagating Begonia grandis from branches, select healthy, non-flowering stems from a mature plant. Look for young branches that are flexible and free of any disease or damage. Avoid older, woody branches, as they may not root as easily.
- Ideal Time for Cutting: The best time to take cuttings is during the spring or early summer, when the plant is actively growing. However, you can also propagate in the fall after the plant has finished blooming.
2. Prepare Your Cutting
Once you’ve selected your branches, follow these steps to prepare them for rooting:
- Cut the Stem: Use a sharp, clean sterilized knife or pruning shears to cut a 4-6 inch section of the branch. Make the cut just below a node (the point where leaves or side branches emerge).
- Remove Excess Leaves: Trim any excess leaves from the lower half of the cutting, leaving only a few leaves at the top. This helps prevent moisture loss while the cutting is forming roots.
- Optional: Use Rooting Hormone: While not necessary, using a rooting hormone can encourage quicker root development. Dip the cut end of the stem into the rooting hormone powder before planting.
3. Plant the Cuttings
Now it’s time to plant the prepared cutting in a suitable growing medium.
- Choose a Pot or Container: Select a small pot with good drainage. Fill it with a well-draining potting mix—a mixture of perlite and peat moss or cactus soil works well for Begonia grandis.
- Insert the Cutting: Insert the cutting into the potting mix, making sure the cut end is buried about 1-2 inches into the soil. Gently firm the soil around the cutting to ensure it stays upright.
4. Create a Humid Environment
Begonia grandis cuttings prefer a humid environment to encourage root growth. Here are a few tips to create the perfect conditions:
- Cover the Cutting: To maintain humidity, cover the pot with a clear plastic bag or place it in a mini greenhouse. This will trap moisture and create a warm, humid microenvironment for the cutting to root.
- Provide Indirect Light: Place the cutting in a bright location with indirect sunlight. Avoid direct sunlight, which can cause the cutting to dry out or scorch.
5. Monitor the Rooting Process
Check your cutting regularly to make sure it’s not drying out. Mist the cutting lightly with water if the soil looks too dry. After a few weeks, gently tug on the cutting to see if it has developed roots. When the cutting resists being pulled, this indicates that it’s successfully rooted and ready for transplanting.
6. Transplant the Rooted Cutting
Once your cutting has developed a healthy root system, it’s time to transplant it into a larger container or directly into your garden.
- Select a Location: Begonia grandis prefers partial shade or dappled sunlight, so choose a spot in your garden that offers these conditions. It can also be grown in containers that are placed in shaded areas like patios, balconies, or under taller plants.
- Transplanting: Gently remove the rooted cutting from its pot and place it into a hole in your garden or a larger container, making sure the roots are spread out and not cramped. Water it thoroughly after transplanting.
Caring for Begonia Grandis Once Planted
Now that you’ve successfully propagated Begonia grandis, here are some essential care tips to keep your plants healthy and thriving:
1. Watering
Begonia grandis requires consistent moisture, especially when it is actively growing. However, it’s important not to overwater, as this can lead to root rot. Ensure the soil is well-draining to prevent water from sitting around the roots.
- Watering Tip: Water the plant when the top inch of soil feels dry to the touch, but avoid letting it sit in water.
2. Soil Requirements
Begonia grandis prefers slightly acidic, well-drained soil. Adding organic matter such as compost or peat moss can improve soil texture and help retain moisture without becoming waterlogged.
3. Light Requirements
While Begonia grandis thrives in partial shade, it can tolerate some morning sunlight. Too much direct sunlight can scorch its leaves, so try to place it in a spot where it gets filtered light.
4. Temperature
This begonia variety prefers temperatures between 60-75°F (15-24°C). It can tolerate cooler temperatures in the winter but should be protected from frost, which can damage the plant.
5. Fertilizing
During the growing season (spring and summer), you can feed your Begonia grandis with a balanced, water-soluble fertilizer every 4-6 weeks to encourage healthy growth and blooming. Avoid fertilizing in the fall and winter when the plant is dormant.
Common Problems and Solutions
Like all plants, Begonia grandis can face a few challenges. Here are some common problems and how to address them:
- Yellowing Leaves: This could be a sign of overwatering or poor drainage. Ensure the soil drains well and adjust your watering schedule.
- Pests: Keep an eye out for common pests like aphids or mealybugs. You can treat infestations with insecticidal soap or neem oil.
- Wilting: If the plant is wilting, it may be too hot or dry. Ensure it has enough water and is in a location with proper shade.
Conclusion
Begonia grandis is a beautiful and hardy perennial that can brighten up any garden with its vibrant flowers and distinctive foliage. By following the steps to propagate from branches, you can easily grow this attractive plant in your garden or as a potted specimen. With the right care, your Begonia grandis will thrive and reward you with its stunning blooms and ornamental beauty year after year. Whether you’re a novice gardener or a seasoned pro, growing Begonia grandis from branches is a rewarding and satisfying experience.