
Alocasia Polly, also known as African Mask or Elephant Ear, is a stunning tropical plant that can add an exotic touch to any indoor garden. Known for its shiny, arrow-shaped leaves and dramatic appearance, Alocasia Polly is a favorite among houseplant enthusiasts. While mandarin plants and Alocasia Polly belong to different families, learning how to propagate Alocasia Polly using its leaves can be a rewarding and straightforward process. If you’re a fan of Alocasia Polly and want to create more of these unique plants, here’s a simple guide on how to propagate your plant using its leaves.
Why Propagate Alocasia Polly by Leaves?
Leaf propagation is a popular method for cloning plants. It involves taking a healthy leaf cutting and encouraging it to grow new roots and shoots, ultimately creating a new, independent plant. This method works particularly well for Alocasia Polly, which can be slow to propagate through other means, like stem cuttings.
Why choose leaf propagation?
- It’s an easy and affordable way to create new plants.
- Leaf cuttings allow you to clone your favorite Alocasia Polly, maintaining its unique traits.
- This method is ideal for people with limited space or resources for more complicated propagation techniques.
Step-by-Step Guide to Propagate Alocasia Polly by Leaves
Step 1: Select a Healthy Leaf
Start by selecting a healthy, mature leaf from your Alocasia Polly plant. Ensure that the leaf is free of any diseases, pests, or damage. The leaf should be firm, vibrant, and free of any yellowing or brown spots. Avoid using older, dying leaves, as they are less likely to propagate successfully.
Step 2: Cut the Leaf
Using a sharp, sterilized knife or scissors, carefully cut the leaf from the main plant. You can cut the entire leaf along with its petiole (the stalk that attaches the leaf to the stem). Make sure the cut is clean to avoid damaging the plant.
Step 3: Prepare the Cutting
Next, trim the leaf into smaller sections, each with a bit of petiole still attached. Aim for pieces that are about 4 to 6 inches long, ensuring they still have a small section of the petiole. These sections will help in root development when placed in water or soil.
Step 4: Let the Cutting Callous Over (Optional)
Some plant owners prefer to allow the cut end of the leaf to callous over for a day or two before placing it in water or soil. This step helps prevent rot, especially when propagating Alocasia Polly, which can be prone to root rot. However, this step is optional, and some growers place their cuttings directly into water without this step.
Step 5: Place the Leaf Cuttings in Water
Fill a clean glass jar or container with room temperature water. Place the cut end of the leaf cutting into the water, ensuring that only the cut petiole is submerged, not the leaf blade itself. Position the container in a bright spot, but avoid direct sunlight, as it can harm the cutting.
- Change the water every couple of days to keep it fresh and free from bacteria.
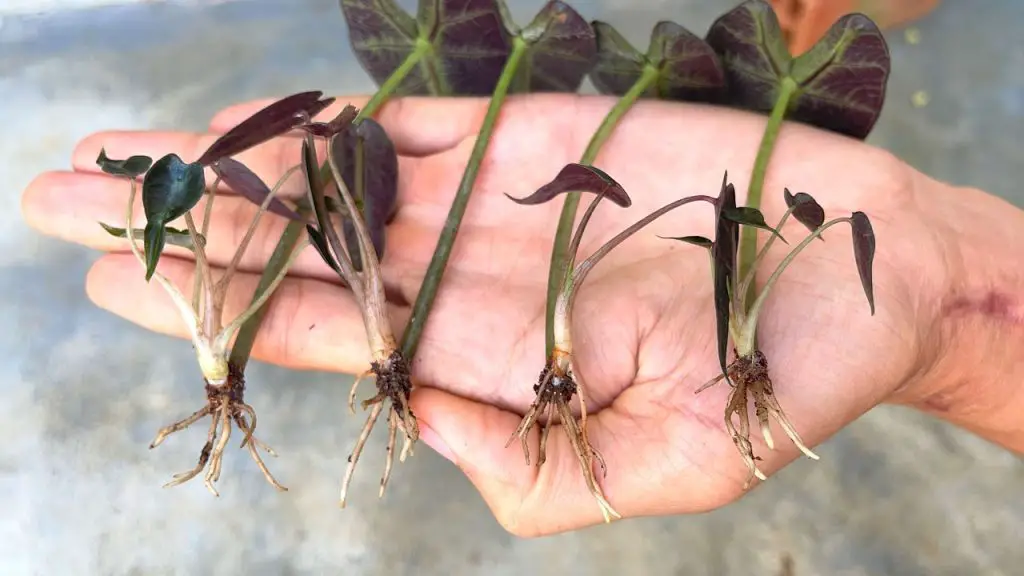
- Watch for roots: Within 2 to 4 weeks, the cutting should start to develop roots from the petiole, signaling that it’s ready to be transferred into soil.
Step 6: Transplant into Soil
Once the cutting has grown a healthy root system, it’s time to transplant it into soil. Prepare a well-draining potting mix suitable for tropical plants, such as a peat-based mix combined with perlite or sand for aeration. Carefully plant the cutting in a small pot, ensuring the roots are well covered with soil.
- Water the newly potted plant gently to help it settle.
- Keep the plant in a humid, warm environment to encourage growth.
- Provide indirect sunlight to help the cutting acclimate to its new environment.
Step 7: Care for Your New Alocasia Polly
Now that your Alocasia Polly has taken root, continue to care for it as you would with any established plant. Make sure it gets adequate light, and keep the soil moist, but not soggy. Consider placing the plant in a humid area or using a humidifier to replicate the tropical environment it thrives in.
Tips for Successful Leaf Propagation of Alocasia Polly
- Patience is key: Leaf propagation can take several weeks to months before the cutting is fully rooted and ready for transplant.
- Avoid overwatering: Both the cutting in water and the plant in soil need to be watered appropriately to prevent root rot.
- Ensure your plant is in an ideal environment: Alocasia Polly thrives in warm, humid conditions with temperatures between 60-80°F (15-27°C).
- Keep your propagation containers clean to prevent the spread of diseases.
Final Thoughts on Propagating Alocasia Polly
Propagating Alocasia Polly by leaves is a simple and effective way to grow new plants and expand your collection. With patience and care, you can watch your leaf cuttings develop into healthy, vibrant plants. Whether you’re an experienced gardener or just starting, this propagation method offers a fun and rewarding way to create more of the stunning Alocasia Polly plant for your home.
Happy gardening! 🌱🌿


